
In the third article in our series on using version control with WordPress, we introduce the Composer package manager and use it to handle our dependencies, including plugins, themes and WordPress itself. In an upcoming article, we'll look at the role of the database in our workflow and present a couple of plugins which can be of use here.
Dependency Management
In our last article, we put the whole site under version control and used a Git submodule to manage WordPress. We referred to "The Twelve-Factor App" and the recommendation of keeping your site in a single codebase under version control. Now, we'll apply another one of the twelve factors to our Git and WordPress projects, namely factor number two. This states that we should "explicitly declare and isolate dependencies". Let's take a look at what that might entail in the context of a WordPress project.
What are our dependencies in such a project? Well, that is not quite as clear-cut as you might think:
- Some would say, for example, that WordPress itself is a dependency. Others might say that WordPress is the application itself (the discussion on this WordPress ticket provides some differing viewpoints on this matter).
- Are our plugins and themes dependencies? It's certainly possible to see things that way.
- How about PHP, its extensions and the web server? Again, it's probably possible to make a case either way.
For the purposes of this article, we're going to draw the line at plugins and themes. We'll look at how we might set up a project where we consider WordPress core and our plugins and themes external dependencies for our project.
Enter Composer
The point about dependencies being explicitly declared is this: the code of the dependencies should not be included in the repository, nor should it be assumed to exist on the system. Instead, dependencies should be specified in a file (or several files) included with the project, and be installed using a package manager.
There exist many package managers and formats for specifying dependencies: the package.json file for the NPM package manager is an example in the JavaScript/Node.js ecosystem and Ruby has Gem and its Gemfile. For PHP, the package manager we'll use is called Composer, and the dependencies will be specified in a file called composer.json.
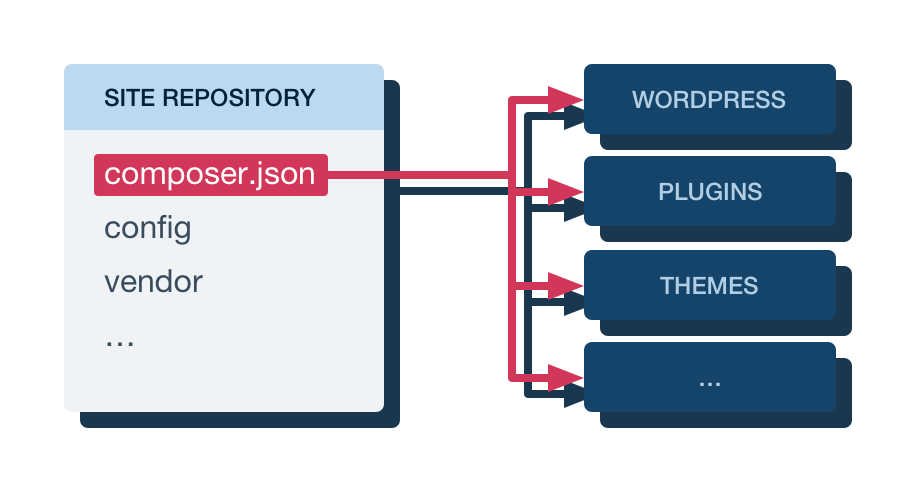
The workflow we're looking to implement is this: as the site is developed, dependencies will be recorded in the composer.json file. The code of the dependencies themselves won't be included in the repository, but the composer.json file will. When someone else starts working on the project, all they need to do is clone the repository and then use Composer to install the dependencies. This will put the actual code of the dependencies in the right place, using a version that satisfies the constraints specified in the composer.json file.
Conventions and Solution
There's one more thing to address before we move on to a practical example. While systems such as Ruby on Rails, Django and Node.js have been designed with this sort of dependency management in mind, WordPress has not. For the former systems, there are clear best practices and accepted ways to do things. With WordPress, this is not really the case. As noted, some would argue that treating WordPress and its plugins and themes as dependencies the way we do here is the wrong way to go about things. Furthermore, a package manager installing dependencies needs a place to get these dependencies: a source of information about available packages and a place to download their actual contents. For Composer, this source is the package repository Packagist. There are just a couple of problems: there is no official WordPress package here, nor are there packages for every plugin and theme.
Fortunately, the WordPress community has developed workarounds for these problems. For WordPress core, there are unofficial packages on Packagist, allowing us to install WordPress through Composer. When it comes to the plugins and themes, there's a separate package repository called WordPress Packagist, which mirrors the official plugin and theme repositories. With these, we can implement the workflow we want. Finally, there are community efforts wrapping the ideas described here, along with others, into starter projects. That way, we don't have to start from scratch when setting up a modern WordPress workflow. One such starter project is Bedrock, which is what we'll be using in this article.
A side note on the "isolation" part of the factor description above: this refers to the fact that dependencies that exist on the system, outside the application, should not be able to implicitly "leak in" and be used by the application. We'll only note that a WordPress installation or plugins and themes outside our application are unlikely to accidentally be used by our application, and leave it at that.
Getting Started with Bedrock
In the previous article, we started from a standard install of WordPress, changing things around to better fit the workflow we were trying to achieve. In this article, we'll go with a different approach. As mentioned when discussing community solutions above, a team called Roots has created a "WordPress boilerplate" project called Bedrock that helps with many of the things discussed in these articles. In particular, it's set up to allow dependency management using Composer out of the box. It also changes the directory structure in a similar way to what we did in the previous article, although Bedrock takes things one step further.
To get started, we first need to install the package manager Composer on our system. Instructions for doing this vary depending on your system, and can be found on the Composer website. When Composer is installed, starting a new project based on Bedrock is easy:
composer create-project roots/bedrock my-bedrock-siteThis command will download the specified package — Bedrock in this case — into the my-bedrock-site directory, and then automatically run composer install there to install the dependencies defined by that package.
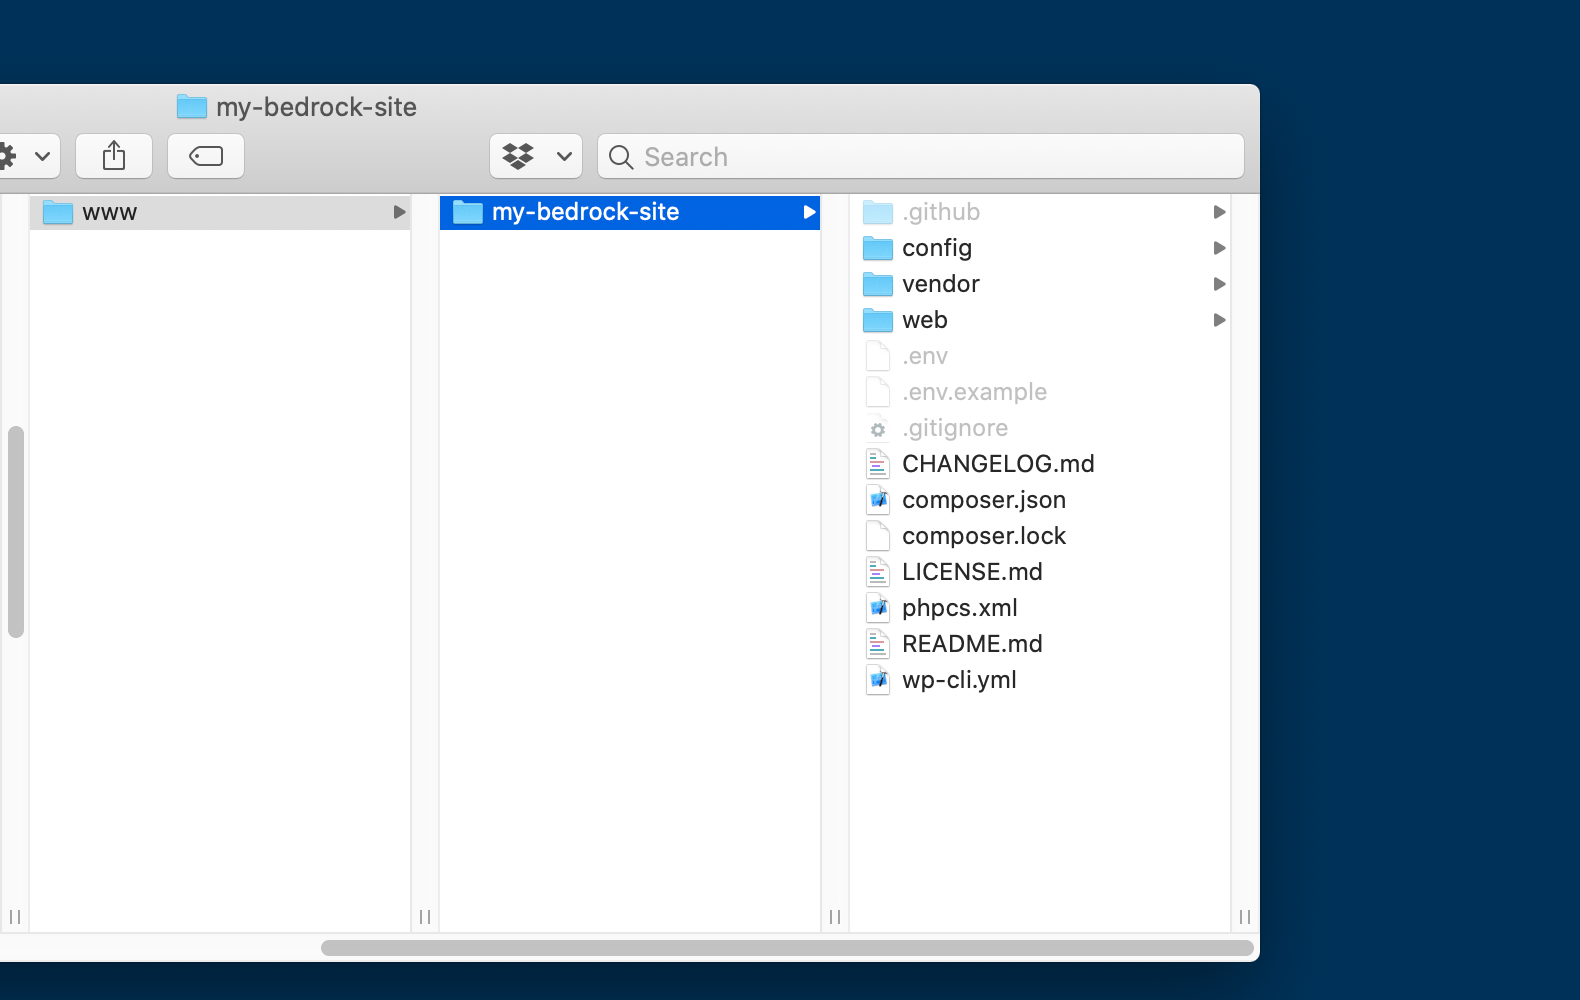
In the previous article, we moved the WordPress core files into a subdirectory of their own inside our webroot. We then moved the wp-config.php file outside the WordPress directory, and did the same with the wp-content directory. Bedrock takes a similar approach. However, while we kept everything inside the webroot, Bedrock moves some files that should not be served by the webserver outside the webroot. These include configuration files, the composer.json file specifying our dependencies, and the dependencies themselves (except for the WordPress core files, plugins and themes). So, where, in the last article, the webroot was the project directory, here, the webroot is a directory inside our project directory.
Configuring Our Site
Bedrock adds some flexibility to the configuration process. We won't go into all the possibilities, but here follows a quick overview: configuration that differs from host to host and that we don't want in our repository (this includes sensitive data like database credentials) is handled through environment variables. This is an application of another factor described in "The Twelve-Factor App". An easy way to populate the environment variables automatically is to fill in the .env ("dotenv") file that comes with the project (and which is excluded from version control by default in the included .gitignore file). The .env file is located in the project directory. Here, we set the database credentials, site URL and location of the WordPress files, and some security-related variables. In addition, the WP_ENV variable specifies whether we're running a development, staging or production instance. This variable is used to load an environment-specific configuration file in config/environments, allowing us to do things like enable debugging when developing, but not in production. The reason there are specific files only for development and staging, not production, is that the default settings are for production.
We don't edit the wp-config.php file directly. Instead, this file is set up to load your actual configuration, which resides in the config directory. The application.php file here holds the configuration normally found in wp-config.php, while the config/environments directory holds environment-specific configuration files.
For our local development setup, the file looks something like the example below. Replace the database credentials and the URL to match your setup. Server configuration is outside the scope of this article but examples for nginx and Apache can be found in the Bedrock documentation. On your staging and production servers, you would add different .env files, corresponding to the particular needs of those environments. The options towards the end of the file relate to security and can be generated automatically online.
DB_NAME='my-bedrock-db'
DB_USER='kristian'
DB_PASSWORD='correct-horse-battery-staple'

WP_ENV='development'
WP_HOME='http://my-bedrock-site.test/'
WP_SITEURL="${WP_HOME}/wp"

# Generate your keys here: https://roots.io/salts.html
AUTH_KEY='KOpS7LuHymY8l))w=Lg68V)4b:=Z]*&)6TZ4:d1yw2;%!V`o:u/$Kg)|x+^n?*kS'
SECURE_AUTH_KEY='1gEkmau@kN6B4MAY}aM=Nj8fSP:O5tkkQ52S4v=74IhD,p<?W6<#KU6F2#$6%%U+'
LOGGED_IN_KEY=']a3f<Y_N&?x|21`]V$7jx2w-!AjO:qDztTH[g/04VJt/?C)k0yD%6ZFUIle;r?=1'
NONCE_KEY='Vf<Z.SqCKWsLeq5`|3o%bx]q%j?5C&.QDcs+56p?}D{W`df`Fo*22+qiS0np(w_`'
AUTH_SALT='EVRi)si#hGqi//0!A[*EjjSAt/9(s0=^0MY/;gWuL>{ImF,aAEXLntO<S.n(gNuG'
SECURE_AUTH_SALT='NGC_tj^4@4:oH)8Dtk>Z4%WuEY.)m:7DfjR&CjEj7y08H>6|zkFG_YL9{|}YF1%#'
LOGGED_IN_SALT='B`>j27%R4%Lb.}Tcio=5qAY,}jQy#8t%p*/6fK^WmwU=[Sjnl76x/ySPYigF-6|C'
NONCE_SALT='X><QK1x`9mP1`2=vjC`xLZW;|k_{Y8`3v1Nx:p*3NFS6jlvmU%D!Q>l-QTKOSqq7'
By setting WP_ENV to development, we ensure that the config/environments/development.php configuration file will be loaded. This enables debugging in WordPress, among some other things.
There is one setting we should change for the development environment. In the last article, we disabled file modifications, disallowing plugin and theme installations from the WordPress admin, along with automatic updates. This setting is applied in the production environment in Bedrock, too. However, the development environment re-enables file modifications. We want to handle everything through Composer in the development environment as well, so, in config/environments/development.php, just remove the line that says Config::define('DISALLOW_FILE_MODS', false);.
Up and Running
With the above steps done, provided the server is configured correctly, we can visit the site in our browser and you proceed with the WordPress installation as usual. Next, let's go ahead and initialise a Git repository in the project directory:
$ git init
$ git add .
$ git commit -m "Initial commit"
The .gitignore file that comes with Bedrock excludes files like the .env file with the database credentials from the repository by default. There are some files like README.md that refer to the Bedrock project rather than to the site we're building, but there's no harm in keeping them in the repository. The .gitkeep files you see in some places are a convention — as Git won't track an empty directory, these are used to make sure otherwise empty directories like web/app/plugins are included in the repository. The files themselves are completely empty.
Plugins and Themes
Unlike the previous article, where we included plugins and themes in the repository, in Bedrock, these are handled by Composer. However, if you're developing a custom theme specifically for your site, you'll want to keep that in the repository. Let's take a look at how to manage WordPress updates and plugins through Composer.
As mentioned before, WordPress core, plugins, and potentially themes are specified in the composer.json file. Here, under require, we find roots/wordpress along with some other dependencies. Note that the WordPress version is specified exactly here. That means that, as WordPress is updated, the version used for our site is not going to change, unless we change it explicitly. Note also that we use a custom version of WordPress, provided by the Roots project, as the official version doesn't support Composer. The dependencies also include other PHP libraries used by the project. For example, the composer/installers dependency along with the extra.installer-paths option makes Composer install plugins and themes in the correct place, rather in the default vendor directory.
To change the WordPress version installed is as easy as changing the version in composer.json and running composer update! What's more, we can install plugins in a similar way. As mentioned, plugins and themes are provided through a separate Composer repository called WordPress Packagist, which mirrors the official plugin and theme directories. Let's say we want to install the plugin "Contact Form 7". Searching for it on the WordPress Packagist website confirms its existence. To install it, we could add a line under require in composer.json manually... but we can also run a Composer command that accomplishes the same thing. Let's do just that:
composer require wpackagist-plugin/contact-form-7After this command, we'll find that the dependencies in composer.json include Contact Form 7:
"require": {
    [...]
    "wpackagist-plugin/contact-form-7": "^5.1"
},
The caret operator ("^") means that Composer can install newer versions of the plugin in the future, as long as they're compatible with the version we just installed. The composer.lock file, however, will specify exact versions of the packages installed. That means by default, versions used by the project will not change... but when we're ready to update packages to the latest versions that still match the constraints in composer.json, we can run composer update.
That's all it takes to install a plugin! git status will now show the files composer.json and composer.lock as being modified, so let's make a commit:
git commit -am "Install Contact Form 7 plugin"Conclusion
That wraps it up for this article. We now base our site on a community project with an updated directory structure and more flexible configuration. Furthermore, we handle the dependencies of our site, including plugins, themes, and WordPress itself, through the Composer package manager. As far as keeping a WordPress site in Git goes, we're pretty far along.
However, there is still one unaddressed issue — an elephant in the room so to speak. You may have asked yourself in earlier articles: "what about the database?". The database doesn't just hold the content of a WordPress site, but also to some degrees its options, layout and other aspects that are hard to ignore as we're trying to improve our workflow. In the next and last installment in this article series, we'll take a look at the database, and see how a couple of plugins can make managing it more convenient.
Make sure to get notified when the next article is available — simply by signing up for our newsletter below or by following us on Twitter.
Join Over 100,000 Developers & Designers
Be the first to know about new content from the Tower blog as well as giveaways and freebies via email.