In this short tutorial, we will install WSL (Windows Subsystem for Linux) in our Windows computer and get started with Git!
The Windows Subsystem for Linux brought the best of both worlds to developers. Programmers that enjoy working on Windows can now run a GNU/Linux environment in all its glory (including common CLI tools and frameworks like Ruby or Python) without the performance hit of installing full-blown virtual machines or the hassle of running a dual-boot setup.
The best part? You can install WSL on most Windows machines and the entire process shouldn't take more than five minutes. Then, we will also configure Git for version control.
Here's everything we will cover in this article:
Ready? Here we go!
1. Installing WSL
WSL supports x64 and ARM CPUs. In order to install it, you will need to be running Windows 10 version 2004 and higher (Build 19041 and higher) or Windows 11.
It's very likely that you are already running a compatible version, but you can quickly confirm this by pressing ⊞ + R and typing "winver".
Once you confirm your machine is eligible, you will need to run Windows Powershell or Command Prompt as an administrator (by right-clicking or selecting the desired option on the right).

Now, type the following command: wsl --install
This simple command will install everything you need: it will enable the required optional components, download the latest Linux kernel, set WSL 2 as your default version, and install a Linux distribution (which, by default, is Ubuntu).

After restarting your Windows machine, a new console window will open to complete the installation. This may take a while, but it will only happen once... per distribution!
Per distribution? Yes, you can install multiple Linux distributions! Read on.
Choosing a Different Distribution
If you prefer working with another Linux distribution (such as Debian or Kali), you can get the full list of options by typing wsl --list --online.
Then, it's just a matter of typing wsl --install -d <Distribution Name> to install the required distribution. This command can also install additional distributions at any given time.
After the console window successfully installs the distribution, it will prompt you to enter a new UNIX username and password.
After providing that info, the installation process is complete! 🎉

Changing the Default Version
WSL 2 increases file system performance and adds full system call compatibility. It also uses an actual Linux kernel inside a managed VM. WSL 2 is available in Windows 10, Version 1903, Build 18362 or higher.
This will be the one most people are looking for, so it's set as default. However, if you're using a Virtual Machine (or running Bootcamp on a Mac), you may run into some issues with WSL 2. If that's the case, enabling virtualization in your BIOS or changing the default WSL version may fix your problem.
To change the default WSL version, run the following command: wsl --set-default-version 1
You can also type that command to upgrade to WSL 2, by simply replacing 1 with 2.
Running your Linux Distributions with WSL
There are several ways to run your Linux distribution. Let's use Ubuntu as an example:
- Typing "Ubuntu" in the Windows Start menu will open Ubuntu's console window.
- Typing
ubuntuin Windows Powershell or Command Prompt will open Ubuntu inside your current command line.
Personally, I prefer to use the Windows Terminal. It's a free download from the Microsoft Store for Windows 10 users. If you're running Windows 11, you should already have it installed.
The Windows Terminal supports multiple command lines (PowerShell, Command Prompt, Linux distributions) and allows you to open them in separate tabs.
Simply click the arrow to open a new tab with the desired Linux distribution and you're good to go!

To speed things up, in the "Settings" tab you can set the Windows Terminal as your default terminal and select Ubuntu (or another Linux distribution) as your default profile.

This should get you up and running with WSL. Time to shift our attention to Git!
2. Configuring Git
Git comes installed with most Linux distributions, but you can make sure you're using the latest stable version by running the following command: sudo apt-get install git.
It is important to keep in mind that while Git will work as expected in your Linux distribution, it won't be accessible on Windows Powershell or Command Prompt.
You can verify this by typing git --version.

If you're looking to use Git with Powershell/CMD, our Git Bash installation guide should be an easier option. The easiest solution, however, would be installing Tower — our Git client — which will automatically download everything you need... and make Git a lot more enjoyable, too (more on that later)!
Not a Tower user yet?
Download our 30-day free trial and experience a better way to work with Git!
Git Configuration Settings
Before we can start adding commits, we should edit some configuration settings.
Let's start with the mandatory parameters: we will need to set the username and email address by typing:
- git config --global user.name "FIRST_NAME LAST_NAME"
- git config --global user.email "MY_NAME@example.com"
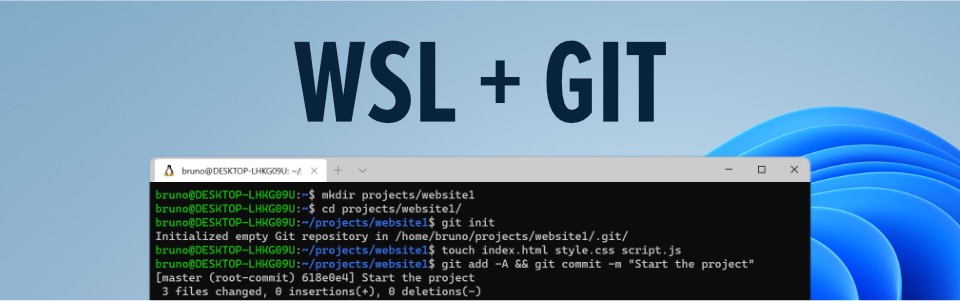
Let's create a sample project to see if things are working...

Yes! Everything seems to work correctly! 🎉
You may also want to change your default branch name. The default is "master" but you can rename it to "main" (or something else) by entering the following:
git config --global init.defaultBranch mainYou can access your configuration items at any time by typing git config --list.
You may also want to change the text editor associated with Git (default is Vim). Depending on the text editor you use, the command will be different. As an example, here is the one you should type to use SublimeText:
git config --global core.editor "'/mnt/c/Program Files/Sublime Text/subl.exe' -w"Did you notice how the path is different? That's because Linux's file system differs from the one in Windows. This can create some confusion, so let's learn more about that.
A New File System
When you installed WSL, you also installed a new file system. In Linux world, drives are not given letters, they are given mount points. So C:\ becomes /mnt/c/. You will notice that the directory separator is also different: "\" for Windows, "/" for Linux.
So, if you are seeking your Windows user directory (C:\Users\username), you should type /mnt/c/Users/username. The Linux distribution treats your Windows file system as a mounted drive.
You can access the distribution's home directory with the cd ~ command. New to the command line? Have a look at this guide to learn all the essential terminal commands.
If you prefer a more visual approach, you can open Windows Explorer in your current working directory by typing explorer.exe . (don't forget the dot).
3. Working with Git
You can use Git on the Command Line Interface or in combination with a desktop GUI like Tower. Be aware that using WSL is slower than using the Git repository natively on Windows, as the WSL Virtual Machine path has to be mapped and the file system "emulated" to be used on Windows.
Why install a Git GUI? Tower offers more intuitive commands and provides a lot of visual aid so that you become more comfortable and productive with Git.
As an example, here is Tower's powerful Drag and Drop, which allows you to perform many complex Git actions with just a single click:
As long as you have the Git binary installed and running on Windows (Tower does that automatically upon installation), you can mount any WSL path and use it in Tower. Simply open Windows Explorer, go to your WSL path and drag & drop the path onto Tower's repository view.
Tower is available for macOS and Windows and you can try it free for 30 days! We strongly recommend you give it a shot, even if you're an advanced Git user already.
If you're new to Git, our online ebook is a fantastic place to start — it's free and aimed at beginners.
We also offer plenty of free video content. Each lesson focuses on a particular topic and lasts about 5 minutes on average. Both the Command Line Interface and Tower are covered.
Tower will also help you in becoming more comfortable with Git's terminology and workflow. However, if you prefer starting with the Command Line, here are 10 commands we think you should learn first:
git init— creates a new local repository;git clone <repository>— clones an existing repository;git status— lists changed files in your working directory;git add .— adds all current changes to the next commit;git commit— commits previously staged files;git branch <new-branch>— creates a new branch based on your current HEAD;git checkout <branch>— switches to a different HEAD branch;git push <remote> <branch>— publishes local changes on a remote repository;git pull <remote> <branch>— downloads changes from a remote repository and integrates them into HEAD;git merge <branch>— merges the specific branch into your current HEAD.
If you're already familiar with some of these commands but are having trouble memorizing them, you can download and print our Git cheat sheet. All the essential commands are listed there.

Congratulations! You're now ready to dive into Git's fascinating universe with Windows Subsystem for Linux!