
If Git is a time machine, commit messages are the exact moments Marty McFly can come back to. You can treat them as checkpoints that are recorded whenever progress is made. Looking at the commit history and quickly grasping the changes made can be a great feeling — a sentiment that is reserved for those who write good commit messages!
With poorly thought-out commit messages, you (and your team) may spend hours trying to figure out which commit introduced a new bug into the project. Not exactly a pleasant afternoon, according to developers who lived to tell the tale! 😰
In this guide, you will learn how you can write better commit messages everyone can benefit from. We'll look into the thought process of creating a well-crafted commit, some established conventions, and a couple of important rules you may want to consider.
Before we advance to some more practical advice, let's understand why writing a good commit message is so important.
Why You Should Care About Commit Messages
It may be tempting to treat Git as a simple backup system, where you make all the changes you need and just add a commit when everything looks good to go. However, with this approach, commits will lose much of their value — it will be hard to tell what exactly changed and no one will be able to make sense of what happened on each revision.
Instead, you should go for a more granular approach, where a commit only describes a particular change in that project. This is sometimes called the "Atomic Commits "approach, which states that commits should be tiny and focused on a single topic.
This will not only improve readability but also make your life easier:
- if you ever need to roll back any changes made
- when the time comes to merge features into other branches
This will require a bit of discipline, but if your team follows suit, there's a nice reward waiting: your commit history will be much easier to digest and everyone will be able to quickly understand the steps taken at each point in time.
This should be something to keep in mind, even if you're working alone on a personal project. Your future self will definitely thank you for that!
Crafting the Perfect Commit
Writing the perfect commit message is just half the story — understanding what should be added to the next commit is equally important.
Commits can play an important part in the way you approach a task. Think about it this way:
- By grouping changes logically into commits, you will refine the process of planning a task and splitting it into smaller pieces (arguably the most important programming skill).
- It makes you think more about your task and your solution to it, not just upfront but also when you pick changes and write the commit message for it. It's like rubber duck debugging — you go through your implementation again and you might spot edge cases, missing unit tests, or other things you forgot.
The Staging Area plays a very important role in this process: it allows developers to handpick the changes that should be included.
Of course, you could simply type git add . to add all your current local changes to the next commit. If you commit often, this may certainly be valid at times; but even when that's the case, you should always step away for a moment and determine if all the changes made are really about just one particular topic, or if something could be broken down into two (or more) commits.
More often than not, it will make sense to only stage some files. That's where git add file1.html file2.html can come in handy. The remaining modified files will remain in the staging area for a future commit.
This important act of reflecting and consciously choosing what should be added to the next commit will already have a big impact on your commit history, but we can even go further and just stage chunks (or hunks) of a file.
This can be achieved with the -p option to git add:
$ git add -p index.htmlGit will go through this file on a "patch" level — it will stop at each chunk to ask us if it should be added to the Staging Area or not. We'll just need to type [Y] ("yes") or [N] ("no") at each step of the way.
While the CLI can get the job done, it's hard to tell what's already been staged. These actions are much easier to perform when you are using a visual Git client like Tower, available for macOS and Windows.
Here's how you can quickly stage just a couple of lines with this Git GUI:
As you can see, Tower allows you to easily review the changes made on each file thanks to the Diff viewer on the right. You can then decide if that file should be staged by selecting it and ticking the box (or simply hitting the spacebar).
You can easily stage specific chunks of a file as well, or even single lines (by clicking and dragging) as in the example above. You can then review what's already staged before making it official.
Not a Tower user yet?
Download our 30-day free trial and experience a better way to work with Git!
The Commit Message — What to Consider
Now that we have decided what should belong to our next commit, let's take a moment to think about the commit message itself.
Consistency is key, so teams should first discuss and agree on these 3 topics:
- Style
- Content
- Metadata
1. Style
"Style" will play an important part in making sure that the commit history is readable. Grammar, punctuation, capitalization, and wrap margins are all items that are worth a discussion.
2. Content
"Content" isn't as easy to standardize. Answering the following question can be a good starting point: "what kind of information would we like to see in the body of the commit message?"
3. Metadata
"Metadata" should consider additional information, such as Issue Tracking IDs and Pull Request numbers.
While the best way to handle these 3 topics is open to debate, most Git commit messages follow a pattern. Now is the perfect time to have a look at some of the most popular conventions.
The Commit Message — Style Guide
Keeping all the above in mind, this is what we recommend for the Subject Line, the Body field and, when necessary, the Footer.
1. The Subject Line
Just like in an email, the subject line is a very important piece of the puzzle. This is often the only piece that people will read, so it should be visually appealing and easy to find — avoiding unnecessary capitalization/punctuation and making sure all the right keywords are present is a must.
The imperative form is the standard; Git itself uses the imperative whenever it creates a commit on your behalf, like when you run the git merge or the git revert commands.
This means that you should write "Add" instead of "Added" or "Adds". The subject line should complete this sentence: "If applied, this commit will..."
Stylistically, most teams will follow these rules:
- It should be capitalized
- It shouldn't end with a period
- It should be 50 characters or less
Here's an example of a good commit message: Update configuration files with new staging URL
This is not a strict golden rule to follow and the 50 character limit can, of course, be exceeded — however, it is an excellent exercise to make sure that the commit message is clear and concise. Even the popular git log command gets hard to read if the subject lines are too long!
GitHub actually warns you if you go over this limit, and truncates any commit message longer than 72 characters.
Rules Are Meant to Be Broken
Each team can have its own unique convention and differ from the rules mentioned above. The Angular team is a good example of this.
According to their docs, only commits that start with one of these words are accepted:
- build
- ci
- docs
- feat
- fix
- perf
- refactor
- test
Other teams accept other types, such as style or chore. Did you notice they are all lower case? Another rule broken!
More food for thought: Git uses area prefixes for subjects to quickly identify the area of change (e.g.: githooks.txt: improve the intro section). This is another good practice to make the commit message more succint and easier to read.
Nothing is set in stone. You can even add emojis to your commit messages!
2. The "Body" Field
The subject line is many times self-explanatory, but sometimes it makes sense to add more information to the "body" field. We use this field to provide more context about WHAT changed and WHY.
If you feel like filling in the "body" field, make sure to:
- Wrap it at 72 characters
- Use a blank line to separate it from the subject
- Separate paragraphs with blank lines (use bullet points if needed)
Why 72 characters?
The 72 character limit is a common convention, especially in Open Source projects. This is mainly due to historic reasons: it takes terminal width into consideration and the fact that some clients and email patches don't handle wrapping.
Similar to the subject line, this is more of a guideline than a hard rule. Many teams don't follow this, as they believe it should be the client's responsibility to layout the text.
Stylistically, this example by Tim Pope can serve as a template of what you should be aiming for:
More detailed explanatory text, if necessary. Wrap it to about 72
characters or so. In some contexts, the first line is treated as the
subject of the commit and the rest of the text as the body. The
blank line separating the summary from the body is critical (unless
you omit the body entirely); various tools like `log`, `shortlog`
and `rebase` can get confused if you run the two together.

Explain the problem that this commit is solving. Focus on why you
are making this change as opposed to how (the code explains that).
Are there side effects or other unintuitive consequences of this
change? Here's the place to explain them.

Further paragraphs come after blank lines.

 - Bullet points are okay, too

 - Typically a hyphen or asterisk is used for the bullet, preceded
   by a single space, with blank lines in between, but conventions
   vary here
Git never wraps text, so you must do it manually. For this action, a good text editor (here are some suggestions) or Tower can definitely come in handy.
3. The Footer
It may make sense to add any GitHub issues, Pull Requests, or Jira tickets that this commit relates to. Feel free to use the last lines of the "body" field to address this. This is also where deprecations and breaking changes should be mentioned.
Here's an example:
BREAKING CHANGE: <summary>
<BLANK LINE>
Fixes #<issue>
Closes #<pr>
How Tower Can Help You 💡
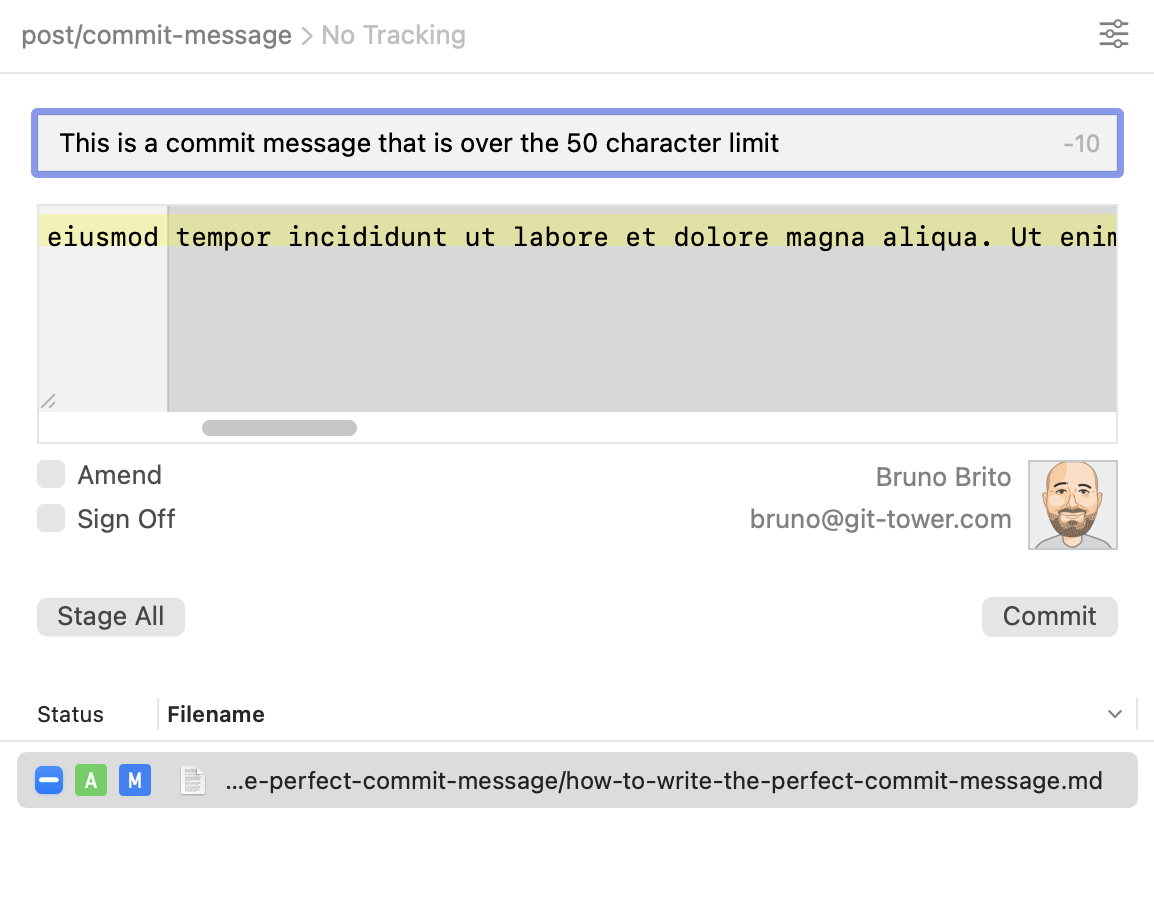
If you're feeling overwhelmed, the Tower Git client can once again come to the rescue. It will warn you if you exceed character limits:
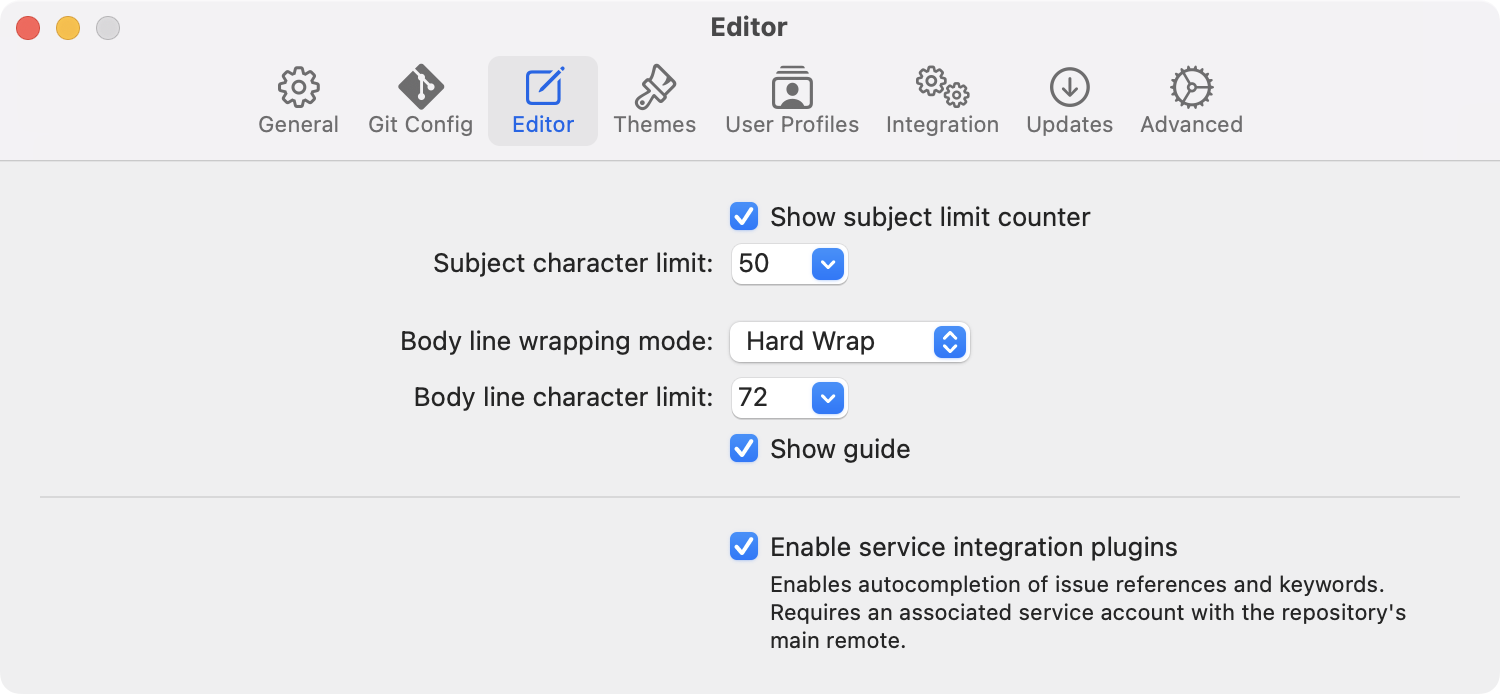
You can also tweak the editor in the "Preferences" window, in case you'd like to define a different character limit or wrapping mode (soft or hard):
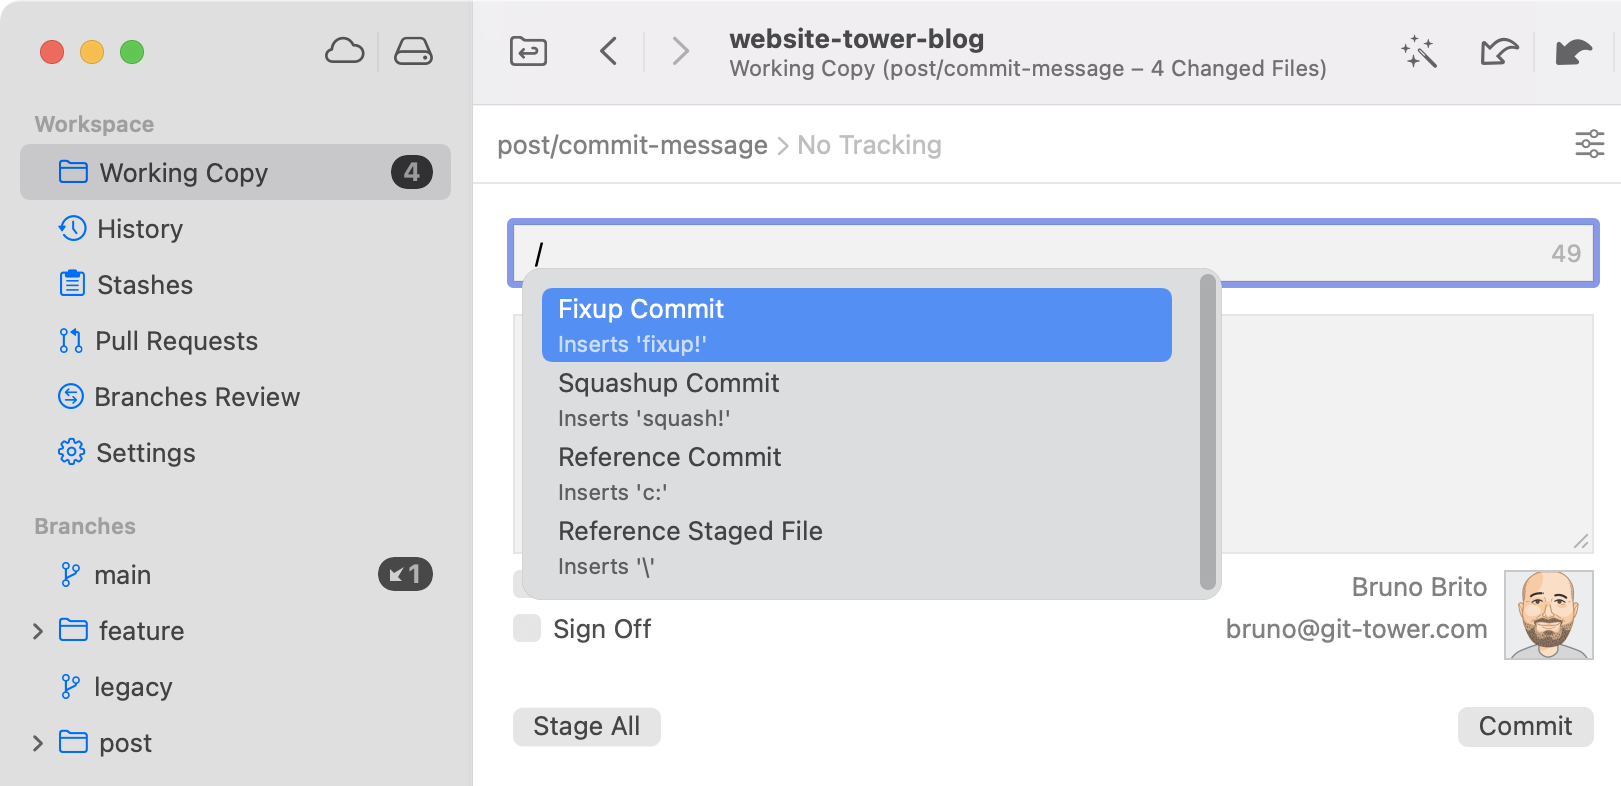
To quickly reference files and commits, you can press the / key and pick the appropriate command.
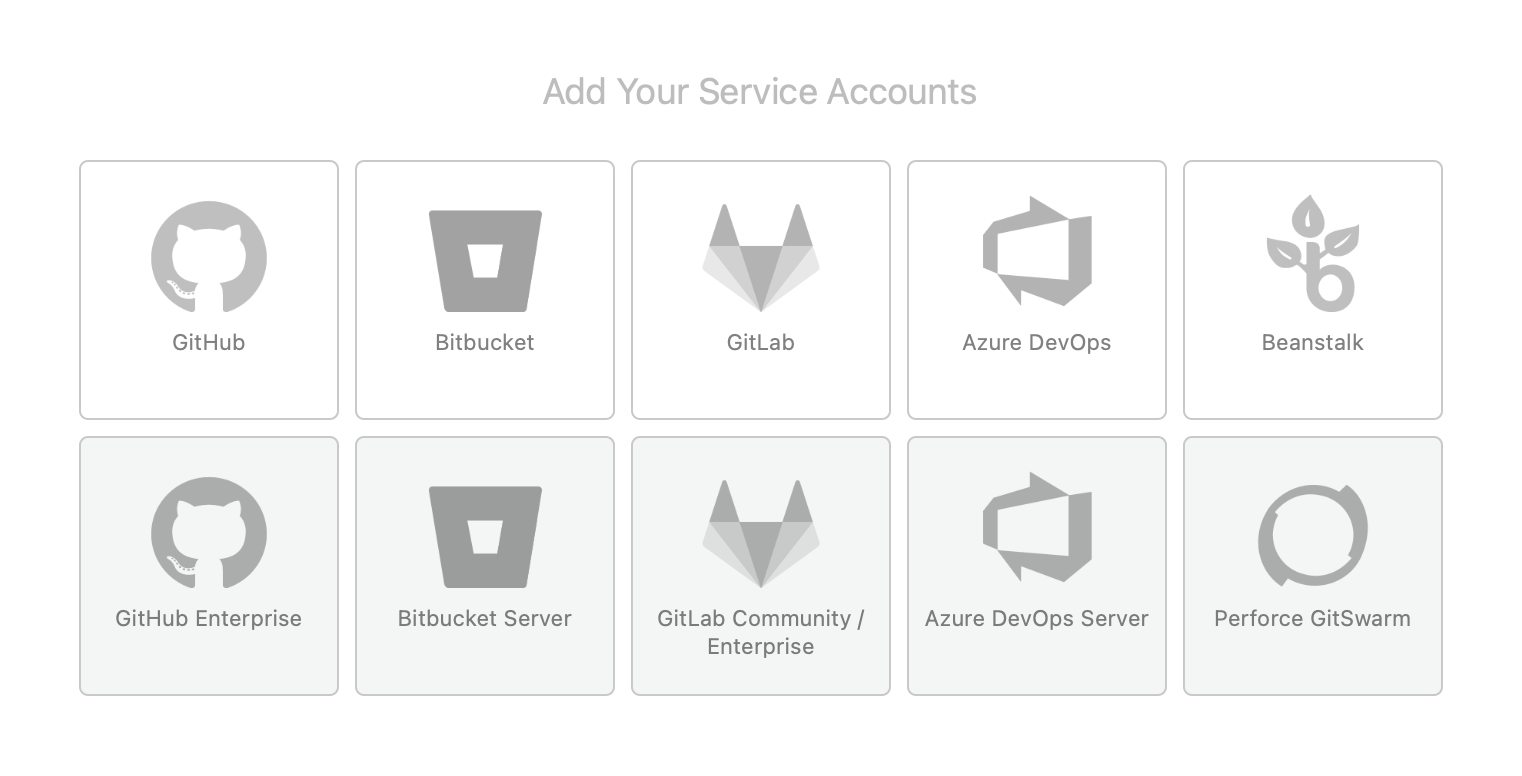
You can also link issues with ease — you will just need to type # followed by the space bar to see a list of open issues. Moreover, common keywords like "closes/fixes/resolves" are supported and issues will be automatically closed once pushed.
For this last tip to work, you must have a service account configured, like GitHub or GitLab. Tower supports all the popular options!
Final Words
If you're reading this, congrats! You made it to the finishing line 🥳
We hope you found this article useful — I'm sure your Git repositories will thank you for all the special care.
For more Git and programming tips, make sure you sign up for our newsletter below and follow Tower on Twitter and LinkedIn!
Join Over 100,000 Developers & Designers
Be the first to know about new content from the Tower blog as well as giveaways and freebies via email.