
Git isn't just for developers. Anyone who seeks a sane way to track changes of files and collaborate with their teams can take advantage of Git's enormous power — this includes Designers!
But getting introduced to Git can be overwhelming. Designers already have a lot to think about: solving problems is part of their daily routine, and mastering design tools can be a challenge as well. Why take the time to learn yet another tool? 😰
Here are 3 important reasons to learn Git:
- Efficient version control: After creating several variations of a layout, it's very easy to end up with dozens of files. Managing multiple versions of a file can be a hassle, and yet most Designers face this problem every day. With Git, all changes will be tracked and easily accessible in a single file, reducing the need for multiple copies of the same document (no more file names like
layout_final_v5.psdor sorting by date to retrieve the latest version in the hard drive). - Increased autonomy: Designers are asked to manage the company's media assets, create documentation, and can even be responsible for updating some sections of the website, such as replacing banners. This is where understanding Git could come in real handy, as more and more sites rely on it to publish changes.
- More confidence: If you mess things up, you can always go back in time. It is very hard to lose work if you follow the basics of Git.
Now that you are aware of Git's benefits, let's dive deeper. Like other tools, Git has a learning curve, but this guide will tell you everything you need to know to get started.
Git can be operated in the Terminal or with the aid of a Graphical User Interface (GUI). In this case, we will use Tower, our own client, which provides helpful features such as drag and drop to simplify the process. The outcome is the same as if you used the Terminal, but with a much clearer view of what has changed.
Let's begin!
Understanding Git
Let's begin with a rather important term: "repository". Essentially, a repository functions like a folder where you store your entire project, such as a website or a collection of media assets.
Once you initialize the repository, Git will keep track of every new file you create inside that folder, as well as any changes made to existing files. For instance, if you're working on a project involving graphic design, you may have a bundle of images in your repository. If you need more visuals but are on a tight budget, you could use Freepik to get royalty-free photos. Git would keep track of these new additions to your files.
When you reach a point where you're satisfied with the progress you've made, you can take a snapshot of your project. This is what we call a "commit".
We suggest committing often and making small changes each time, making it easier to understand differences when reviewing the project later. Both your future self and team members will appreciate this approach.
Git operates like a time machine, enabling you to travel back in time and view the project's status as it evolves. These snapshots are essential for this time travel capability.
To put this into practice, let's launch Tower. If you haven't installed Tower, you can download a 30-day free trial to follow along.
Tower is available for both macOS and Windows. Although we'll use the macOS version in this guide, the tasks described in this article can be completed in either version.
Starting Your Git Journey with Tower
Let's kick this off with something very simple. We'll start a new blank project, add an image to Git, modify it and add another commit, so that we can observe the changes afterwards.
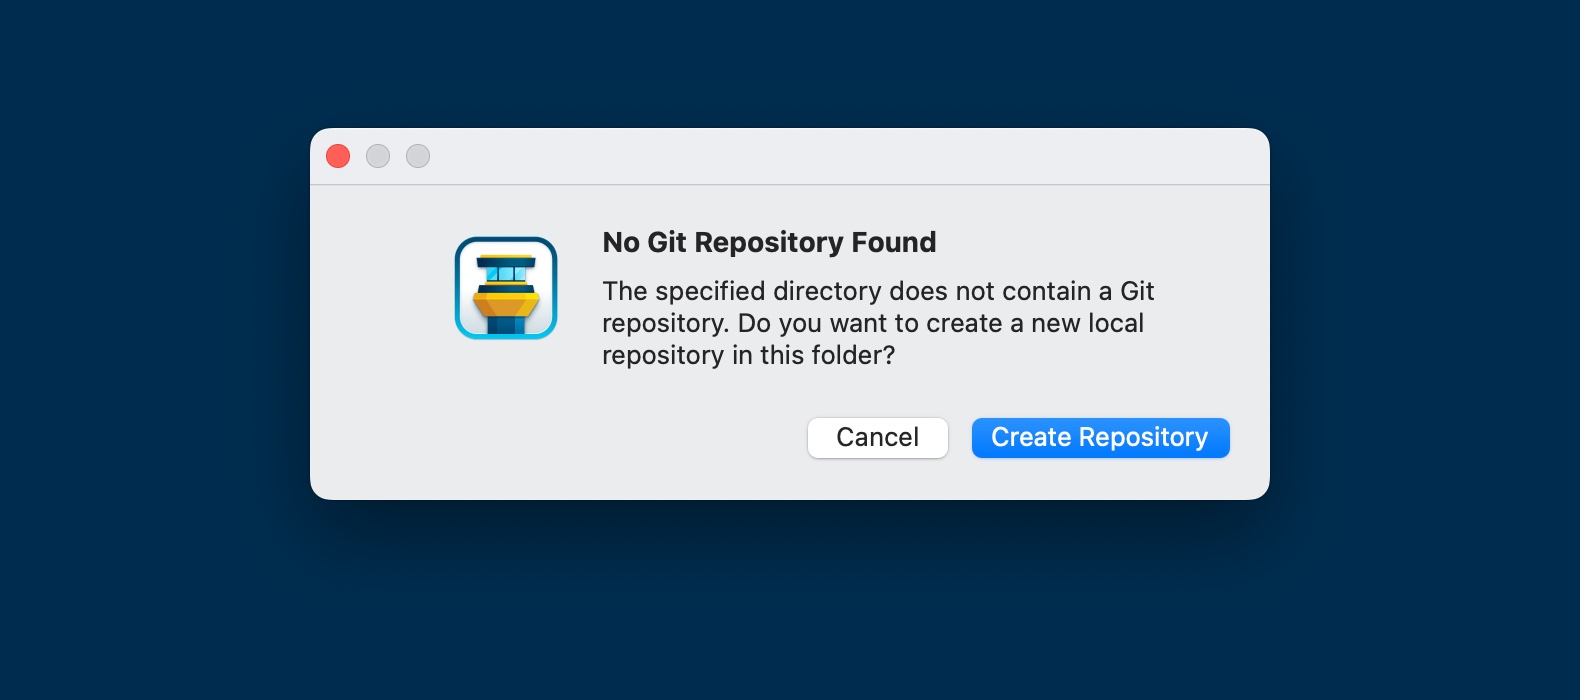
We'll make a blank directory called git-for-designers and open it in Tower, by selecting "File > Open" and locating it. Tower will warn you that the folder is not a Git repository yet; no worries, we'll just click on "Create Repository" to initialize this project.
Now, let's quickly create an image — a simple blue background will do for now.
In Git, you always need to explicitly select which modifications you want to include in the commit. This process is known as "staging" changes.
Fortunately, staging changes in Tower is straightforward. You can easily mark the checkbox for each file you want to stage. In this case, there's only one file, so let's select the image and add our first commit, with a meaningful image such as "Add background image".
When creating a commit, it's important to use a descriptive message, usually written in the imperative, present tense. Here's more information about writing good commit messages.
Now, let's work on the image and export it again. This time, we'll go for shades of orange. As soon as you head back to Tower, you will notice that you can instantly see the old and new versions of the file.
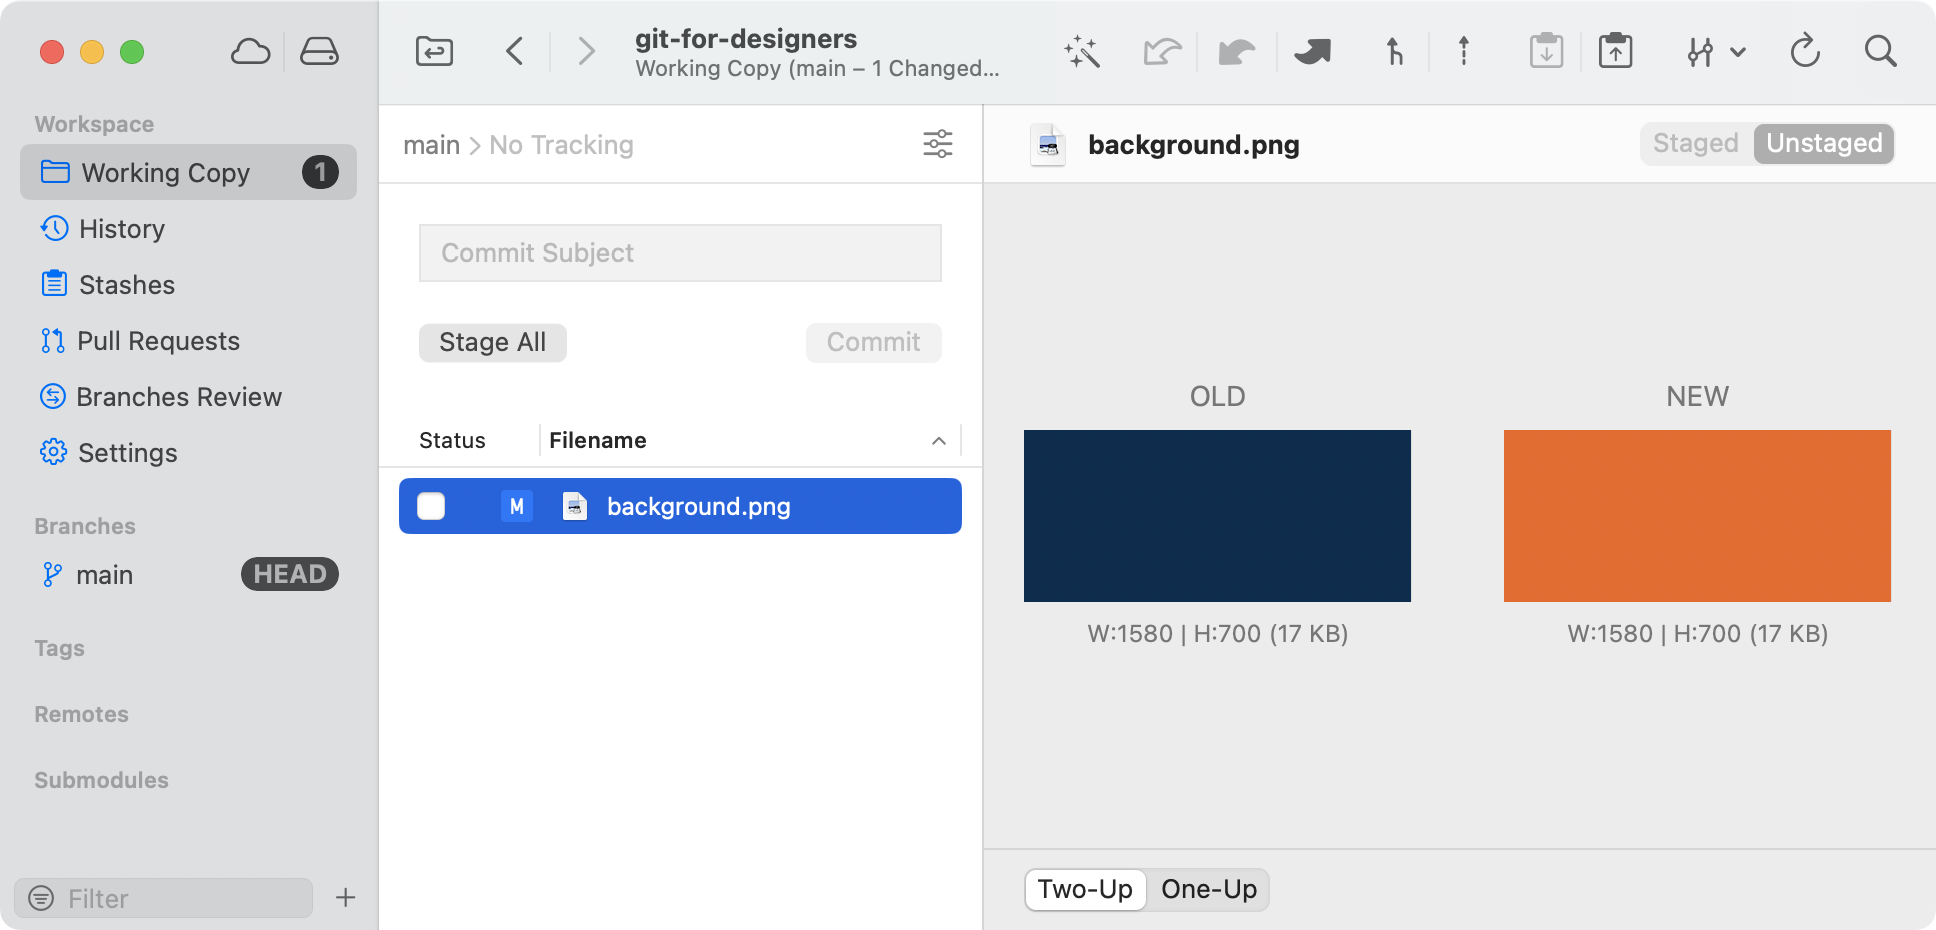
Tower supports an "Image Diff" feature that is compatible with all the most popular image formats (PNG, JPG, GIF, BMP, TIFF, JPEG2000, and HEIC). For some other formats, such as PDF, you will need a dedicated "diff tool" to visualize the changes. These are our recommendations for macOS and Windows (Tower supports all the popular options).
Let's complete our task by committing our change. For this update, a commit message such as "Update background Image with orange background" would suffice.
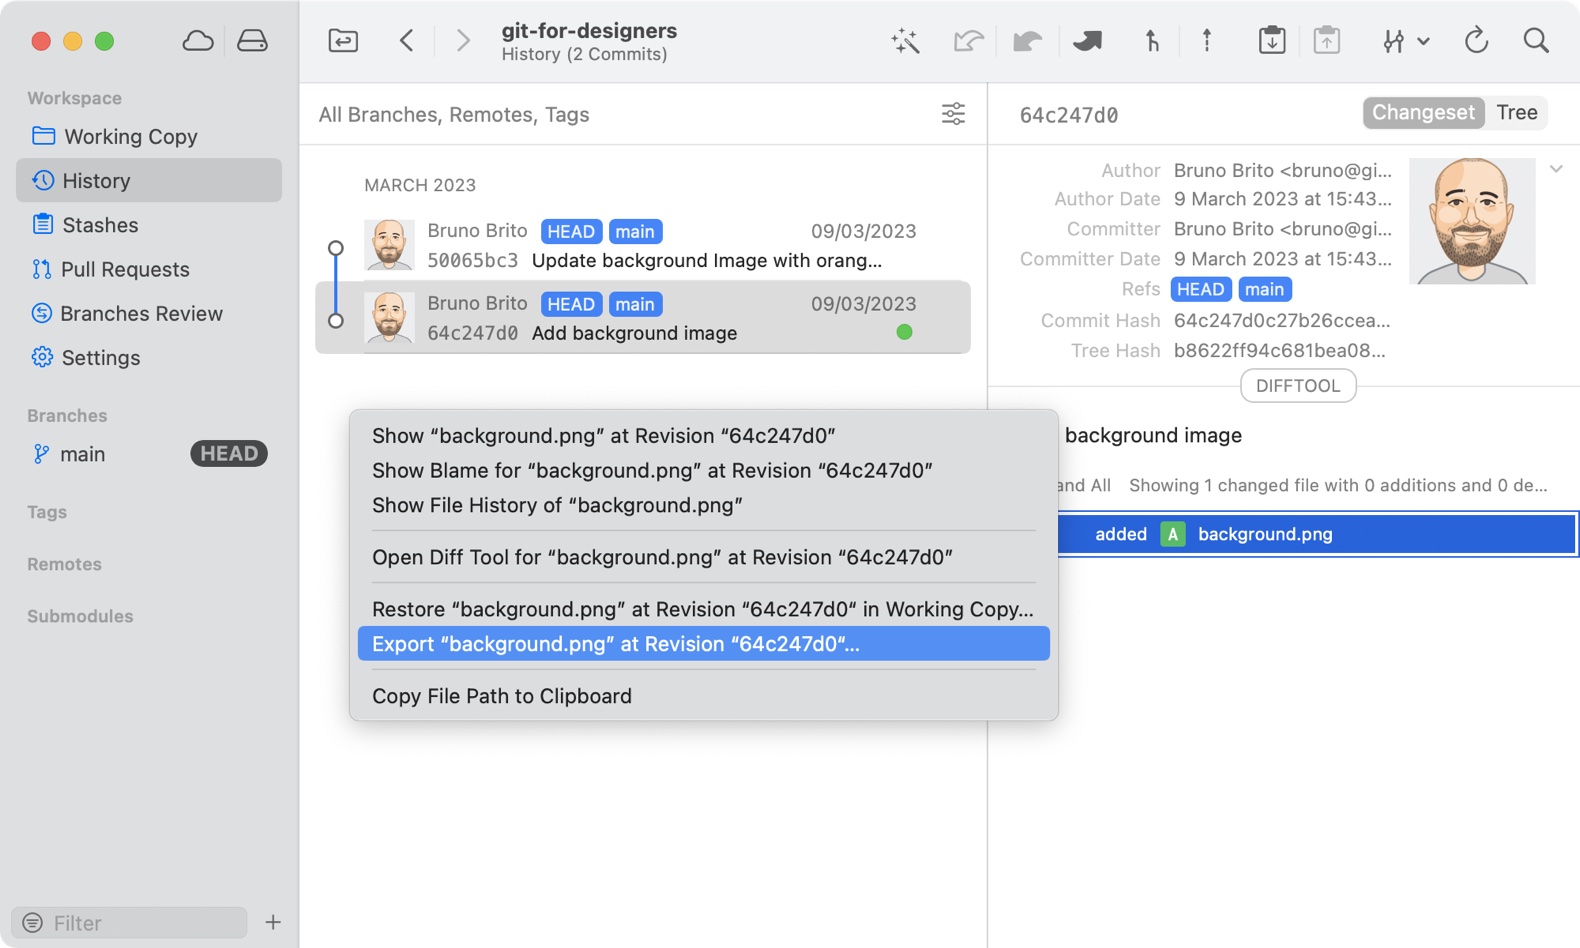
Your entire commit history will be accessible in Tower's "History" tab. Right now we don't have much, but as commits are added, this view will become beneficial over time. On the right sidebar, you can view the list of modified files and other details, including the author, files modified, and time of the commit.
You can easily recover prior versions of your work, too. Click on the commit containing the version you require and right-click on the file you wish to restore. Then, select "Export [file] at revision [revision]," and pick a location to store the file.
Congratulations! You now have a grasp of the fundamentals of Version Control! Now, let's delve into the collaborative aspect...
Not a Tower user yet?
Download our 30-day free trial and experience a better way to work with Git!
Combining Git and GitHub for Collaboration
A single project can be worked on by numerous people. To maintain synchronization, a cloud-based hosting platform is necessary. This is where platforms like GitHub, BitBucket, or GitLab come into play (in this article, we will stick to GitHub).
If you upload your project to one of these platforms, you can make it public for the world to see or keep it private so that only your team members can access it. This removes the need for emailing ZIP files back-and-forth, as long as everyone involved has access to the repository.
Git works very well with any of the cloud-based platforms we mentioned, but there is some new terminology you should become familiar with. These are the most important terms:
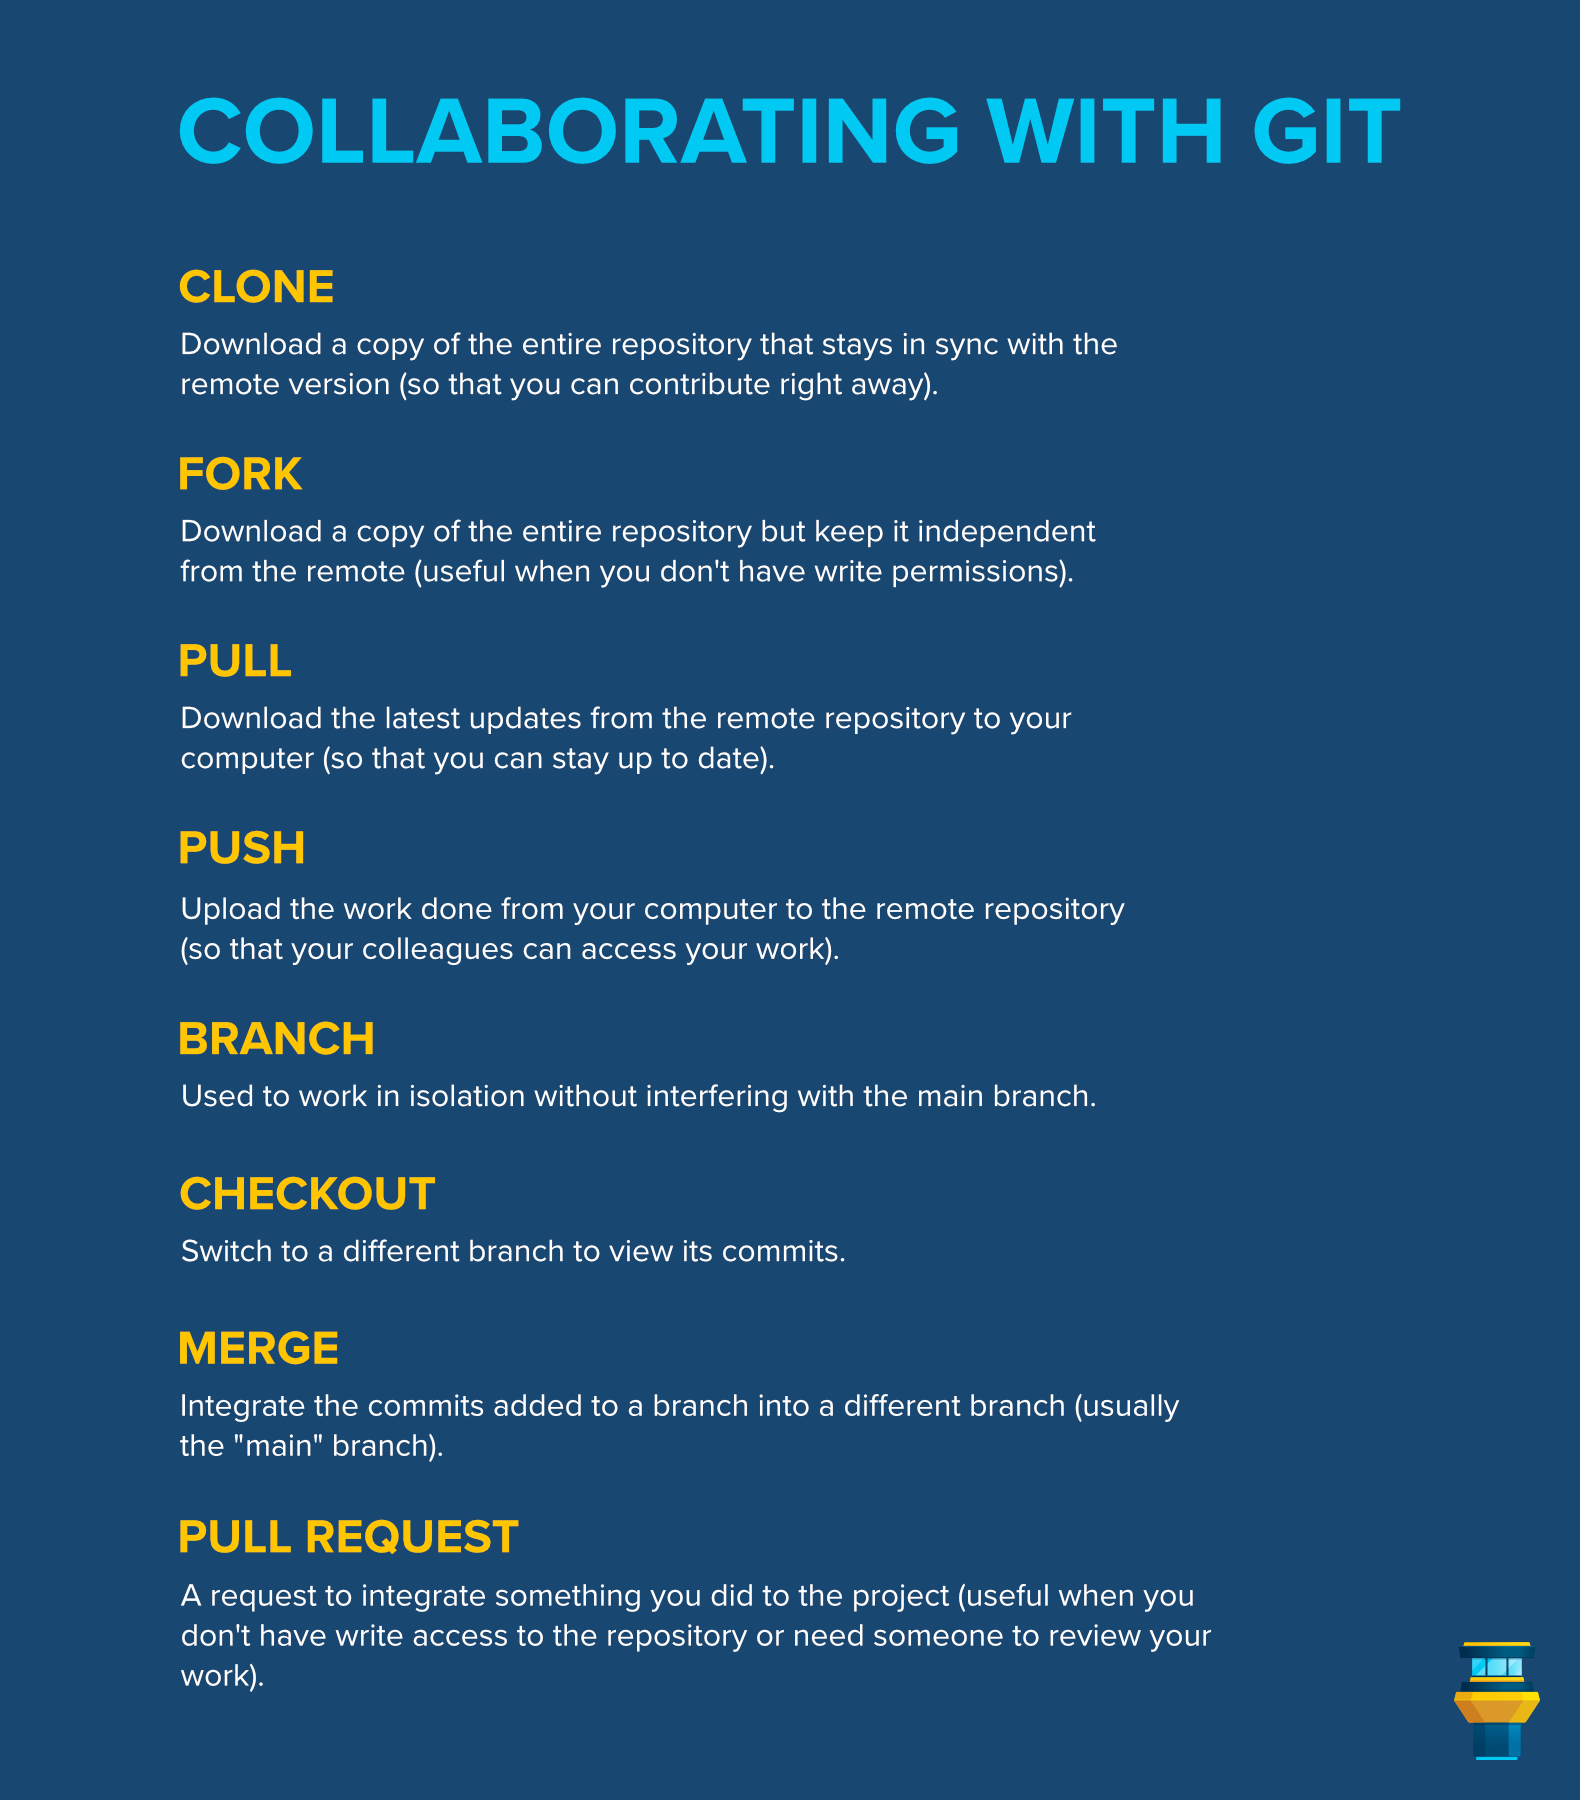
- "Clone" and "Fork"
- "Pull" and "Push"
- Branches
Let's learn more about this next.
Cloning and Forking
When you are "downloading a project" to your computer, you're probably looking to "clone" the repository. The main difference is that this copy stays in sync with the remote repository, allowing you to add commits and contribute to the repository immediately.
Forking is something you will also come across, and it's a slightly different action; it also downloads the whole repository, but keeps it entirely independent. When you want to make changes but lack authorization to modify the original repository, this is the best solution.
Pulling and Pushing
From time to time, you will need to update your local repository to ensure that you have the most recent remote version. This is known as "pulling." Conversely, when you make changes and commit them, you should "push" them to the remote repository, so that everyone can access your work.
Pulling and pushing are essential for maintaining synchronization.
Branches and Pull Requests
As projects become more complex, it is advisable to isolate your work so that it won't get affected by others. In Git, this is called "branching" and it's one of Git's most important features.
You create a new branch to work on something, and when it's ready you can "merge" it into the main branch. Git is smart enough to understand the files you've modified and leave the rest up to date, even if some commits were added in the meantime.
Pushing and merging are straightforward when you have write access to the repository. However, if you wish to contribute, but lack the necessary permissions, you can still create a Pull Request, so that the author(s) can review and decide whether or not to integrate your changes.
Essentially, you will need to fork the original repository, add your changes, and push them back to your remote repository. Then, you can go to your platform of choice and create a Pull Request.
This section covered many essential Git concepts and it can be overwhelming at first. This cheat sheet covers everything we mentioned and can be helpful when you're still learning the ropes.
Now, let's see how this all comes together in Tower.
Working with Tower
Tower seamlessly integrates with all popular remote services. To access the "Services" view, click on "View > Show Services" (or the "cloud" icon), and then select the desired online service.
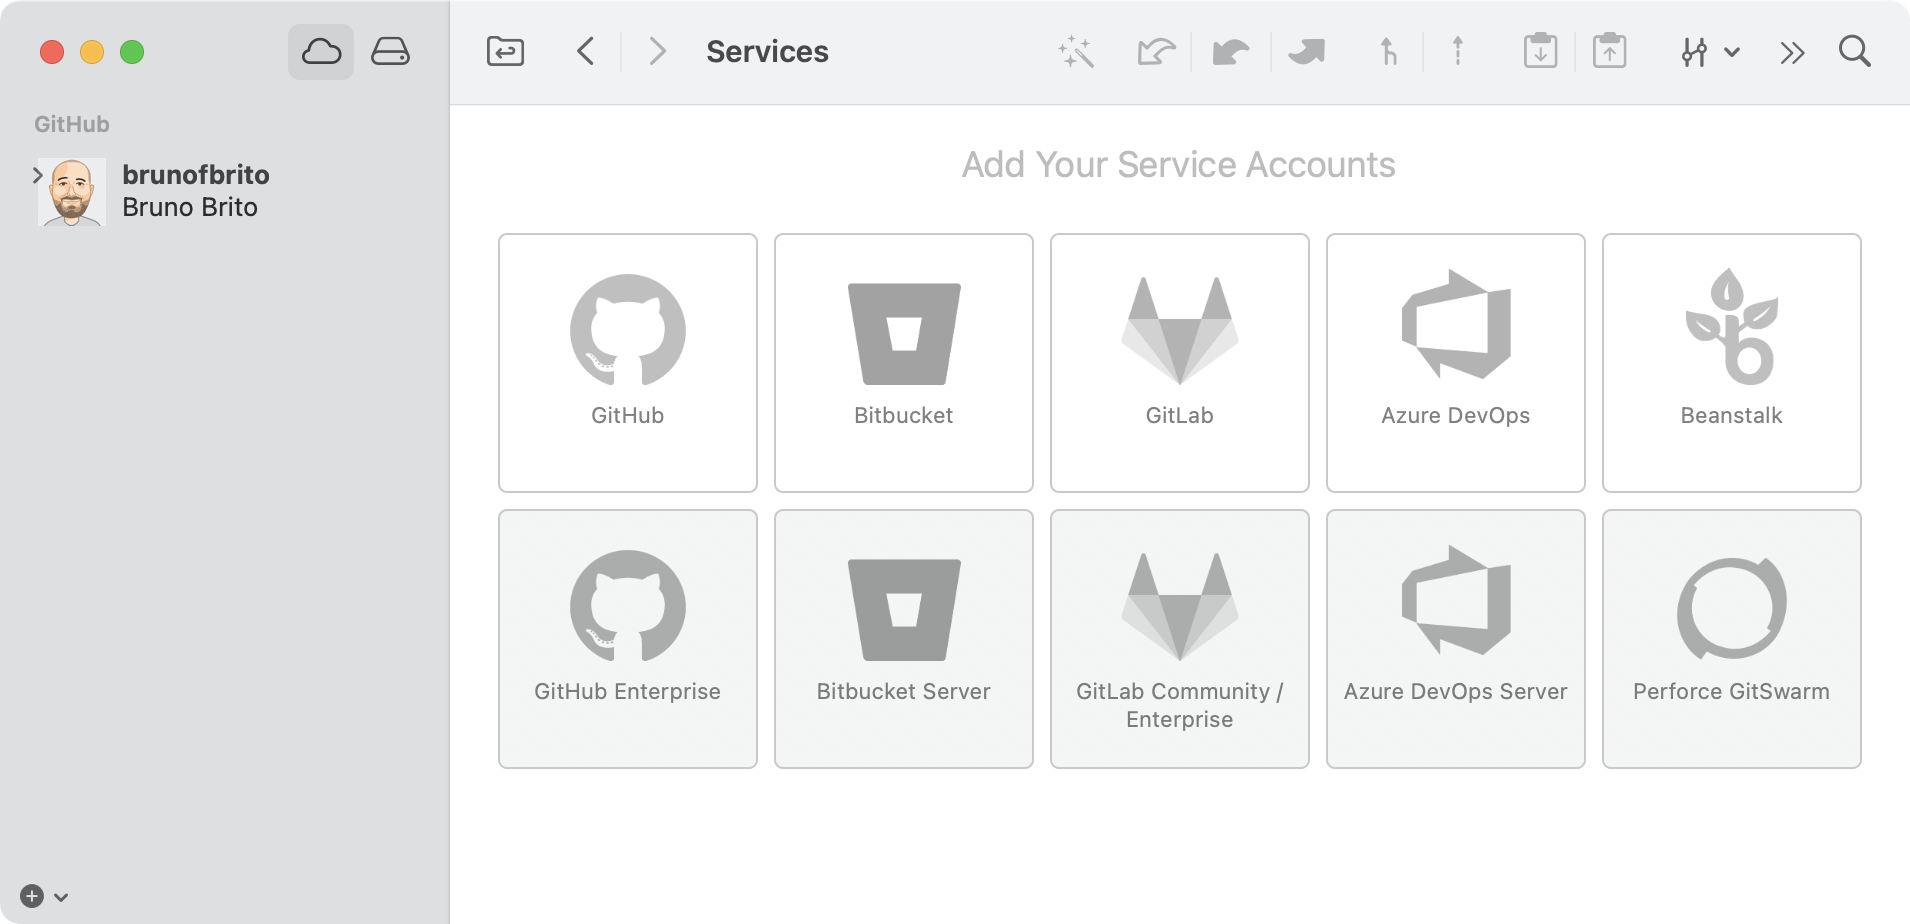
After logging in, Tower will display all available repositories. Pick the project you need and click on "Clone" to download it to your computer.
When cloning is finished, the repository will be up to date, but it's essential to know how to keep it that way in Tower. Time to think about "Pushing" and "Pulling" again!
Pushing and Pulling in Tower
Staying in sync can be accomplished by clicking on one of the three arrows at the top.
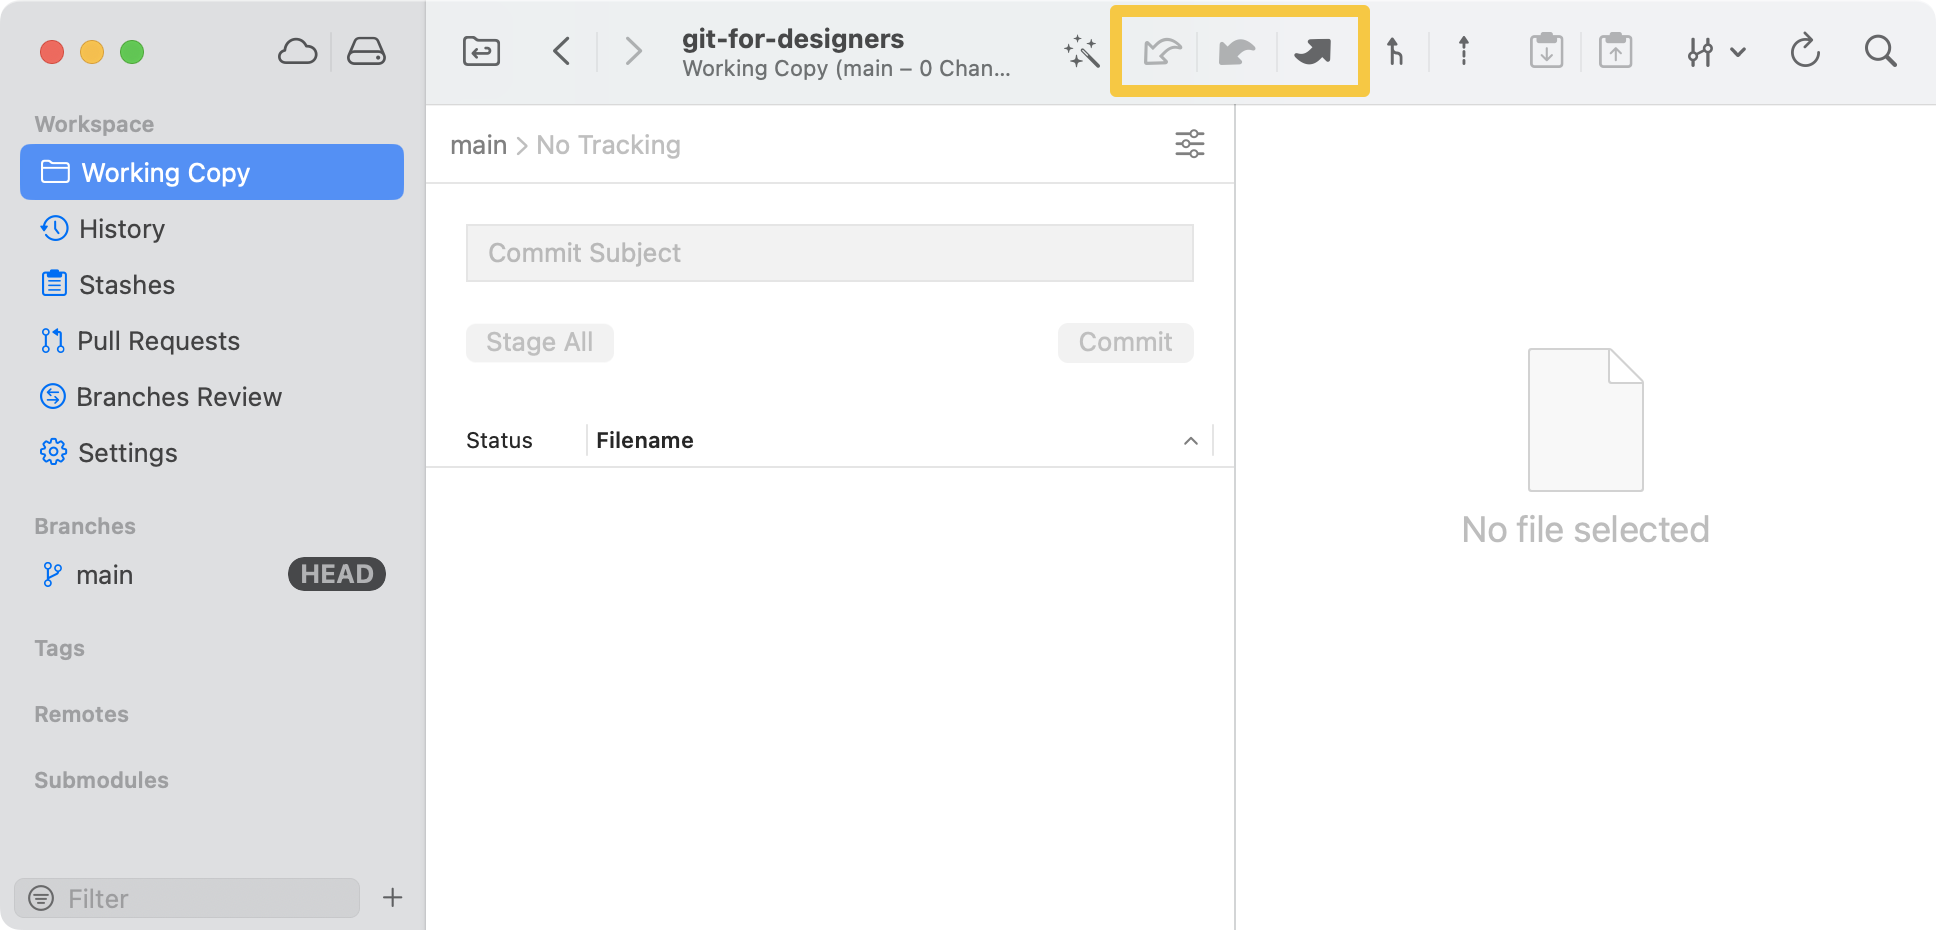
The first arrow runs a "Fetch," which is similar to "Pull" but only informs you if any changes were made in the project. It won't download anything.
The second arrow performs a "Pull"; it downloads all the latest updates and integrates them.
Finally, when you're done with your tasks, you should add your commits and "Push" them to the remote repository, so that everyone can access your latest work. This is what the third arrow is for!
Branching and Merging in Tower
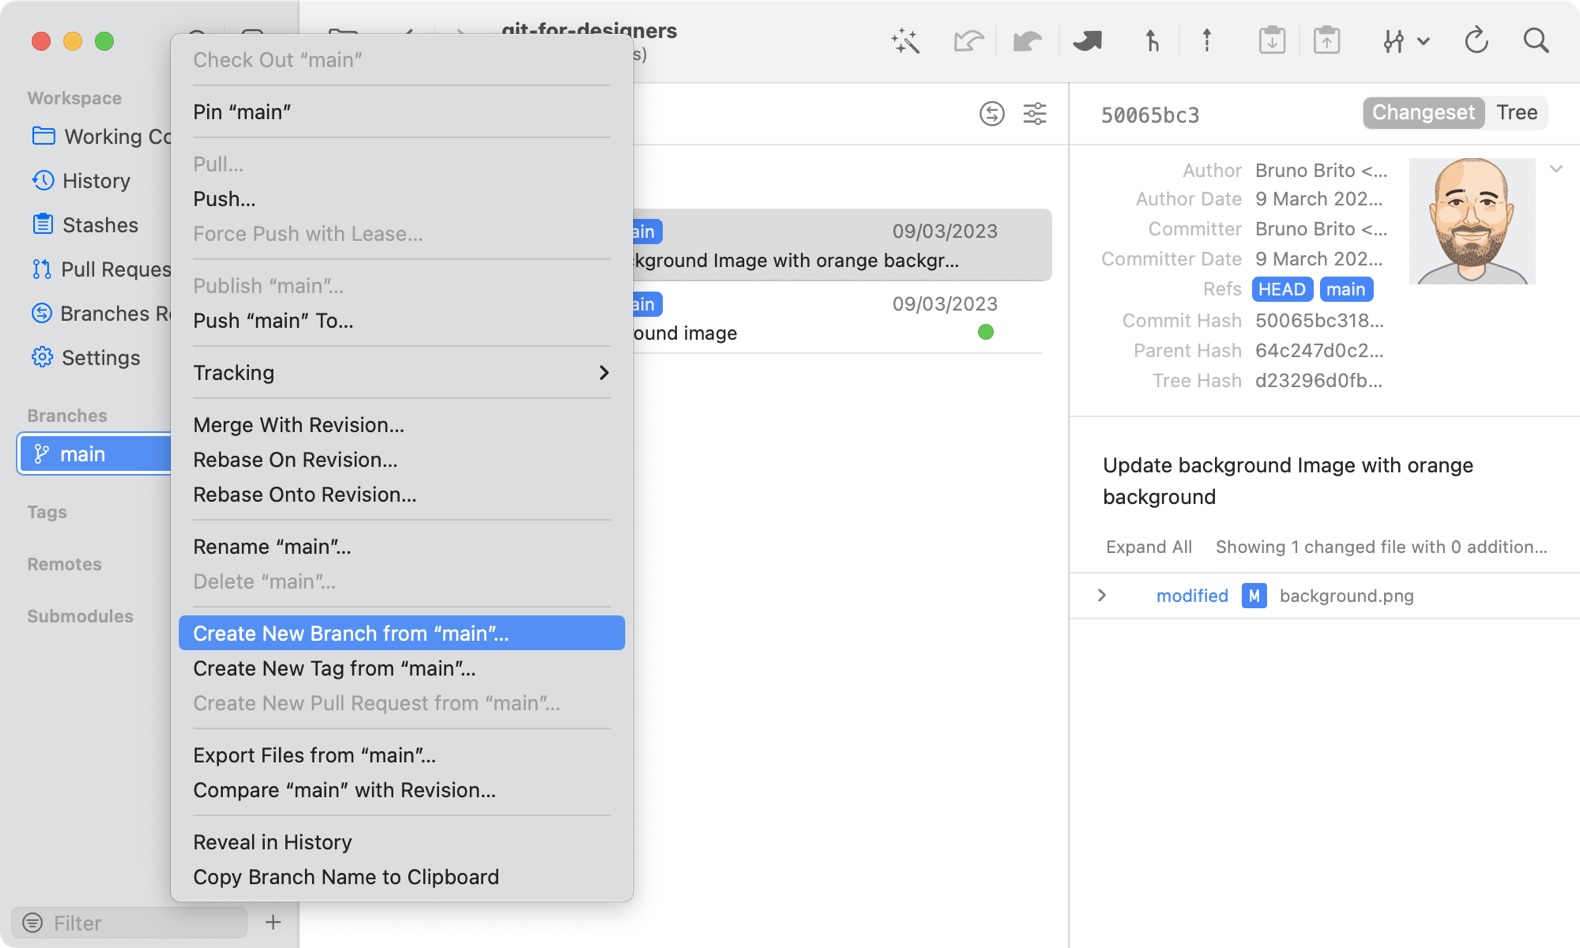
Finally, let's see how we can perform these two important actions in Tower. In the "Branches" section, located on the left, you'll notice that "main" (or "master") is the only available branch. This is the case when you're working on a new repository but if you've cloned another project, you may have plenty of branches to choose from.
Let's create a new branch based on "main", the only branch we currently have. To do so, right-click on it and select "Create New Branch from main". While we usually pick the latest commit as the starting point, this is not mandatory — it could be any commit.
Before naming your branch, it's a good idea to check with your team if there is a naming convention they prefer you to use. Typically, naming it after the feature you'll be introducing is appropriate. Let's work on the featured image once again, by naming it hello-world-new-featured-image.
You will notice that the "HEAD" label has moved from "main" to "hello-world-new-featured-image". This indicates that you're now ready to work independently from the "main" branch.
Once the task is complete and you commit your changes, you can push your changes so that you can ask your colleagues to check out that branch and review your work, or you can simply go ahead and merge it!
You can do a merge in Tower with a simple drag and drop action. First, let's checkout "main" again, to make it our current "HEAD" branch, and then drag the hello-world-new-featured-image branch to this one. The missing commit will be transferred to the "main" branch.
Excellent! We can now delete the "hello-world-new-featured-image" branch. As repositories grow in size, it's always a good idea to remove these short-lived branches when they're no longer needed.
Assuming you have write permissions to the repository, this covers the basics of collaborating with Git. If you don't, you can still contribute to a project you like — that's the beauty of open-source!
To contribute to open-source projects, you will need to become familiar with Pull Requests. Don't worry, we cover this process in great detail in this article.
Final Words
Well done! By reading this article and getting some practice, you are now equipped to harness the immense power of Git. The best part? You don't even have to open a terminal or write any code to do so 😎
While we've covered all the essentials to get you started, Git and Tower are incredibly versatile tools with so much more to offer. Head over to our Learn section to explore additional resources such as videos, books, and webinars that will help you take your Git skills to the next level.
Not a Tower user yet? Download our 30-day free trial and experience a better way to work with Git!
PS: Did you know? Tower Pro is now free for students as well as teachers and educational institutions!