If you want to get the most out of Tower for Mac, then this post is for you. We talked about this internally, had a look at your most frequently asked questions, and eventually came up with a list of our own best tips and tricks. After reading this guide, we're confident you'll become (at least) "10% More Productive" with your favorite Git client!
New Series: "10% More Productive"
This is part 4 of our series titled "10% More Productive". Be sure to check out our tips on:
- Mastering the Keyboard
- Mastering Sublime Text
- Mastering the Terminal
- Mastering Tower for Mac ← you are here!
- Mastering Google (for Developers)
- Mastering macOS
- Mastering SEO for Developers
- Mastering Tower for Windows
Sign up for our newsletter to get notified about the next episode!
What's on the menu for today? A bit of everything to become more confident and productive while working with Tower.
We will highlight Tower for Mac in this guide, but Tower is also available for Windows. If you haven't installed our Git client yet, you can download our 30-day FREE Trial.
If you're an avid Tower user, we're certain you're already familiar with some of Tower's outstanding features and productivity hacks. But do you know all of them? Let's find out!
We also put together a quick 10-minute video that presents all the tips mentioned below:
Ready? Let's begin!
1. Navigation at the Speed of Light ⚡
While there is nothing wrong with clicking around, you can navigate between projects and views much faster if you master a few keyboard shortcuts.
We're big fans of keyboard shortcuts (as this article may suggest) and Tower has plenty of them. We'll look at the most important ones in this guide.
For your convenience, you can download our Tower Cheat Sheet, available for both Mac and Windows.

Quick Open
To quickly open any repository, press ⇧ + ⌘ + O to launch Tower's "Quick Open" window.
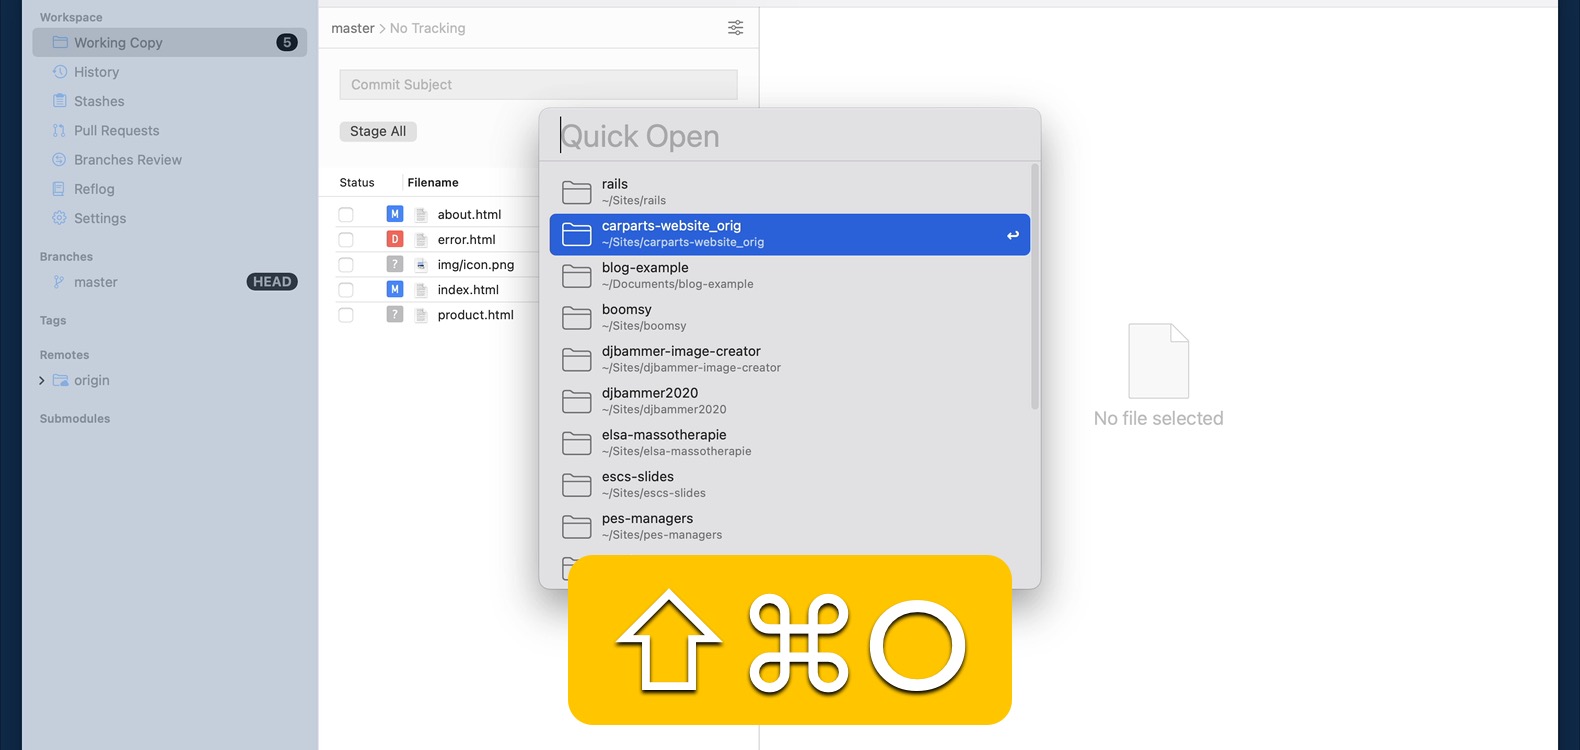
While the input field is empty, the repositories will be sorted by the date they were last opened. Simply start typing to find the project you're looking for.
Want to open the repository in a new window? Just hit ⌥ + ⏎.
Quick Open lists every repository available in your Home Directory — not just the ones you've already opened in the past. This is the default option, but you can visit the "Advanced" tab in the Preferences window to disable it. On that screen, you can also determine which folders Tower should ignore.
Navigating Between Views with the Keyboard
Now that you're already inside a project, you can quickly jump to a different view by pressing one of the following keyboard shortcuts:
- ⌘ + 1 to show the "Working Copy" view;
- ⌘ + 2 to show the "History" view;
- ⌘ + 3 to show the "Stashes" view;
- ⌘ + 4 to show the "Pull Request" view;
- ⌘ + 5 to show the "Branches Review" view;
- ⌘ + 6 to show the "Reflog" view (this shortcut will show the view even if you have "Show reflog in sidebar" disabled in the Preferences).
⌘ + 0 will show the HEAD branch.
Finally, you can press ⌘ + CTRL + S and ⌘ + CTRL + R to easily toggle between "Services" and "Repositories" view.
Quick Actions
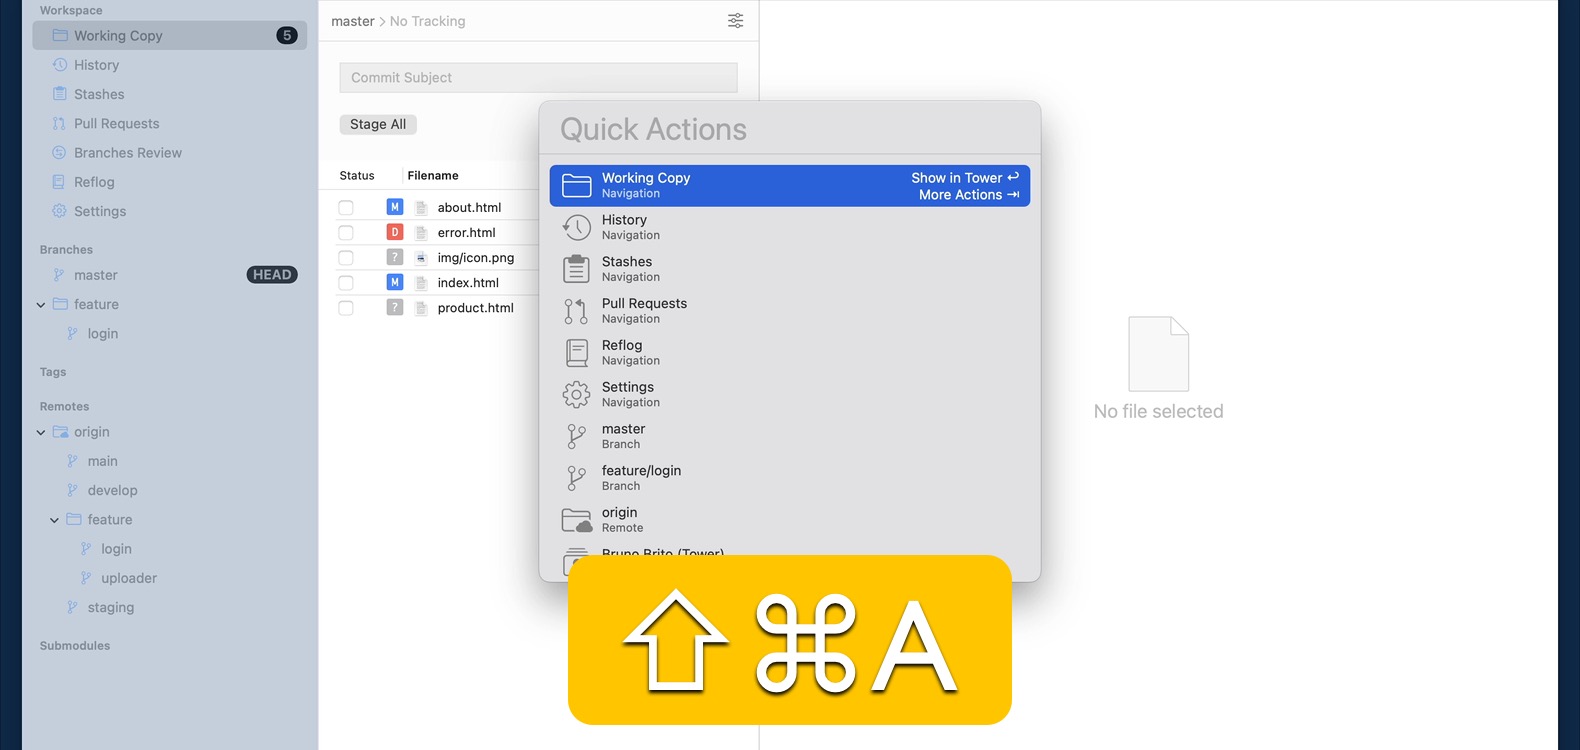
Command Palettes are very popular among developers; Tower has a similar feature and it goes by the name of Quick Actions.
Inside a project, press ⌘ + ⇧ + A and start typing — the suggested actions will be contextual.
Here are some powerful actions you can perform:
- search for a file;
- switch between themes;
- checkout branches or tags;
- set a different Committer Identity.
2. Better (and Faster) Commits
We spend a reasonable amount of time in the "Working Copy" view, so let's see how we can stage files and commit faster.
Staging
Press the SPACEBAR to stage the currently selected file. This is the default behavior in Tower, but you can visit the "Preferences" window and set it to "Quick Look" the selected file instead.
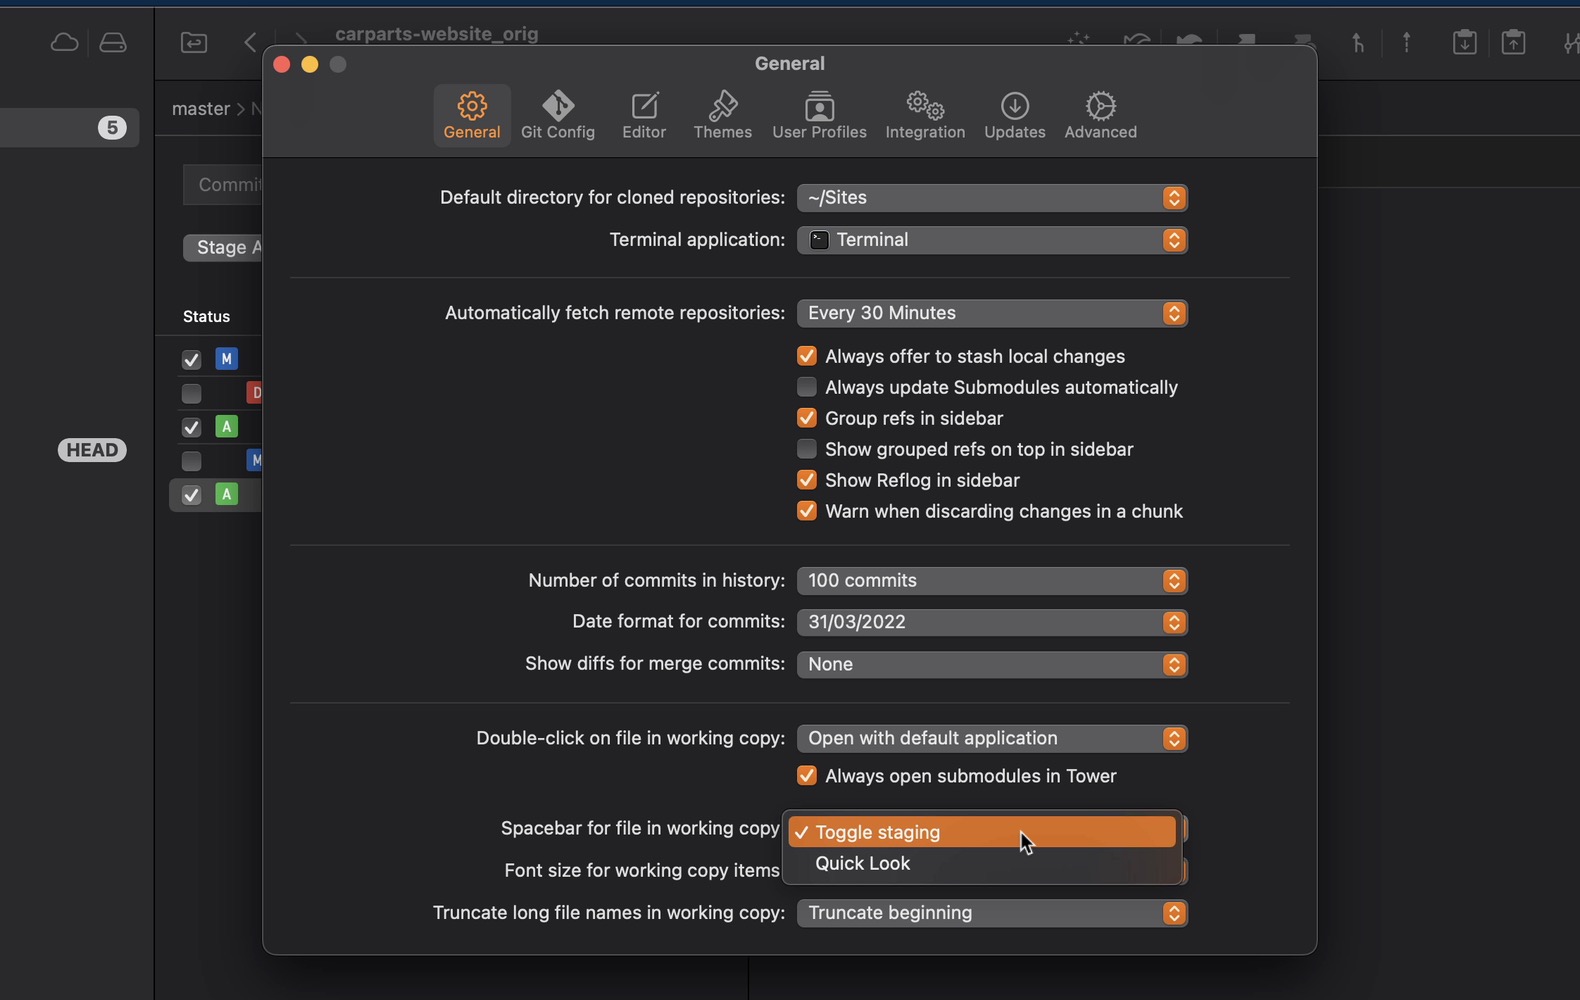
⌘ + ⇧ + E will stage all current changes (⌘ + ⇧ + ⌥ + E will perform the opposite).
Finally, ⌘ + ⇧ + BACKSPACE will discard any local changes to the selected file.
Committing
Hit ⌘ + ⇧ + C to quickly activate the commit dialog. This shortcut works from all views, which comes in very handy.
Tower can help you in writing a better commit message — try typing the following:
\to insert a file name;c:to reference a commit;#to address an issue (you can even use keywords such as "closes/fixes/resolves"), provided you have configured a Services account in Tower.
If that sounds like too much to memorize, worry not: you can just type / in the Commit Subject field and a list of relevant commands will appear.
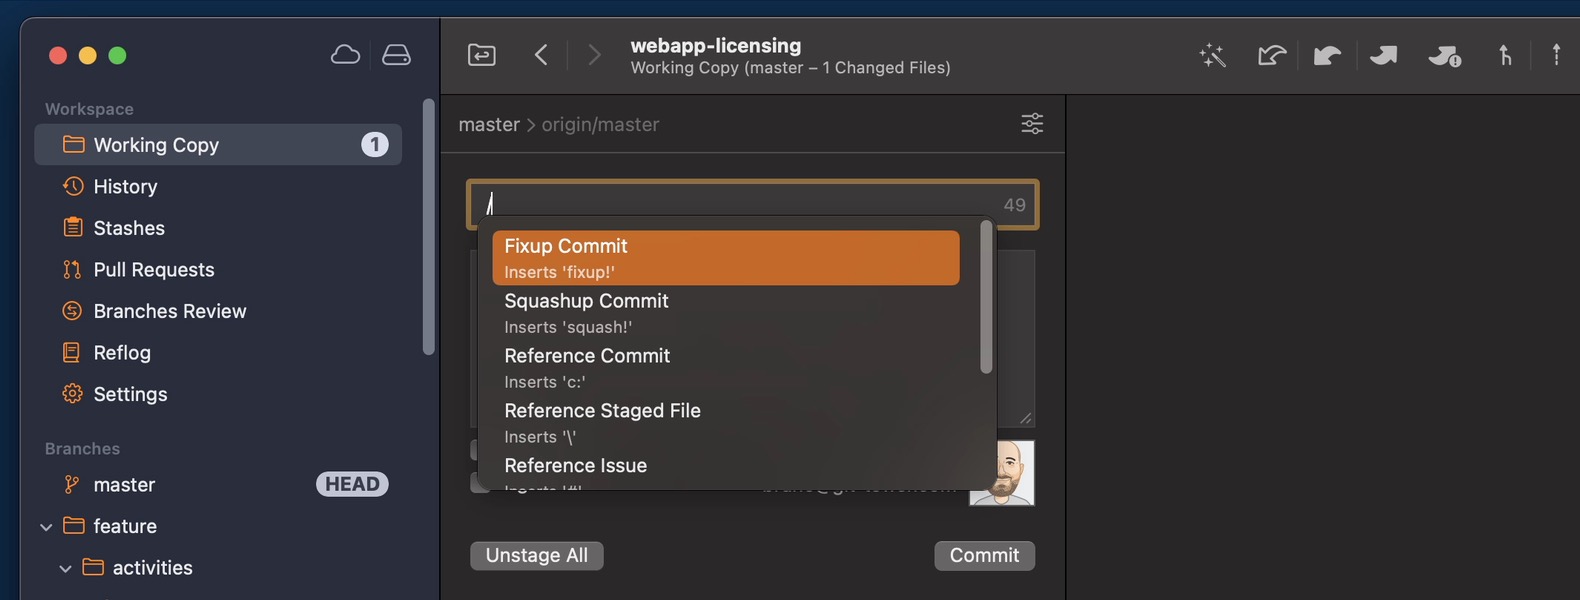
With the Subject of the commit message out of the way, you can either hit ⏎ to jump to the "Body" field or ⌘ + ⏎ to add this commit to the commit history.
BONUS TIP: if you're looking for a way to quickly Amend the previous commit, press ⌥ — the "Commit" button will transform into "Amend" and the last commit message will automatically fill the message text field.
Not a Tower user yet?
Download our 30-day free trial and experience a better way to work with Git!
3. Workflow Tips
Drag and Drop
We've given the keyboard a lot of love, so let's shift our attention to some interesting actions you can achieve with the mouse.
Many complex Git commands can easily be performed in Tower with a simple "Drag and Drop" gesture. Let's explore this feature next.
Creating a New Branch or Tag
Drag and drop a commit item onto the "Tags" or "Branches" sections in the sidebar to create a new branch or tag based on that commit.
In Tower's sidebar, you can also drag a branch and drop it onto the "Branches" section to create a new branch based on the dragged one.
Pulling, Pushing, Merging, and Tracking Branches
If you drag and drop a branch onto another branch (while optionally holding down ⌥ or ⌘) you will be able to pull, push, merge, or track a branch.
Cherry-Picking
Similar to the previous tip, you can cherry-pick a commit by dragging it from the "History" view to the "Working Copy" item in the sidebar, or directly to the HEAD branch.
Interactive Rebasing
In the "History" view, simply drag and drop a commit to move it around. Be aware that this will rewrite your commit history.
Squashing
To squash multiple commits into a single one, simply click and drag one commit to another (you will see a "+" symbol). All file modifications will be added to the latter.
Squashing preserves and combines all commit messages, but if you just want to keep the original message, you can hold the ⌥ key to fixup commits instead.
You can also start your commit message with "squash!" or "fixup!" and pick an existing commit. After making that commit, switch to your HEAD branch's history and you will find a button at the top to conclude the process.

Like in the previous tip, this action will rewrite history, effectively generating a new commit. You will probably want to erform this action in your local repository only, before pushing your changes.
Chunk and Line Staging
In Tower, you can specify the exact chunks and even lines you want to commit. If you're a fan of small, granular commits, you'll definitely benefit from this powerful feature.
All you have to do is click on the lines (or chunks) you would like to add to the next commit. You can then review what is staged or unstaged before making it official.
Undo
In Tower, you can undo most actions by pressing a familiar keyboard combination: ⌘ + Z.
As a general principle, try undoing any undesired action (such as a commit, a merge, a discard chunk or a branch deletion) with that keystroke. You can always redo the action by pressing ⇧ + ⌘ + Z.
Set Assume Unchanged
Say you need to modify a file locally, without wanting to commit those changes to the repository. How would you go about it?
If such files are untracked, ignoring or excluding would do the job. However, in this case, we simply want to have our local changes ignored. Enter "Set Assume Unchanged".
Simply right-click the file and click on "Mark > Set Assume Unchanged". Done!
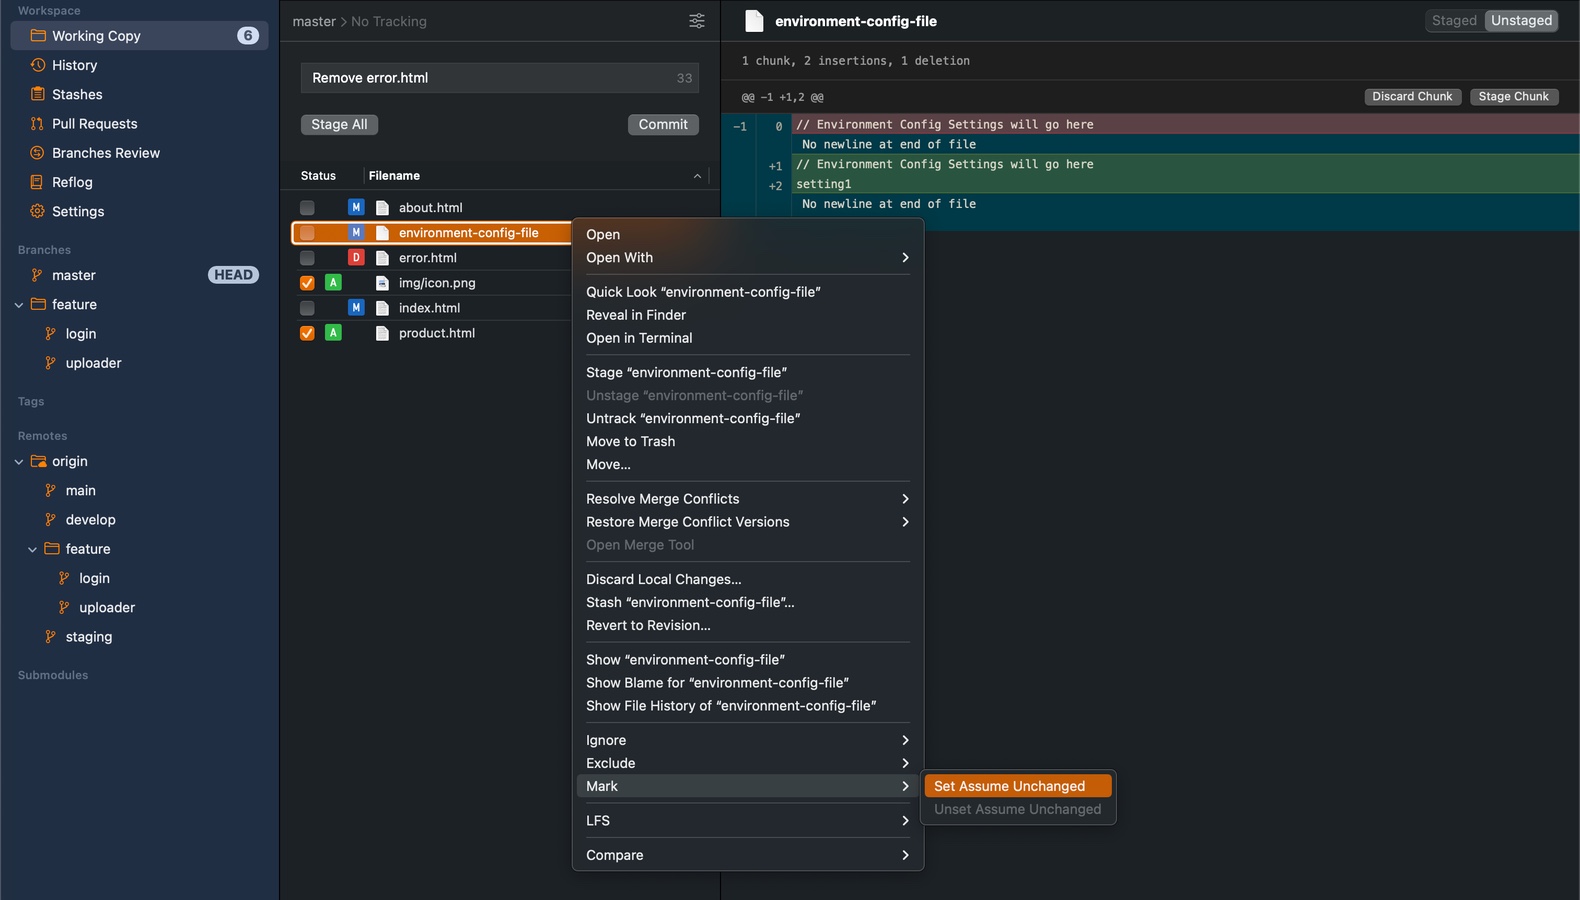
At some point, you may want to change this setting. You could undo with ⌘ + Z, of course, but since you will probably need to change this setting at a later date, you can tell Tower to "Show Assume-Unchanged" items, like in the example below:
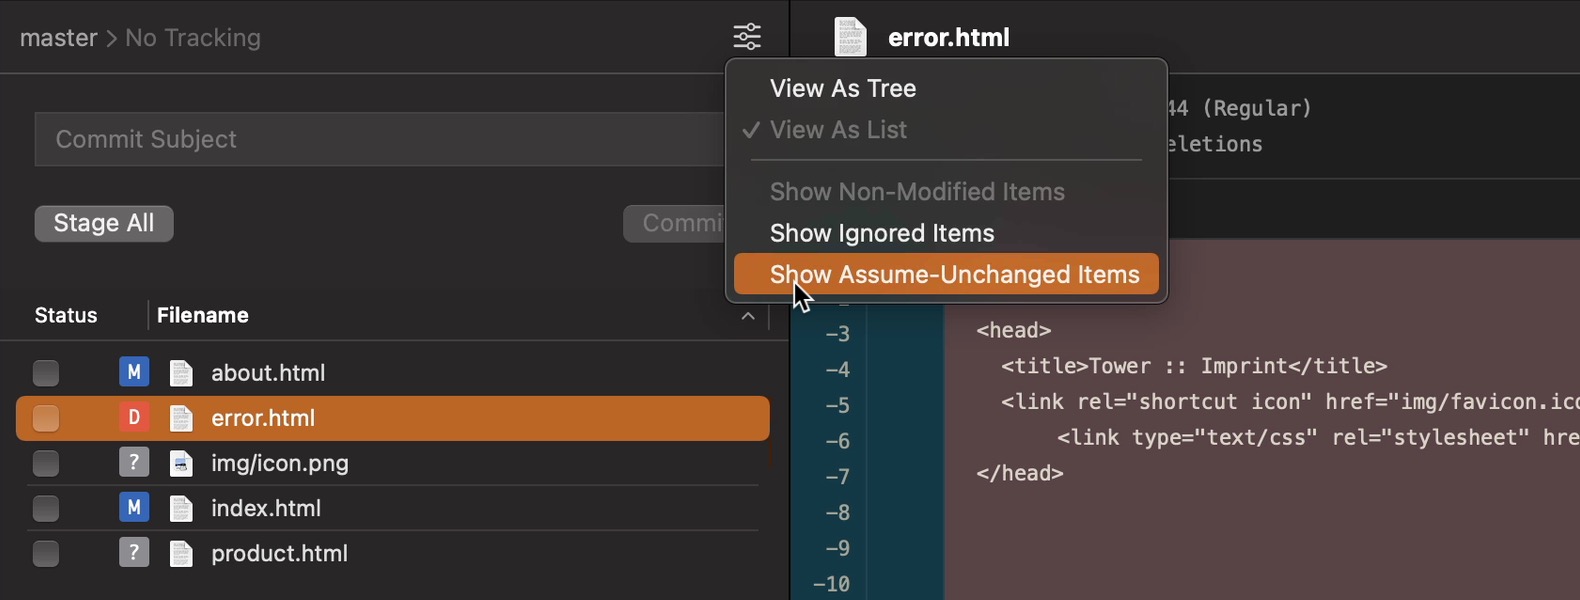
Working Copy View Modes
Now would also be a good time to remind you that you can choose a different Working Copy view mode in Tower.
By default, Tower shows you just the modified files in a list view, but you can examine all your project files by selecting "View as Tree" and "Show Non-Modified Items".
Accessing File History (and Restoring Previous File Versions)
You can combine the previous tip with this one to quickly inspect how a file evolved over time, or restore a previous version.
Right-click any file and select "Show File History" to view all the commits that affected that file. After detecting the commit that piqued your interest, right-click on it and select "Restore [FILE] at Revision [REVISION]" to bring that version back to your working copy. Please note that this will overwrite any other current local changes in those files.
You can also click on "Export [FILE] at Revision [REVISION]" instead of "Restore" to download a ZIP package with that version of the file.
Stashing
Stashing is an important action whenever you need to save your uncommitted changes and leave your working copy in a clean state — because you need to pull the updates to the branch or checkout a different branch, for example.
You can press ⌘ + ⇧ + S to stash your work. ⌘ + ⇧ + ⌥ + S will then apply it.
Alternatively, you can stash a single file by right-clicking on it in the working copy view.
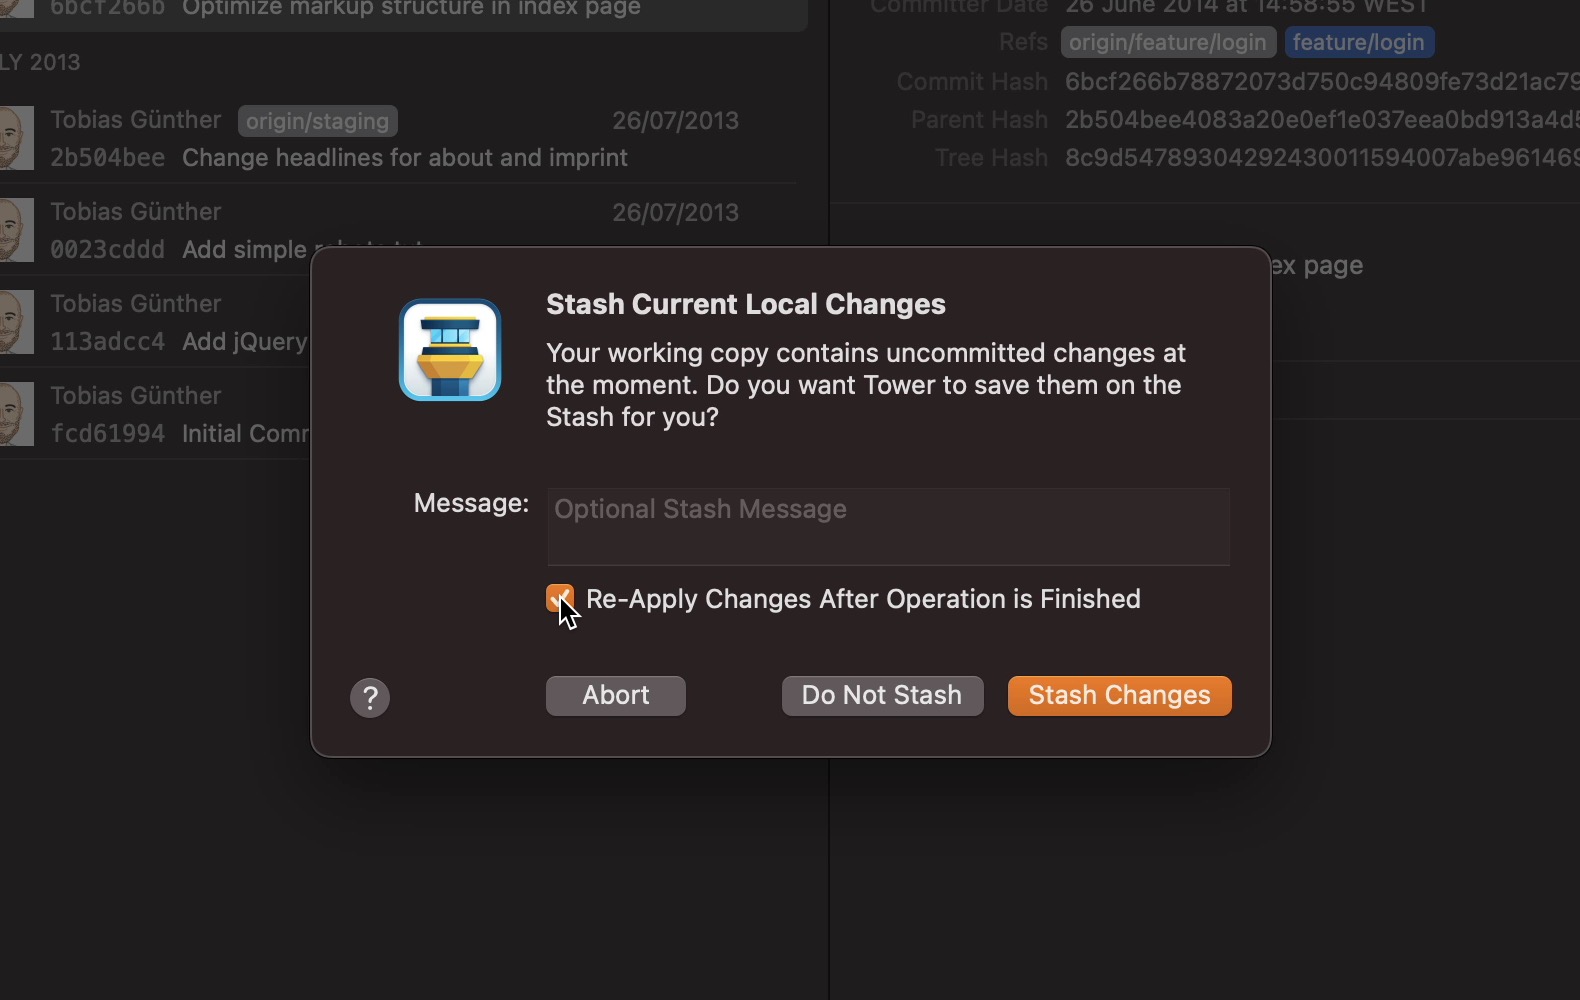
If you attempt to switch branches with a dirty repository, Tower will ask you if you would like to stash your files. If you want to bring your changes to the new branch, tick the "Re-apply Changes After Operation is Finished" box — it will automatically stash the changes, switch branch and pop those changes (similar to the git switch command).
Get started with Tower — FREE for 30 days!
Download our FREE trial and explore all these Workflow Tips in your own time!
Quick Fetch/Pull/Push/Merge/Rebase
Wish you could skip the dialogues whenever you clicked on one of the Fetch/Pull/Push/Merge/Rebase buttons? If so, the ⌥ key is your new best friend.
By holding down this key, a quick variant will be performed using the default values as a reference.
Working with Branches
If you switch branches often, you should know that you can pin your favorite branches for improved accessibility. Simply right-click any branch and select the "Pin [BRANCH]" option.
To quickly access any branch, you can type its name using Quick Actions or by pressing ⌘ + ⇧ + B, but you can also filter it by typing the name in the input field located at the bottom of the sidebar. This works for tags and submodules alike.
Force Push with Lease
Force Push (git push --force), while sometimes necessary, can be a dangerous command — as we detailed in our Force Push guide. In essence, it can overwrite some of your team's commits without you even noticing it, since they weren't fetched.
Luckily, there's a safer alternative: "Force Push with Lease" (git push --force-with-lease). The big advantage of this command is that it allows you to force push in Tower without risking to overwrite someone else's work unintentionally. It's the default option in Tower, so whenever you force push and there are newer commits on the remote, you'll always see a warning first.
You can Force Push with Lease by clicking on "Repository > Force Push with Lease" or by pressing ⌃ + ⌘ + U. If you use this command often, you may also want to consider dragging the toolbar icon to the customizable toolbar.
Rebase Onto
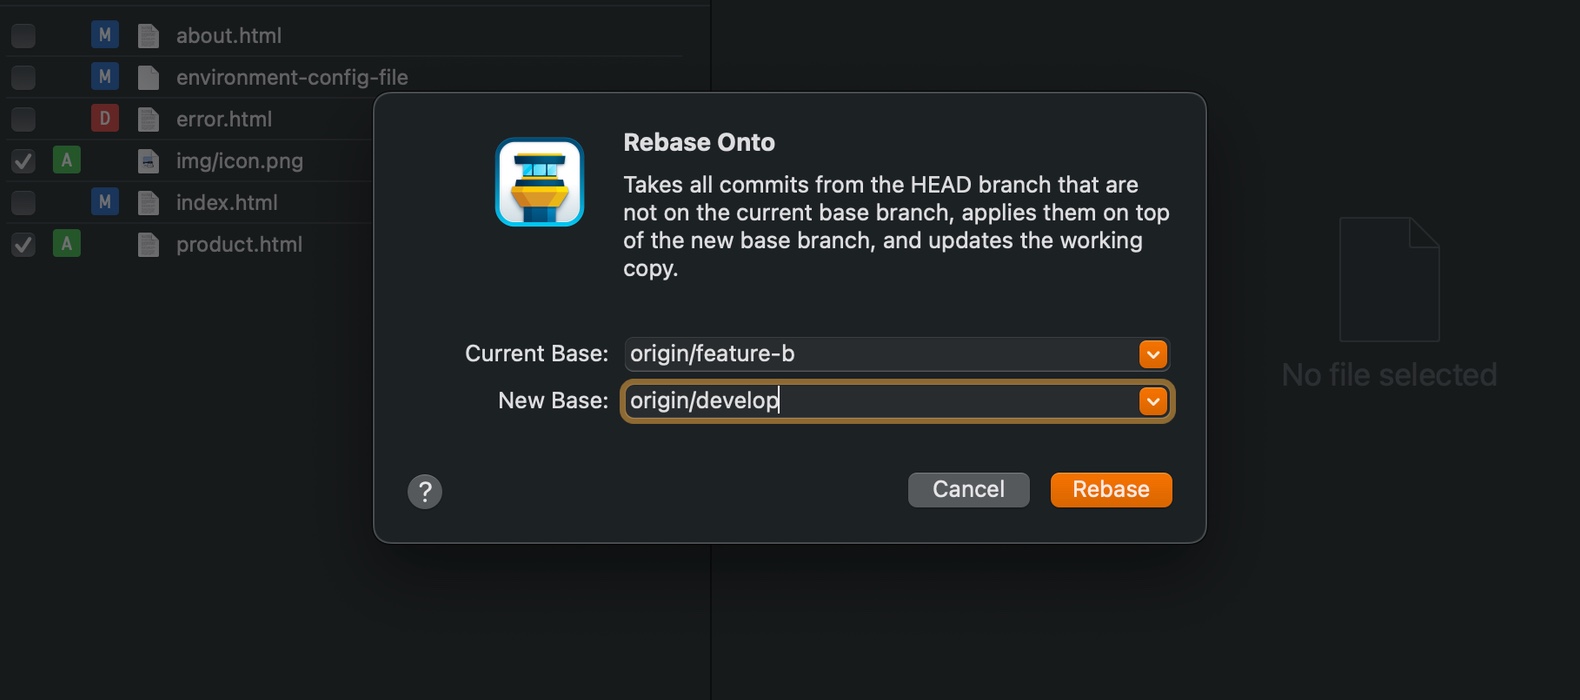
"Rebase Onto" is a helpful command whenever you would like to take all the commits from the HEAD branch (that are not on the current base branch) and apply them on top of a new base branch. A common use case is when you want to switch the base of a feature branch to a different branch.
You can perform this action by clicking on "Working Copy > Rebase Onto", by right-clicking the HEAD branch, or by pressing ⌃ + ⇧ + ⌘ + R.
4. Settings to Tweak
Changing your Theme
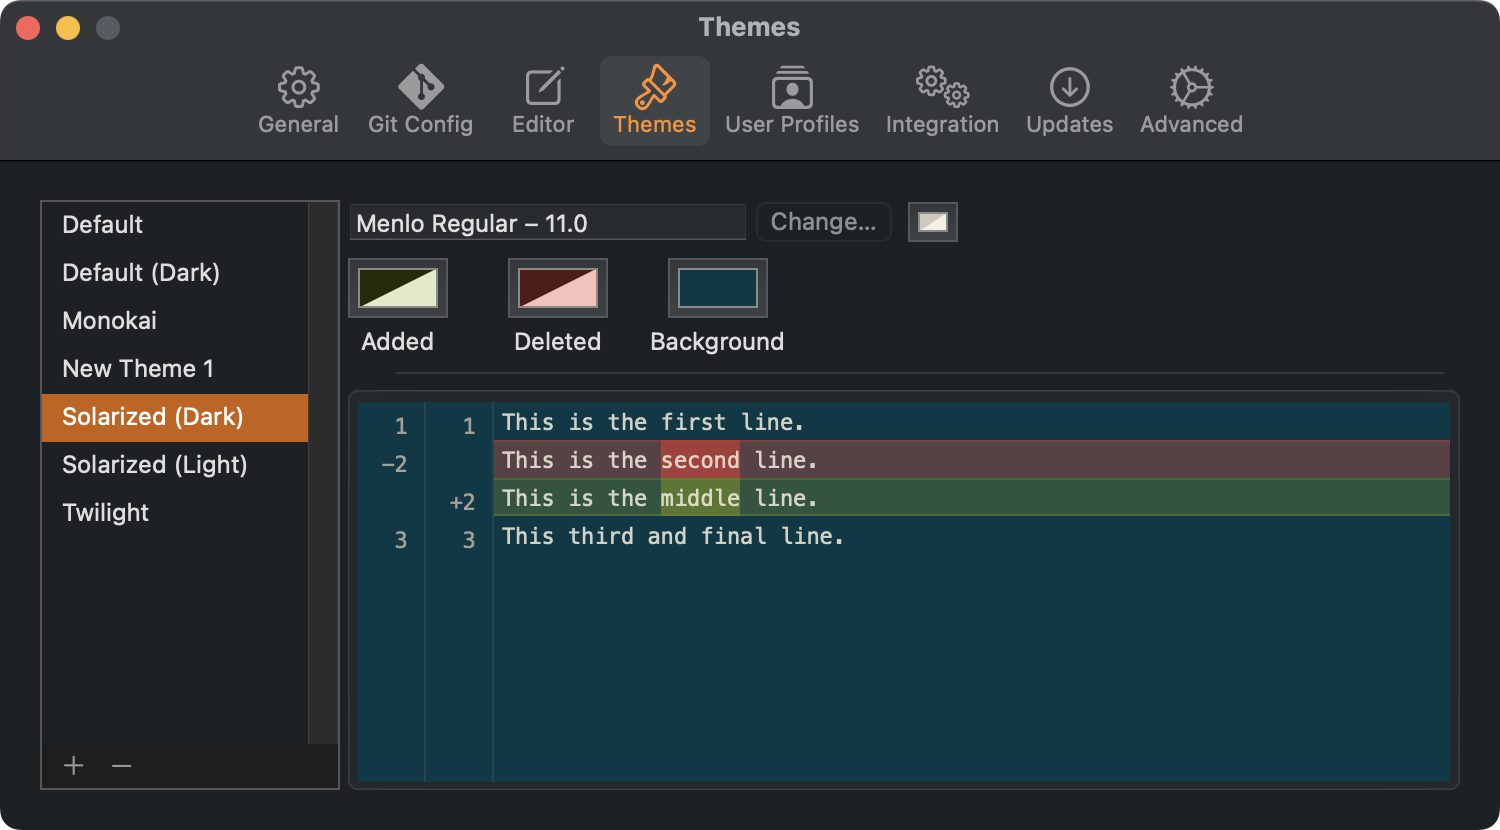
You can set a different color scheme in the "Themes" tab in the Preferences window. Personally, I'm a fan of Solarized (Dark).
If you're not happy with the options provided, you can always come up with your own! Choose a different font and set new text and background colors. You can also tweak the "Added" and "Deleted" shades.
Setting a Default Cloning Directory
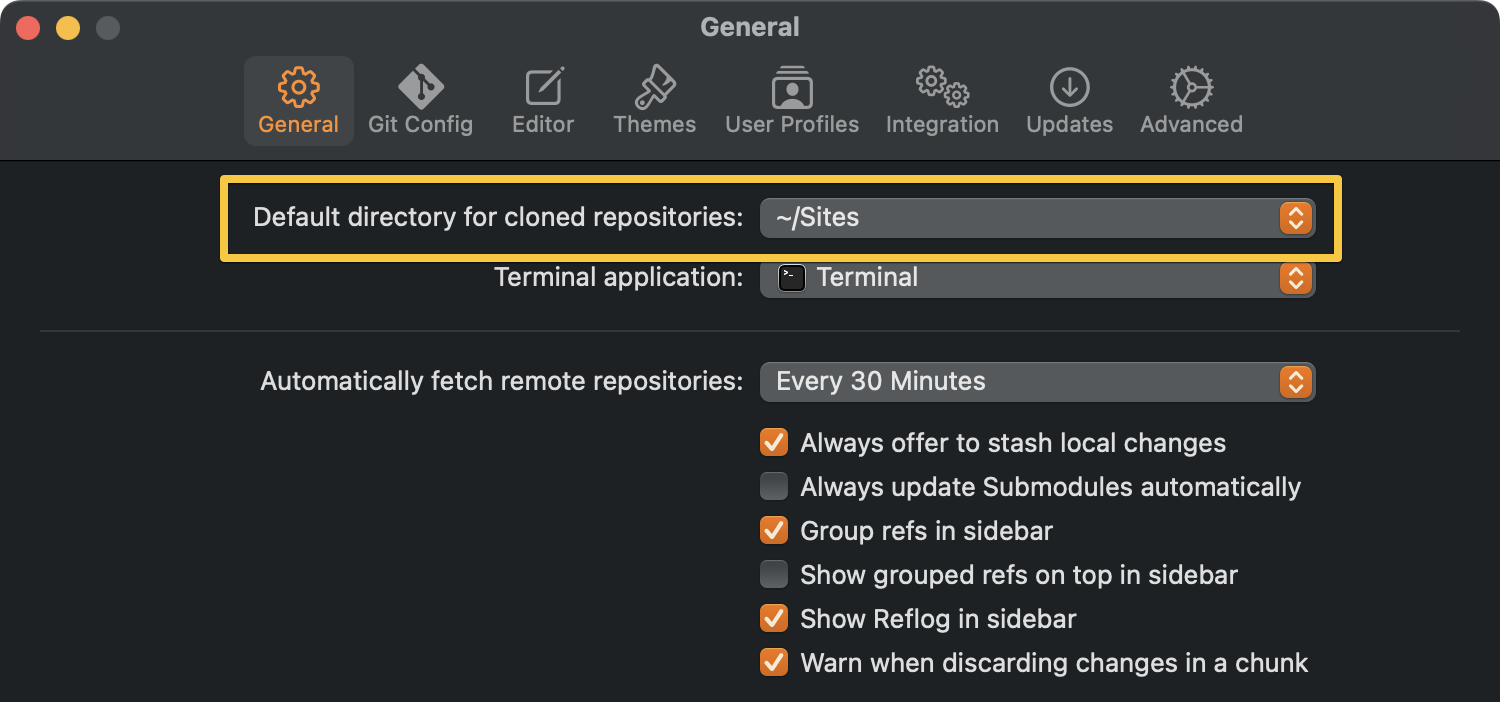
Find yourself cloning repositories often? Make sure you're cloning them to the right folder!
Visit the "General" tab in the Preferences window to define which should be the default directory for cloned repos.
Automatically Sign Commits and Tags (GPG)
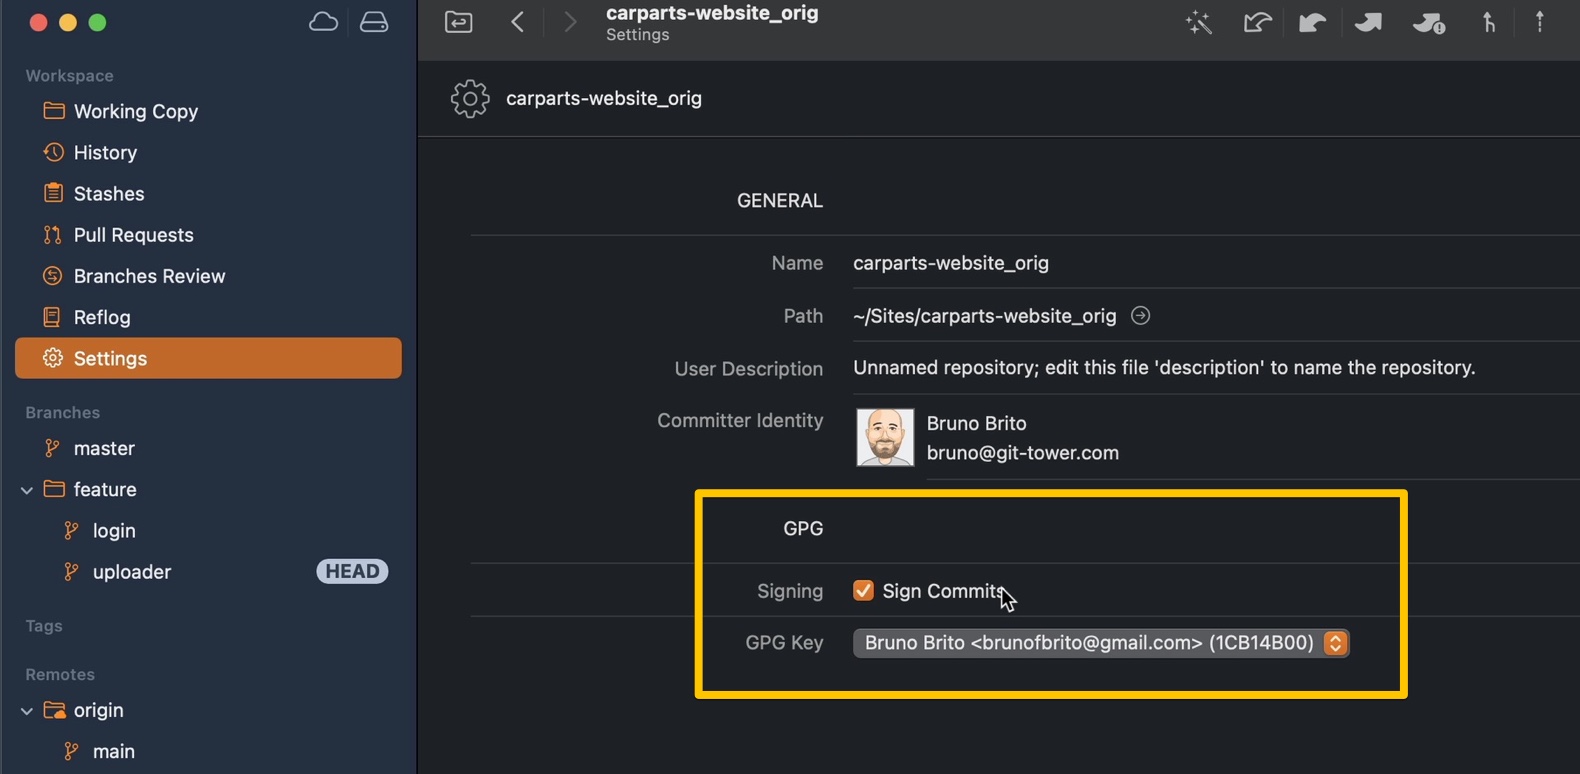
Tower provides seamless GPG support and it can automatically sign new commits for you. Other actions, such as merging or cherry-picking, will also be included.
You can set this globally or just for certain Git repositories.
You can also sign tags automatically by simply checking the checkbox inside the "Create New Tag" dialog.
Switching Author Profiles
To easily switch between different identities while committing, you can create several user profiles in Tower's "User Profiles" tab, inside the Preferences window. You can even assign different GPG keys for each profile.
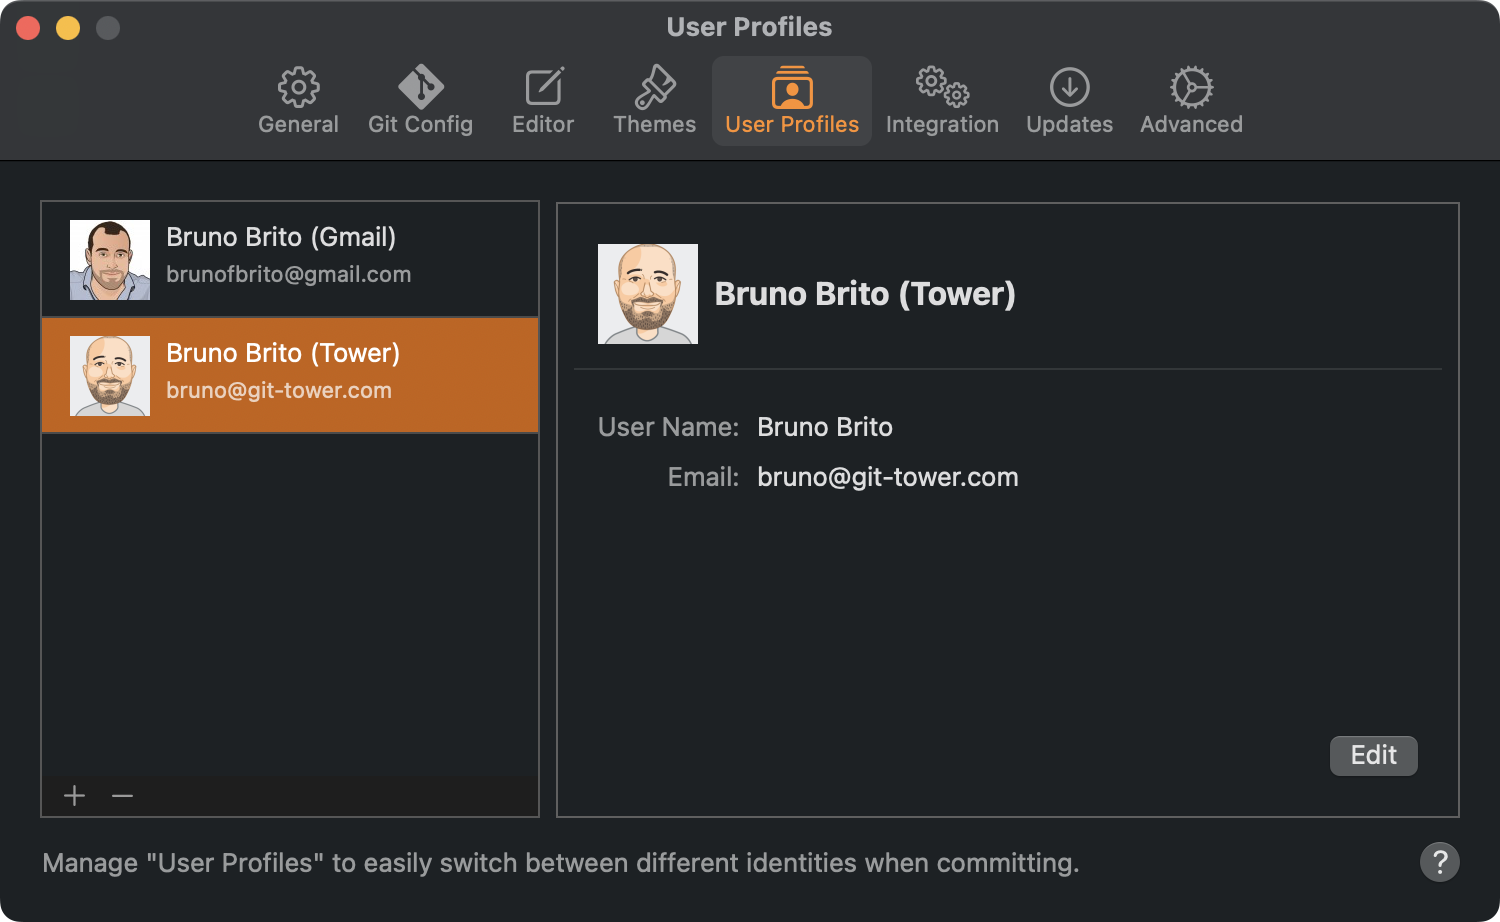
You can then switch identities before committing in the Working Copy view, or define the default identity for that specific repository in the Settings view.
Not a Tower user yet?
Download our 30-day FREE trial and try out all the features mentioned in this guide.
5. Powerful Features (That You Might Not Know About)
Image Diffing
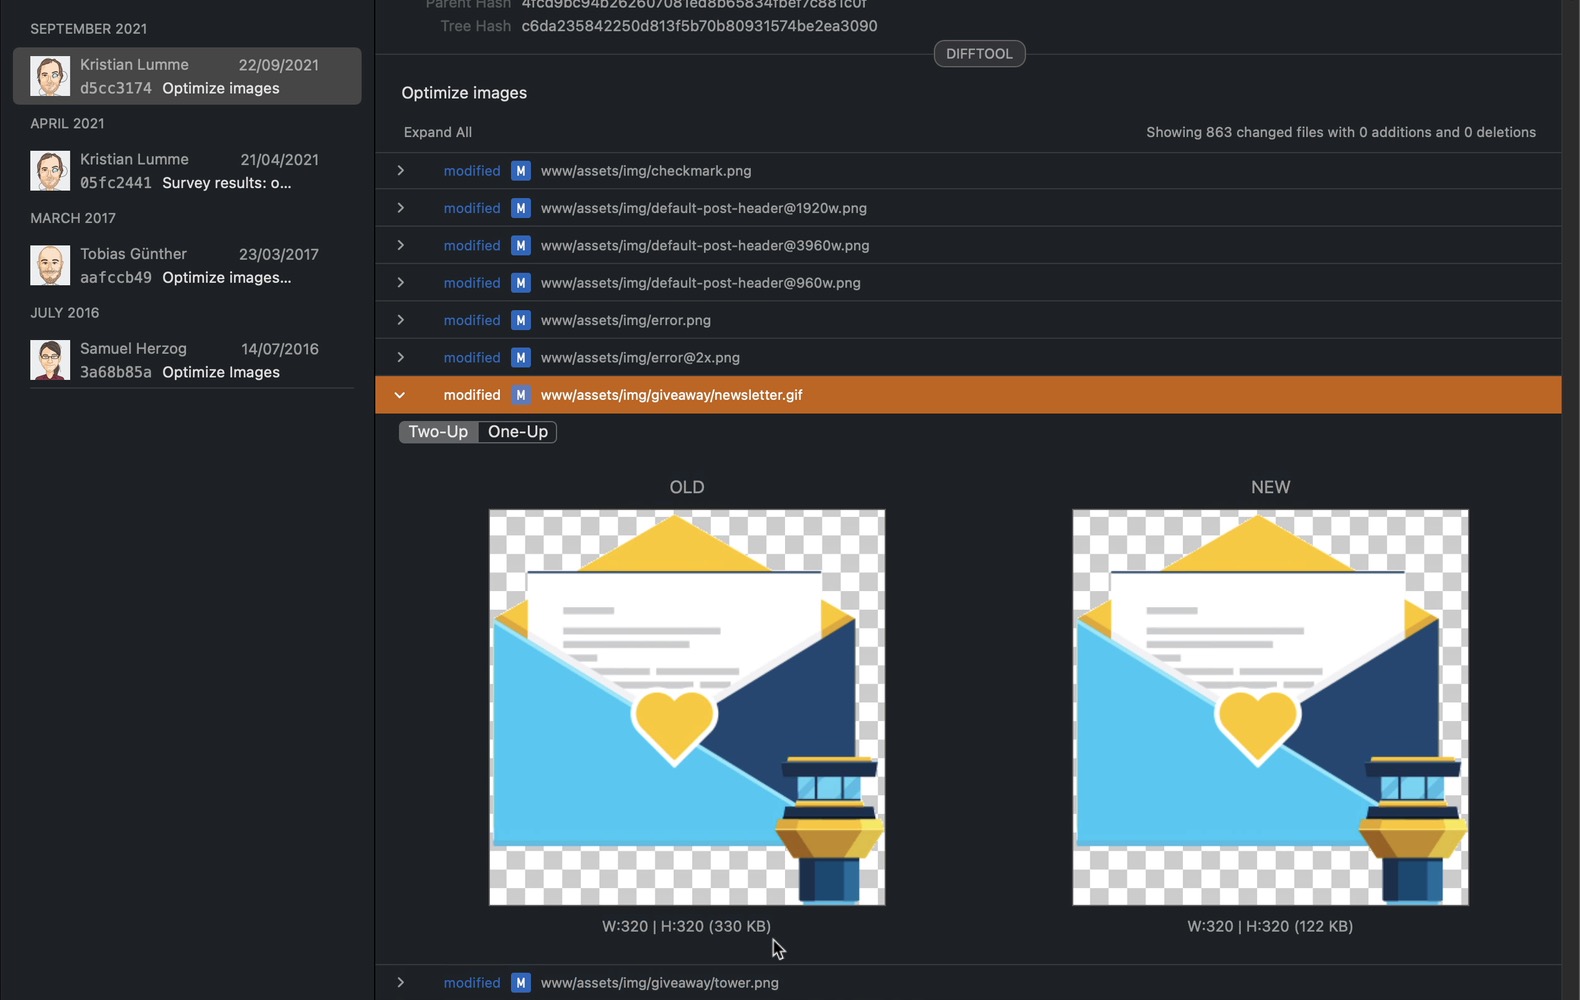
Tower has an integrated "Image Diffing" feature that supports all the most popular file formats: PNG, JPG, GIF, BMP, TIFF, JPEG2000, and HEIC.
I found this feature exceptionally useful when I compressed hundreds of images with image optimization tools and wanted to have a look at the result, comparing the two images (and their file sizes) side-by-side.
Advanced Filtering
Our "Search" functionality lets you filter commits by Author, Date, Message, Commit Hash, or File. But did you know you can combine these search filters?
Very handy when you're looking for the commits from a colleague during a specific time frame!
Comparing Branches
It can be very helpful to compare a feature branch to a base branch to review all the changes introduced. Tower has you covered!
While viewing a branch's history, click on the "Compare" icon to compare that branch against a different local branch.
You will have access to the exclusive commits and the number of commits the branch is behind. If a merge would lead to merge conflicts, a warning will also be displayed.
Cleaning Up Merged Feature Branches
As projects grow, your repository may contain several branches that have been fully merged, but haven't yet been removed. After a while, it's easy to lose track of which branches can be safely deleted.
In our "Branches Review" view, you can filter by "Fully Merged" to pinpoint the branches that can be removed without hesitation. Time to clean up your repository!
Final Words
You made it to the finish line! Congrats: you're now a certified Tower sensei! 🥳
I hope you enjoyed this guide! If you'd still like to learn more, have a look at our Documentation — we cover not only Tower, but Git and Version Control as well.
For Tower updates and future episodes of "10% More Productive", keep an eye on our blog, sign up for our newsletter below or follow us on Twitter!
Join Over 100,000 Developers & Designers
Be the first to know about new content from the Tower blog as well as giveaways and freebies via email.
