
Search Engine Optimization (SEO) plays a crucial role in ensuring your website performs well with search engines, ultimately driving organic traffic and pageviews. While content creation is typically handled by bloggers or the marketing team, developers hold the key to implementing the technical foundations that can significantly enhance a website's performance.
However, in my experience, many web developers are unaware of the diverse techniques and opportunities that exist in SEO-land. Nowadays, SEO goes well beyond keyword research and obtaining backlinks; it encompasses best practices that involve user experience, page speed, mobile optimization, security, accessibility, and more.
In this comprehensive guide, I aim to cover all the essential concepts that web developers should be aware of. What sets me apart is my unique position — I work in Marketing and hold a Marketing degree, but I've also built numerous websites using various platforms and frameworks, ranging from vanilla HTML/CSS/JS to Drupal, WordPress, Kirby CMS, Gatsby, and NextJS.
Let's get your website ready for search engine success!
New Series: "10% More Productive"
This is part 7 of our series titled "10% More Productive". Be sure to check out our tips on:
- Mastering the Keyboard
- Mastering Sublime Text
- Mastering the Terminal
- Mastering Tower for Mac
- Mastering Google (for Developers)
- Mastering macOS
- Mastering SEO for Developers ← you are here!
- Mastering Tower for Windows
Sign up for our newsletter to get notified about the next episode!
To understand how to rank for our desired search terms, it's crucial to grasp how search engines operate. While several options exist, including Google, Bing, Yahoo!, or DuckDuckGo, they all follow three fundamental steps:
To effectively showcase various SEO techniques, I believe it's best to present them while explaining each stage of this process. So, let's learn how Crawling works!
Crawling
Every search engine employs a bot, often referred to as a spider, that tirelessly scours the web to discover new content. These inquisitive beings spend their days following links, constantly on the lookout for updates or deletions on web pages. They are very curious fellows who basically follow links 24/7 for fun!
As a developer, your role is essential in ensuring that search engines can successfully crawl your site. After all, how can a search engine recommend your website if it doesn't know about it in the first place?
As an initial step, you can use one of Google's useful operators to verify if Google is aware of your website. Simply perform a search using the site:yourdomain.com operator, and you will be able to see if any of your pages are currently included in Google's index. You can learn more about Google operators here.
In any case, let's explore some techniques to facilitate effective crawling. There may be situations where you prefer to prevent your content from being indexed by search engines. Don't worry, you'll learn how to block specific pages or sections from bots as well!
1. Uploading a sitemap.xml file to ensure discoverability of your content
Search engines are generally proficient at following links, so assuming your website is well-linked, most pages should be discovered. However, there's a step we can take to make their task easier: creating a sitemap!
Sitemaps are highly recommended, particularly for large or newly established websites with limited external linking. They help ensure the discoverability of isolated pages.
Although various formats exist (such as RSS or TXT), XML is typically the recommended choice. A standard XML sitemap typically looks like this:
<?xml version="1.0" encoding="UTF-8"?>
<urlset xmlns="http://www.sitemaps.org/schemas/sitemap/0.9">
<url>
<loc>https://www.example.com/index.html</loc>
<lastmod>2023-07-04</lastmod>
</url>
</urlset>
Always use the complete, absolute URL when creating your sitemap. Keep in mind that there is a size limit of 50,000 URLs or 50 MB for a sitemap file. If your site exceeds these limits, you will need to split the sitemap into multiple files.
Regenerating the sitemap every time a new URL is added can become a tedious process. Thankfully, if you're using a CMS, you can often find plugins that handle this task for you. For example, WordPress offers SEO plugins like Yoast SEO, Rank Math SEO, or The SEO Framework that can simplify the process.
Popular JavaScript frameworks like Gatsby or NextJS often include built-in sitemap generators. Alternatively, for custom projects, I've found success using this npm package. There are also online tools.
Once your sitemap is ready, you (or your team) should submit it to search engines. You can do this by adding it to the Google Search Console and Bing Webmaster Tools. Additionally, you can also include the sitemap reference in your robots.txt file, which we'll look into in the next section.
2. Guiding the Robots with a robots.txt File
A robots.txt file allows you to control what URLs, file types, or entire sections of your website are blocked from search engines. This is particularly useful for staging environments or when you want to restrict access to specific areas.
The syntax of the robots.txt file is straightforward, and you can create customized rules for different bots. Here's an example:
User-agent: *
Disallow: /private/

User-agent: Googlebot
Disallow: /useless_file.html

Sitemap: https://example.com/sitemap.xml
While a robots.txt file can be effective, bear in mind that:
- Not all search engines support (or respect)
robots.txtdirectives. - Even if a page is disallowed, it can still be crawled if other websites link to it.
For complete and permanent blocking of a web page, you have two options. You can either password-protect the page, ensuring only authorized users can access it, or you can add the following <meta> tag within the <head> section of your page, without listing it in the robots.txt file:
<meta name="robots" content="noindex">3. Using a JavaScript Framework? Pre-Render your Content
In traditional static HTML websites, search engines can easily crawl and index the content since it is readily available in the HTML source code. However, the emergence of JavaScript frameworks like React, Angular, and Vue.js brought a new challenge to search engines. These frameworks have the capability to generate dynamic content on the client-side, presenting a hurdle for search engine crawlers.
This is where pre-rendering comes to the rescue.
Pre-rendering involves generating static HTML versions of the dynamically rendered pages on the server-side. By serving these pre-rendered pages to search engine crawlers, you ensure that the content is accessible and indexable.
By implementing pre-rendering techniques in your JavaScript framework-based website, you provide search engines with static HTML versions containing the necessary content and metadata. This enables them to understand and index your website more effectively.
There are different approaches to implementing pre-rendering:
-
Server-Side Rendering (SSR): With SSR, the server generates HTML for each requested page and sends it to the client. This ensures that search engine crawlers receive fully rendered pages with all the content.
-
Static Site Generation (SSG): SSG generates static HTML files during the build process, pre-rendering each page in advance. This eliminates the need for server-side rendering during runtime, resulting in faster page loads. Depending on the size of your site, build times can be time-consuming.
Implementing pre-rendering for your JavaScript framework-based website requires proper configuration and setup. I like Prerender for this task because it is an easy-to-integrate service that supports all the popular JavaScript frameworks, making the pre-rendering process a breeze.
Prerender is especially handy if your project is very large or frequently updated. Search engines have a crawl budget, which means there are limits to how much time spiders can spend crawling each website. Prerender delivers your JavaScript pages as easy-to-read HTML in milliseconds, enhancing crawl efficiency.
If crawlers can access your pages quickly, they can explore more of your site. This results in more indexed pages, which can give you a competitive advantage.
4. Fixing Broken Internal Links and Backlinks
As your website evolves, encountering broken links becomes inevitable. Whether due to CMS changes, URL updates by bloggers, or unnoticed typos, stumbling upon the dreaded "Error 404" page is an experience nobody enjoys.
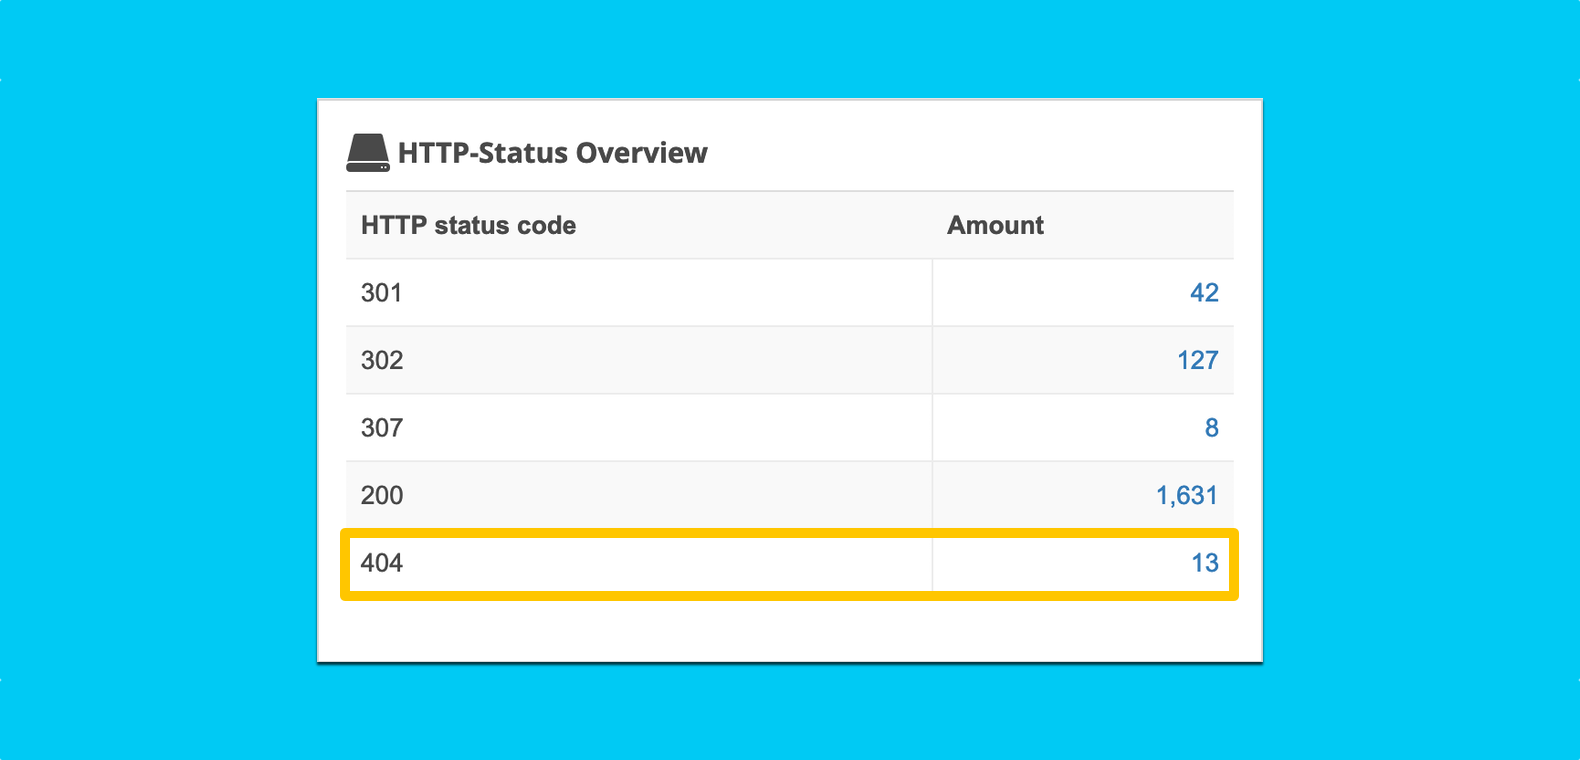
To address this, you first need to identify the list of broken internal links. A tool like Seobility can crawl your entire project and highlight pages returning 404 status codes. You can also extract a CSV or PDF report with the list of URLs.
Then, it's a matter of fixing any internal links that were pointing to broken URLs.
This fixes part of the problem, but what about the number of external links that are pointing to your site? These links, commonly referred to as "backlinks", are one of the most pivotal ranking signals. You have no control over those websites, so you can't update those URLs directly. You could contact every author, but there's a much more convenient and effective solution: creating redirects!
Without redirects in place, you hinder search engines' understanding of the value your page offers. Search engines assign a score to each URL they've found; if the URL changes, they will treat it as a new page, even if the content is the same. Redirects come in handy to transfer the link equity to the correct destination. Otherwise, you're essentially starting from scratch! 😬
We will look into how to create redirects in just a moment. First, let's get a list of broken backlinks, so that we know the number of URLs that need to be pointed to the right resource. Once again, we can use Seobility for this task by accessing the "Broken Backlinks" tab:
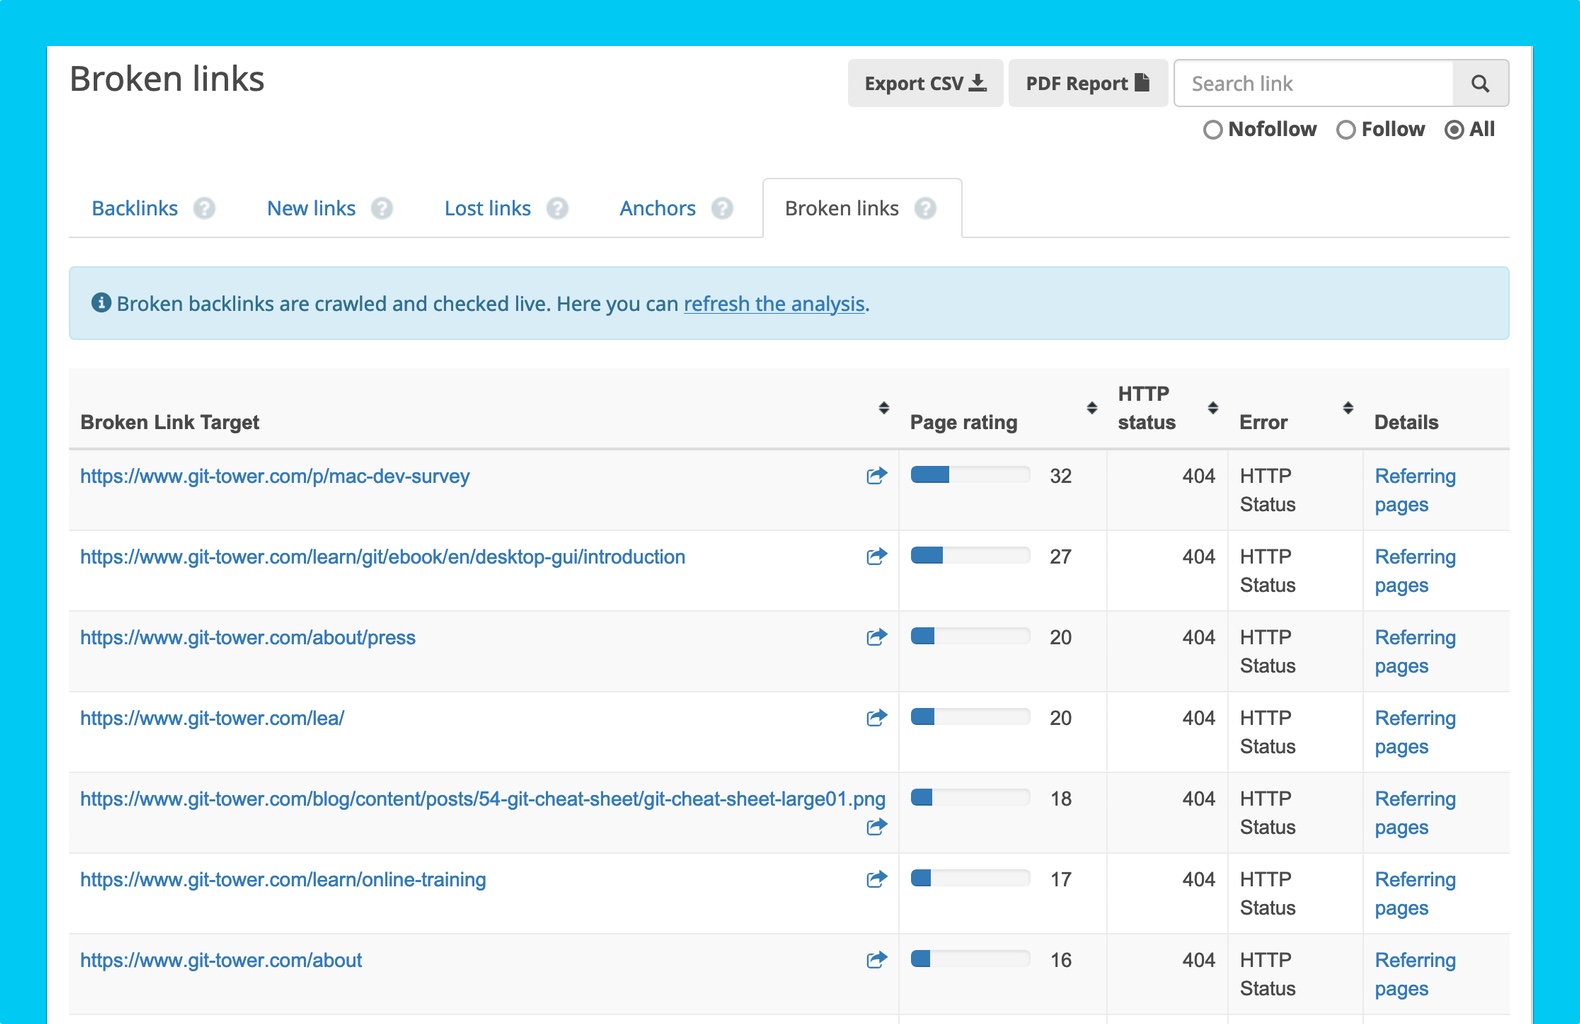
Looks like I've got work to do! Now that we know which URLs we need to address, let's go ahead and create redirects for the affected pages. There are two common types of redirects:
- A "301 Redirect" is a permanent redirect.
- A "302 Redirect" is a temporary redirect.
In most cases, a permanent redirect is preferred. These redirects are typically implemented server-side, commonly by editing the .htaccess file on Apache servers. Here's an example:
# Permanent redirect:
Redirect permanent "/old" "https://example.com/new"

# Temporary redirect:
Redirect temp "/two-old" "https://example.com/two-new"
If server-side redirects are not feasible on your platform, alternative solutions such as meta refresh redirects or JavaScript location redirects can be explored.
By promptly resolving broken links with appropriate redirects, you enhance user experience, preserve the value of backlinks, and ensure search engines accurately interpret the relevance and authority of your pages.
5. Addressing Duplicate Content with rel="canonical"
Search engines typically disapprove of duplicate content, although there may be situations where it cannot be avoided. For example, when managing a multilingual website with content targeting different regions or when generating e-commerce pages with sorting and filtering options.
While duplicate content may serve a purpose, it can create a suboptimal user experience. Additionally, search engines may struggle to determine the primary source, the version that should be crawled more frequently and suggested to users.
To tackle this issue, you can utilize the rel="canonical" link element in the <head> section of your duplicate page(s). This element allows you to indicate that another page should be treated as the definitive version. Here's an example:
<link rel="canonical" href="https://example.com/shop/main-category-page" />By specifying the canonical URL, you guide search engines to prioritize the designated page when indexing and ranking, thereby consolidating the ranking signals and directing traffic to the preferred version of your content.
6. Handling Internationalization with hreflang
The hreflang attribute in HTML plays a crucial role in indicating the language of a webpage. By incorporating hreflang tags for multiple versions of the same page in different languages, search engines can understand and deliver the appropriate version to their users.
Hreflang tags work in pairs, establishing a reciprocal relationship. For example, if you add a hreflang tag to an English page that points to the German variant, the German variant should reciprocate by including a hreflang tag pointing back to the English page.
It's worth noting that Google recommends including a self-referential hreflang tag on every page. In our example, this means adding the following code to BOTH pages within the <head> section:
<link rel="alternate" hreflang="en" href="https://en.example.com/hello.html" />
<link rel="alternate" hreflang="de" href="https://de.example.com/hallo.html" />
With these two lines of code, users will be directed to the most relevant version based on their preferences and search context.
7. Subdomains, Subfolders, and New TLDs: Making the Right Choice
When determining the structure of your project, you may find yourself contemplating whether to use a subdomain, a subfolder, or an entirely new Top-Level Domain (TLD). Each option comes with its own advantages and disadvantages, and while there is no definitive answer, you should look into the available choices carefully.
If your goal is to maintain a unified brand and consolidate authority, subfolders are generally recommended. With subfolders, the main domain's authority is shared, making it easier to build and establish credibility.
On the other hand, subdomains are ideal for creating distinct sections like a store or a blog, or for targeting different languages. It's pivotal to note, however, that search engines perceive subdomains as separate entities, potentially impacting their individual SEO rankings.
Alternatively, entirely new TLDs can be advantageous for dedicated projects, such as courses or surveys, where securing a memorable and relevant domain name is paramount. However, starting with a new TLD means building authority from scratch, which requires additional effort and time investment.
As you can see, the choice will depend on your project's specific requirements and long-term strategy. Consider factors such as brand unity, authority consolidation, distinct sections, language targeting, and branding opportunities when making your decision.
Enjoying this SEO guide? We can help you with Git, too!
Download our FREE trial and experience a better way to work with Version Control!
Indexing
Once the spider has completed its task of crawling your website, the next step is to understand the actual content of each page. This phase, known as "Indexing," involves analyzing various elements, such as the <title> tag, headings, images' alt attributes, and, of course, the textual content itself.
In this section, we will delve into the essential aspects that developers should consider during the Indexing phase. This article assumes you already have the content ready. As mentioned in the introduction, content creation is a vast topic that extends beyond the scope of this article. A lot could be said about keyword analysis alone!
1. The Power of Headings and Sub-headings
In HTML, headings from <h1> to <h6> represent six levels of section headings. All these tags are helpful to understand the content and structure of your page, but the <h1> tag holds particular significance as it provides search engines with a key understanding of the page's topic.
It is recommended to have only one <h1> tag per page, which should accurately represent the content displayed on that page. It does not necessarily have to be the same as your <title> tag, although that's often the case.
The <h1> tag does not have to be the largest title in terms of font size either. Be cautious of themes or CSS frameworks that may style the <h1> larger than other headings, potentially leading to a less relevant title choice due to aesthetics.
Maintaining a logical hierarchy is important when using headings. It is recommended to follow a consistent progression without skipping levels (i.e., don't jump from an <h1> to an <h3>).
Here's an example:
<h1>Search Engines</h1>
<h2>Google</h2>
<h3>Google Images</h3>
<h3>Google News</h3>
<h3>Google Shopping</h3>
<h2>Bing</h2>
<h3>Bing Images</h3>
2. Semantic HTML
Back in the day, <div> elements were used for every section of a webpage. Nowadays, with the advancements of HTML5, we can write more semantic HTML by utilizing elements like <header>, <footer>, <article>, <aside>, <nav>, <section>, or <summary>.
These semantic elements help search engines prioritize the most important sections of the webpage. They are also good for accessibility, which we will look into later.
3. Populating the alt Attribute for Images
Images play a significant role on webpages and can appear in search engines' "Image" tabs. While AI technology has made significant progress in image recognition, it is still essential to provide meaningful alt attributes for images, both for SEO purposes and to ensure accessibility.
It is quite common to encounter code like <img src="image.jpg" alt=""> on pages. A tool like Google Lighthouse, which you can find in Google Chrome's DevTools, under the "Lighthouse" panel), will let you know if there are any alt attributes missing.
For instance, if you're working with images that often require the removal of backgrounds, perhaps to make the subject of the image more prominent, you might find that tools like a background remover solution can be incredibly helpful. By integrating such a solution in the workflow, developers can automate the process, improving efficiency while ensuring that the images still maintain their SEO effectiveness with custom alt attributes.
Lighthouse is great for improving individual pages, but when it comes to optimizing multiple pages, I prefer to work in batches. I like Seobility as it can help me identify all the URLs that have images without the alt attribute.
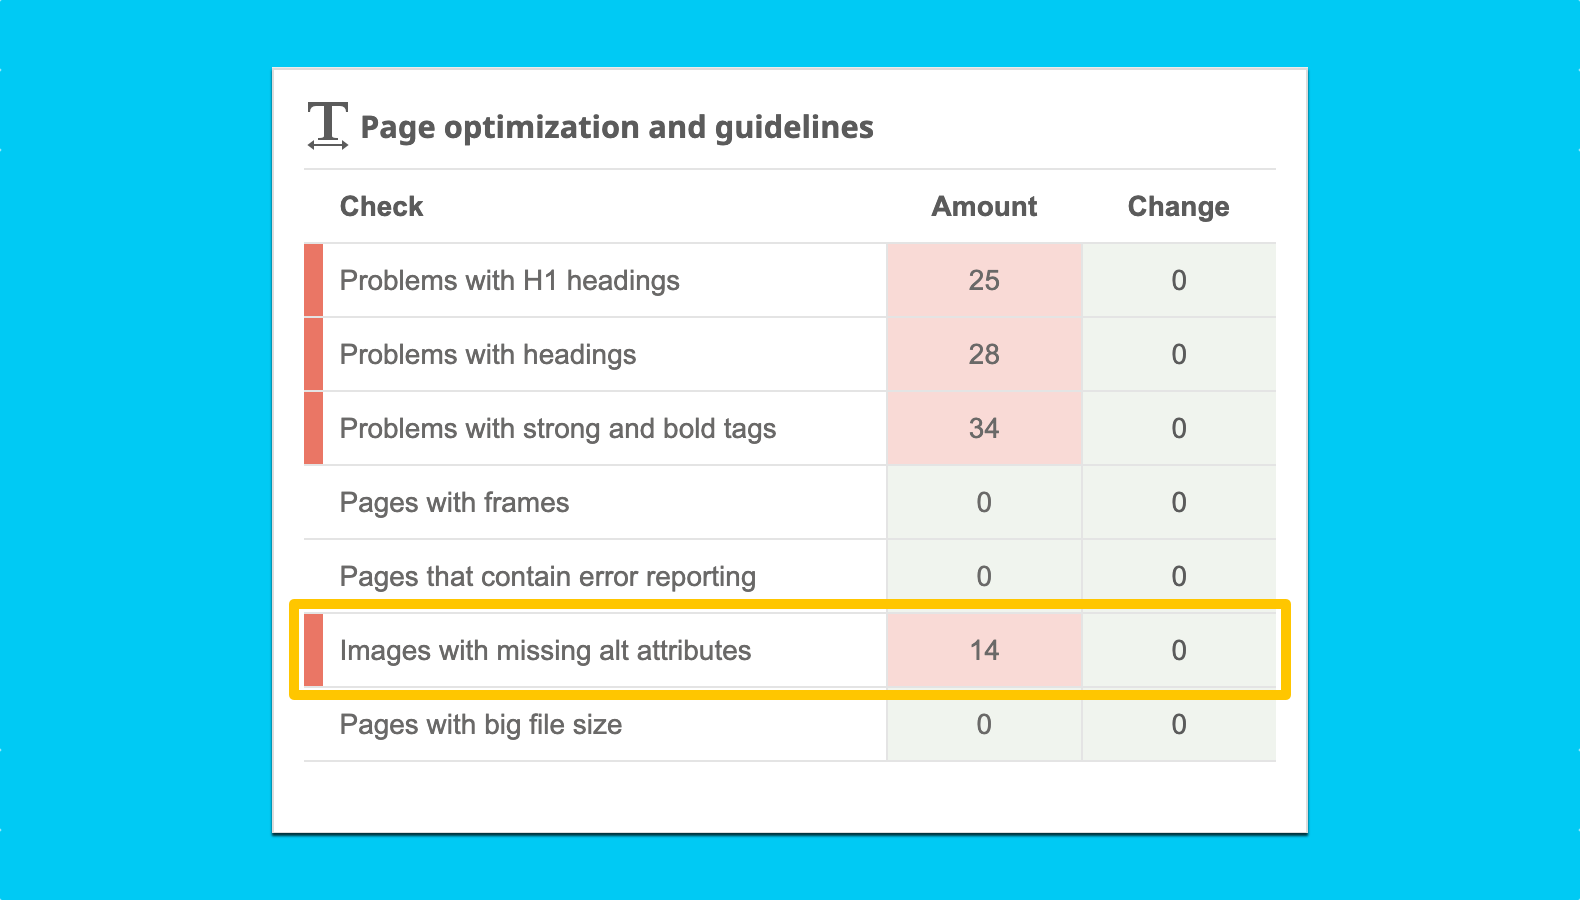
It's time to go to work and fill in those missing attributes (or collaborate with your Marketing colleagues to address this)!
Enjoying this SEO guide? We can help you with Git, too!
Download our FREE trial and experience a better way to work with Version Control!
Ranking
The ranking algorithm varies among search engines and plays a vital role in their success. I still recall the days before Google dominated the market, when search engines like Altavista or Hotbot held the forefront. What happened?
Google's success can be attributed to its ability to deliver superior search results compared to its competitors. Its ranking algorithm outperformed all the other available solutions. Today, Google holds approximately 85% of the global search engine market share.
Users trust Google because they know that, most of the time, the first organic result (i.e., a non-sponsored link) is likely to provide a answer that satisfies their needs. This wasn't the case two decades ago when users often had to scan through multiple search results to find what they needed. Nowadays, that rarely happens, except for those times when I'm trying to solve an obscure error in my code 🫣
Google's ranking algorithm considers over 200 factors, with their weights being adjusted regularly through thousands of revisions each year. The ultimate goal remains the same: to consistently deliver the best possible answers to search queries.
In the realm of SEO, factors such as high-quality content, reputable links, and keyword rank tracking can significantly influence growth. However, in this article, we will focus on the technical factors that can also make a substantial difference, especially in fiercely competitive search queries.
1. Adding Meta Description and Structured Data Markup
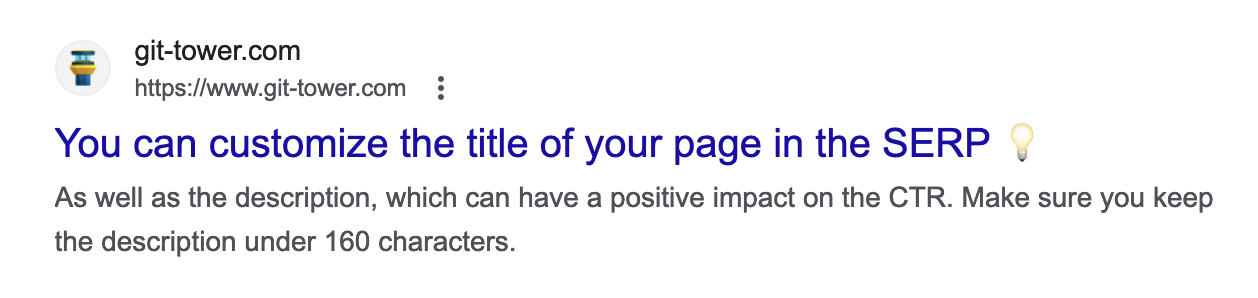
As you well know, when users perform a search, search engines display a list of results, each accompanied by a title and a description. What you may not realize is that you have (some) control over how your result appears!
This is where the Meta Description comes into play. You should customize the Meta Description to increase the likelihood of people clicking on your page. In marketing terms, this is known as improving the Click-through Rate (CTR) in the Search Engine Results Page (SERP).
While crafting the actual Meta Description may be someone else's responsibility, you can add it to any page by including a line similar to the following in the <head> section:
<meta name="description" content="Your Meta Description goes here. Keep it below 160 characters.">Unsurprisingly, many Content Management Systems (CMS) offer built-in customization options for Meta Descriptions.
Search engines may not always use your specified Meta Description. For instance, Google may dynamically modify the displayed snippet based on the user's search query, sometimes opting to present the actual content from the page.
Another way to enhance your page is by adding Structured Data, which provides information about the type of page to search engines. Structured Data can specify details like reviews, recipes, or events, enabling search engines to better understand and present your content to users.
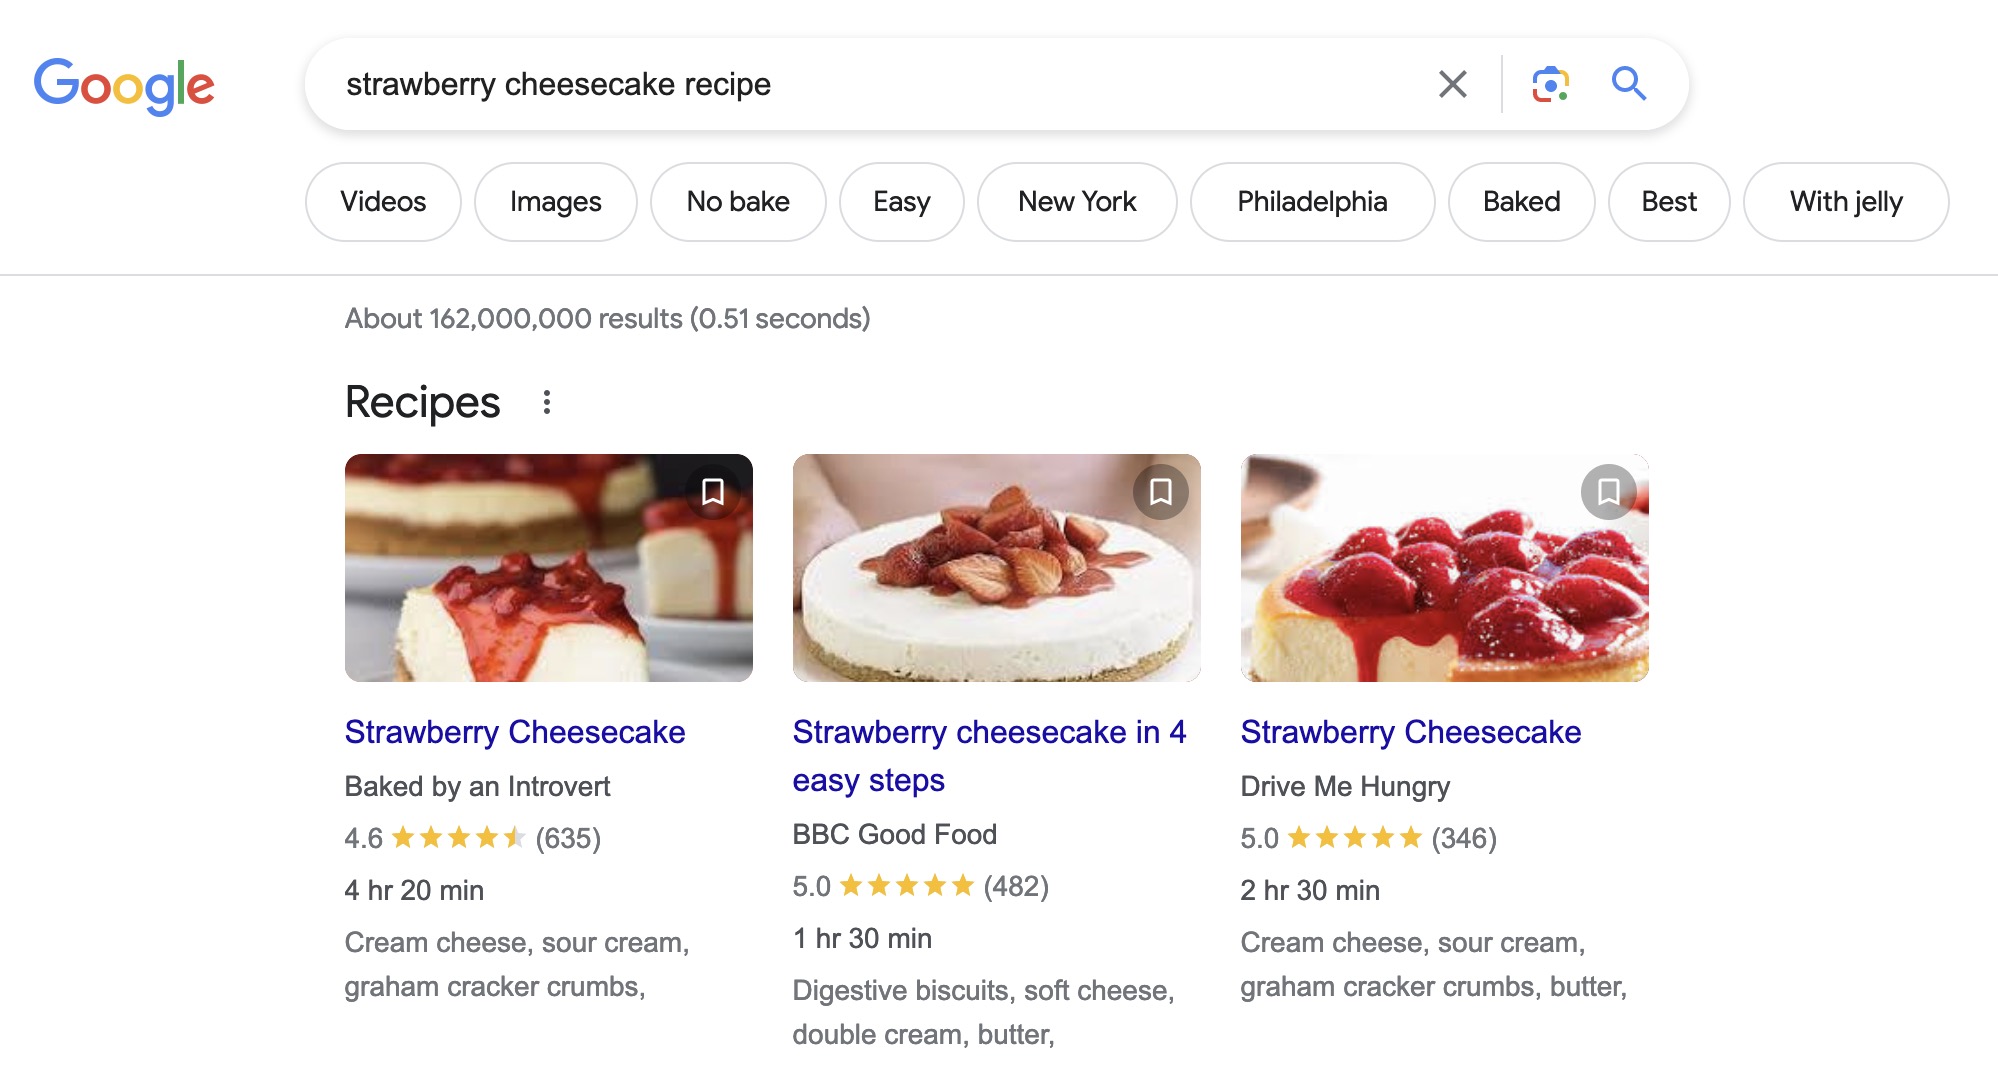
With special fields such as star ratings or calorie counts, implementing Structured Data Markup can give your results a distinct advantage, helping them stand out from the competition. By enhancing the Click-through Rate (CTR) and attracting more traffic to your website, you can increase your overall visibility.
Google supports different formats for Structured Data Markup, including Microdata, RDFa, and JSON-LD files. Among these options, JSON-LD is recommended for its ease of implementation and flexibility.
To learn more about Structured Data Markup and how to implement it, you can refer to the Structured Data documentation provided by Google.
2. Enhancing Social Media Presence with Open Graph Tags
You can think of Open Graph tags as the equivalent of Meta Descriptions for Social Media platforms. In the world of SEO, the number of times a URL has been shared, liked, or commented on also holds significance. Therefore, you should make sure that everything is presented nicely to the users.
Although developed by Facebook, the Open Graph protocol is supported by other social media platforms like LinkedIn and Pinterest. Twitter will also look for Open Graph tags to enhance the display of shared links in the absence of more specific markup like Twitter Cards.
You can use a site like Mega Tags to easily generate Open Graph and Twitter Card tags for your project. The generated output should resemble the following example, which can then be added to the <head> section of your webpage:
<meta name="og:title" content="Your Page Title">
<meta name="og:description" content="Your description goes here. Keep it around 200 characters.">
<meta name="og:image" content="https://example.com/featured-image.jpg">
<meta name="og:url" content="https://example.com">
<meta name="og:site_name" content="Your Brand">
<meta name="og:locale" content="en_US">
<meta name="og:type" content="website">
Most major social media platforms provide a handy tool to preview how your URL will look like when shared. Here are some useful links:
3. Ensuring your Project is Mobile-Friendly
By now, I'm sure you don't need to be reminded that billions of people use their phones to access the internet every day. Google rolled out his first mobile-friendly update in 2015. In 2020, they doubled-down by transitioning to mobile first indexing for the entire web.
If you're new to web development, there are key concepts to learn to ensure your project is easily accessible across all devices. Here are two important ones to start with:
-
Media Queries: Media Queries allow you to apply different CSS styles based on the characteristics of the user's device, such as screen size, resolution, or orientation.
-
Responsive Images: Responsive Images techniques enable you to serve appropriately sized images based on the user's device capabilities and screen size.
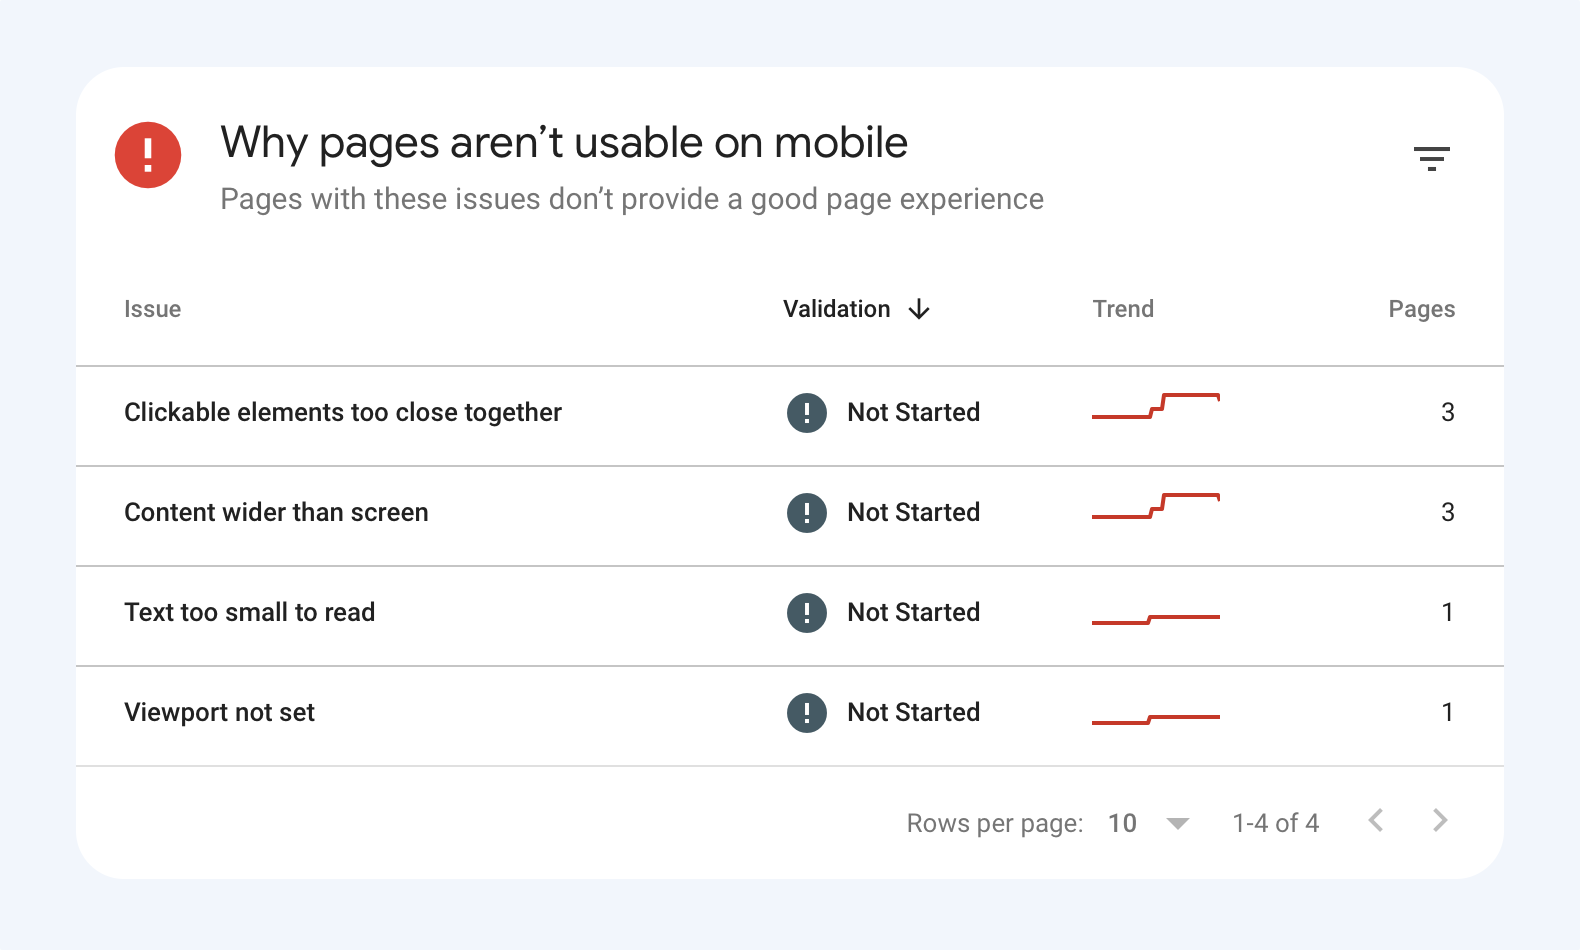
By understanding and implementing these concepts, you can address common mobile-related issues such as typography legibility, proper spacing, image overflow, and button usability. These are all critical aspects for a successful mobile experience.
To assist you in evaluating the mobile-friendliness of your project, Google's Search Console often highlights any critical mobile errors. Additionally, you can utilize Google's Mobile Friendly Test to analyze specific URLs and receive actionable feedback on mobile optimization.
4. Embracing HTTPS for Improved Security and Ranking
HTTPS isn't just a security feature — it actually became a Google ranking signal in 2014. This means that websites using HTTPS are given a slight preference in search rankings.
To enable HTTPS on your website, you'll need to obtain a certificate from a Certificate Authority (CA). Many hosting companies offer SSL (Secure Sockets Layer) certificates as part of their services. Alternatively, you can use Let's Encrypt, a free and widely trusted CA, to set up HTTPS for your website.
If you're starting from scratch, the process is relatively straightforward. However, when updating an existing website, it's crucial to ensure that all resources, such as images and scripts, are loaded over HTTPS. This avoids mixed content issues, where some resources are loaded over the insecure HTTP protocol.
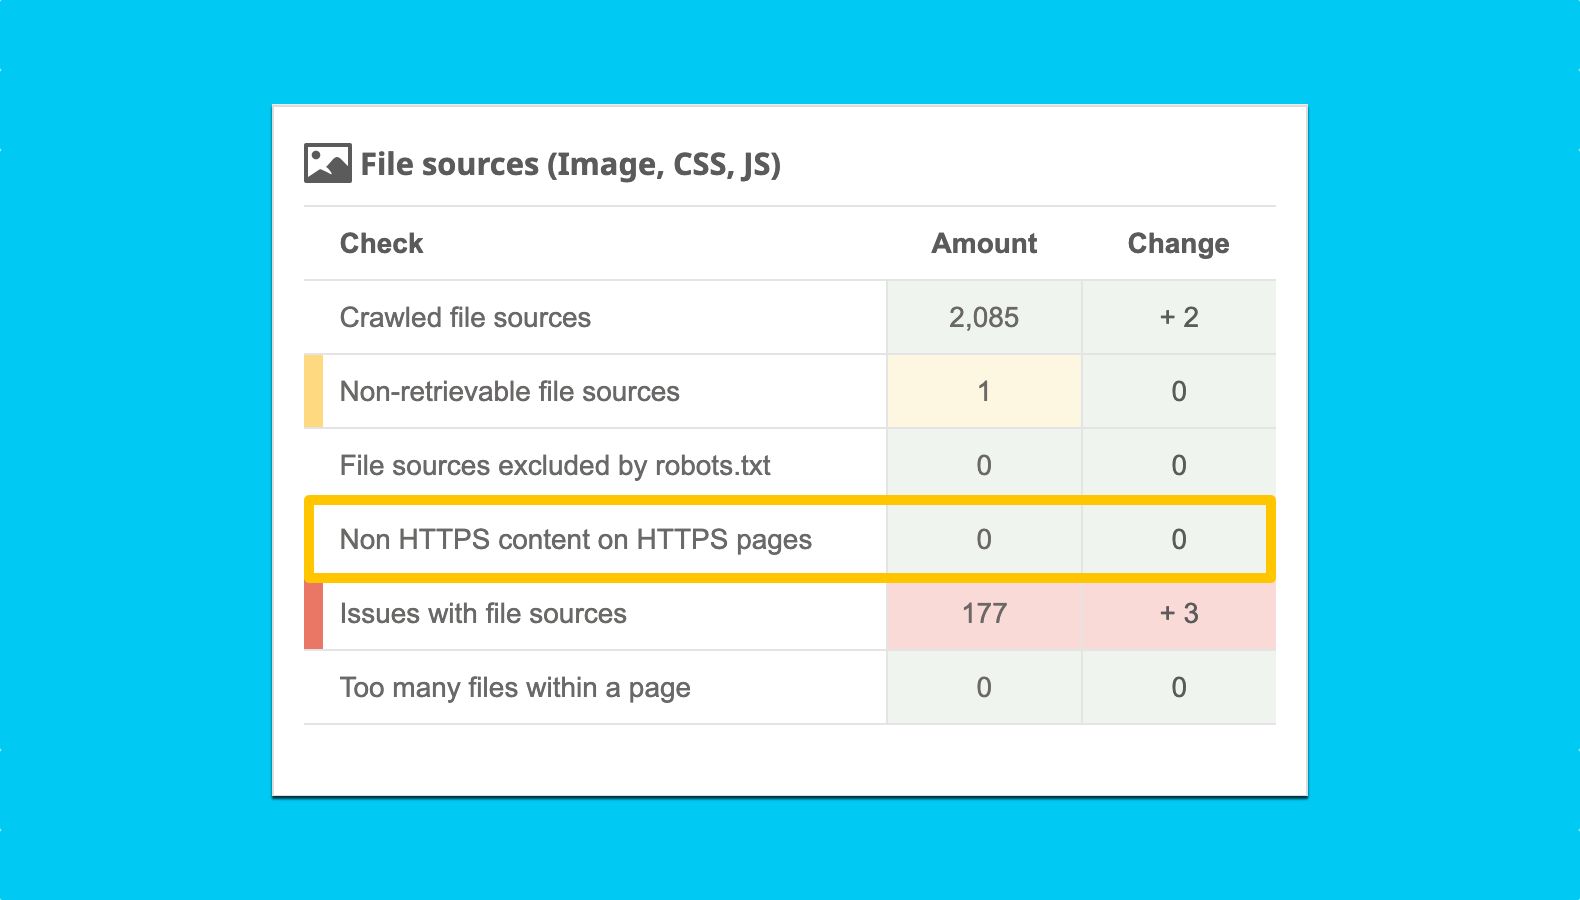
Having mixed content can pose security risks and lead to warnings being displayed to users, creating a sense of distrust. Since serving non-HTTPS content on HTTPS pages can negatively impact user experience, it's important to update all links to use HTTPS resources.
A tool like Seobility can warn you when you're serving non-HTTPS content on HTTPS pages so that you can rectify the issue promptly.
5. Optimizing Image Performance for Faster Loading
Website speed is crucial for a positive user experience and can impact search rankings. Images, which often constitute a significant portion of a web page's weight, play a major role in website performance optimization.
Images comprise almost 75% of the total page weight. For this reason, optimizing image requests may be the single biggest performance optimization you can make!
To begin, let's discuss image formats. The most common formats are:
- PNG: Ideal for images with few colors and when transparency is required.
- JPG: Suitable for real-life pictures and images where transparency is not needed.
- SVG: Well-suited for logos and icons as they can be resized without losing quality.
In addition to these traditional formats, there are two newer formats worth considering: WebP and AVIF. While AVIF isn't ready for prime-time yet , both formats offer better compression and support transparency. Gradually replacing JPG and PNG files with these formats can be beneficial. They even support animation, like GIFs!
Speaking of GIFs: they're usually a really bad idea. GIFs are notorious for their large file sizes and inefficient compression. It's advisable to replace GIFs with muted, looped MP4 videos. By doing so, you can achieve smoother playback by increasing the framerate while significantly reducing the file size. This approach not only improves the user experience but also helps save on bandwidth costs.
To convert images to the new formats, you can use tools like Squoosh on the web or command line utilities like cwebp or sharp.
Keep in mind that switching to these formats may require adjustments to how images are presented, such as using the <picture> tag:
<picture>
<source type="image/webp" srcset="picture.webp">
<img src="picture.jpg" alt="Your image description">
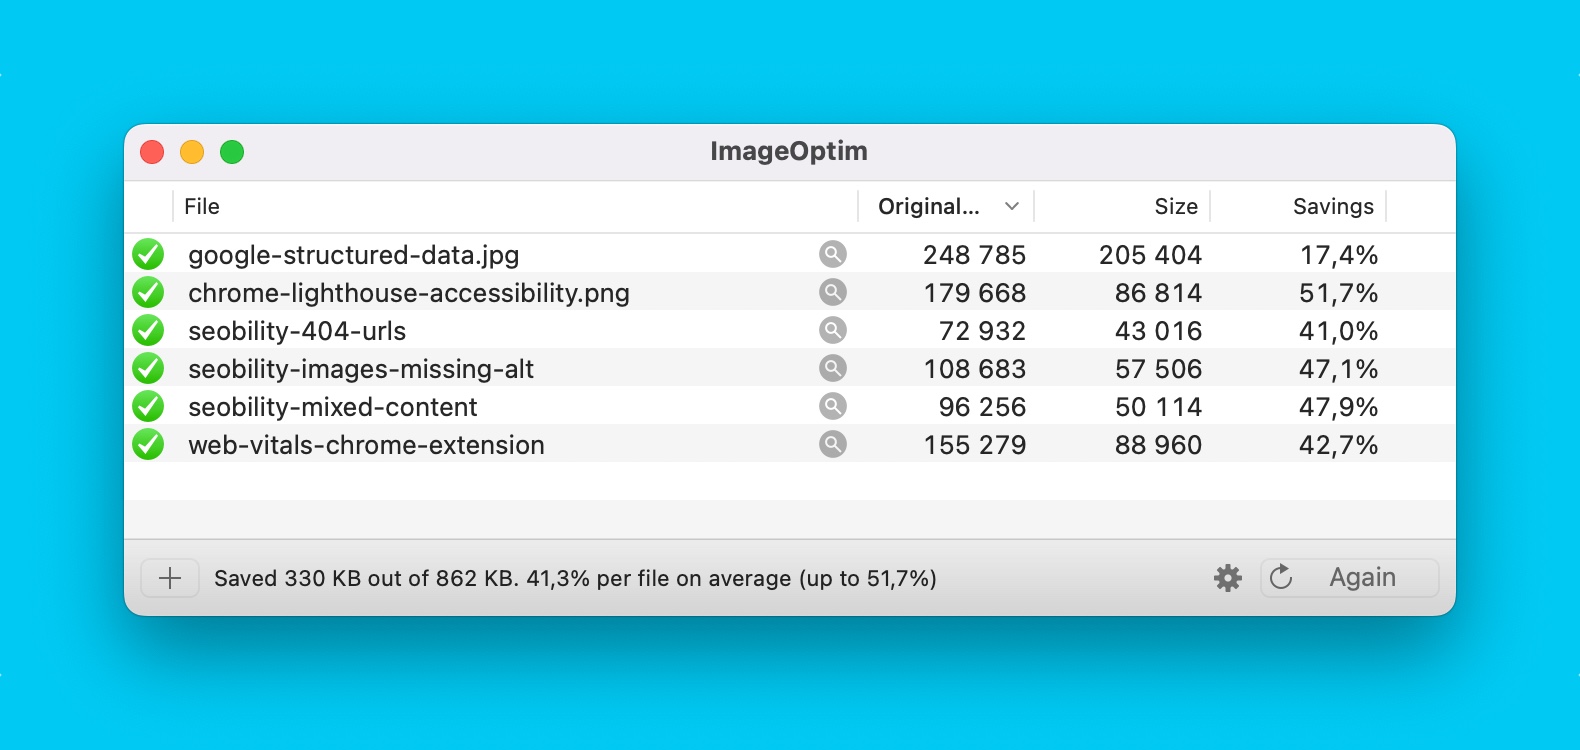
</picture>If you don't have the time to make this change right away, you can at least consider optimizing your existing JPG and PNG images by compressing them. You can use a free drag and drop solution like ImageOptim (my favorite if you're running macOS) or command line tools such as JPEGoptim and pngquant. Most images can be reduced by 30%-40% without any noticeable loss of quality.
You can learn more about all these compression techniques in our Working with Images guide.
Even with all these techniques, images will still take some time to load. This sounds like the perfect opportunity to introduce you to CLS (Content Layout Shift). This is a Web Vitals metric (more on that later) that essentially gives you a score on how much your layout shifts while content is loading.
This can cause frustration to users, as new elements suddenly shift others around when they finish loading. The good news is that we can prevent this for images by setting width and height attributes on our images (and videos).
Before responsive design became the standard, we used to add width and height attributes to every image. They would look something like this:
<img src="image.jpg" width="640" height="360" alt="Your image description">At the time, these attributes suggested absolute pixels. Now, modern browsers can use this information to set the default aspect ratio of images. If your image is in a container, adding these two attributes, along with the following CSS, will ensure that the correct space is reserved while the image is loading:
img {
  width: 100%; /* or max-width: 100%; */
  height: auto;
}
6. Caching and Asset Minification
While optimizing images can be a great performance improvement, there are many other aspects you can look into. Two other topics that can significantly impact page performance are caching and HTML/CSS/JS minification.
There are different caching mechanisms you can implement. Browser caching involves setting proper cache control headers on the server-side, while Content Delivery Networks (CDNs) store cached copies of website resources in multiple geographical locations. These approaches help reduce server load and decrease page load times, positively impacting SEO rankings and user engagement. At Tower, we use Fastly as our caching solution.
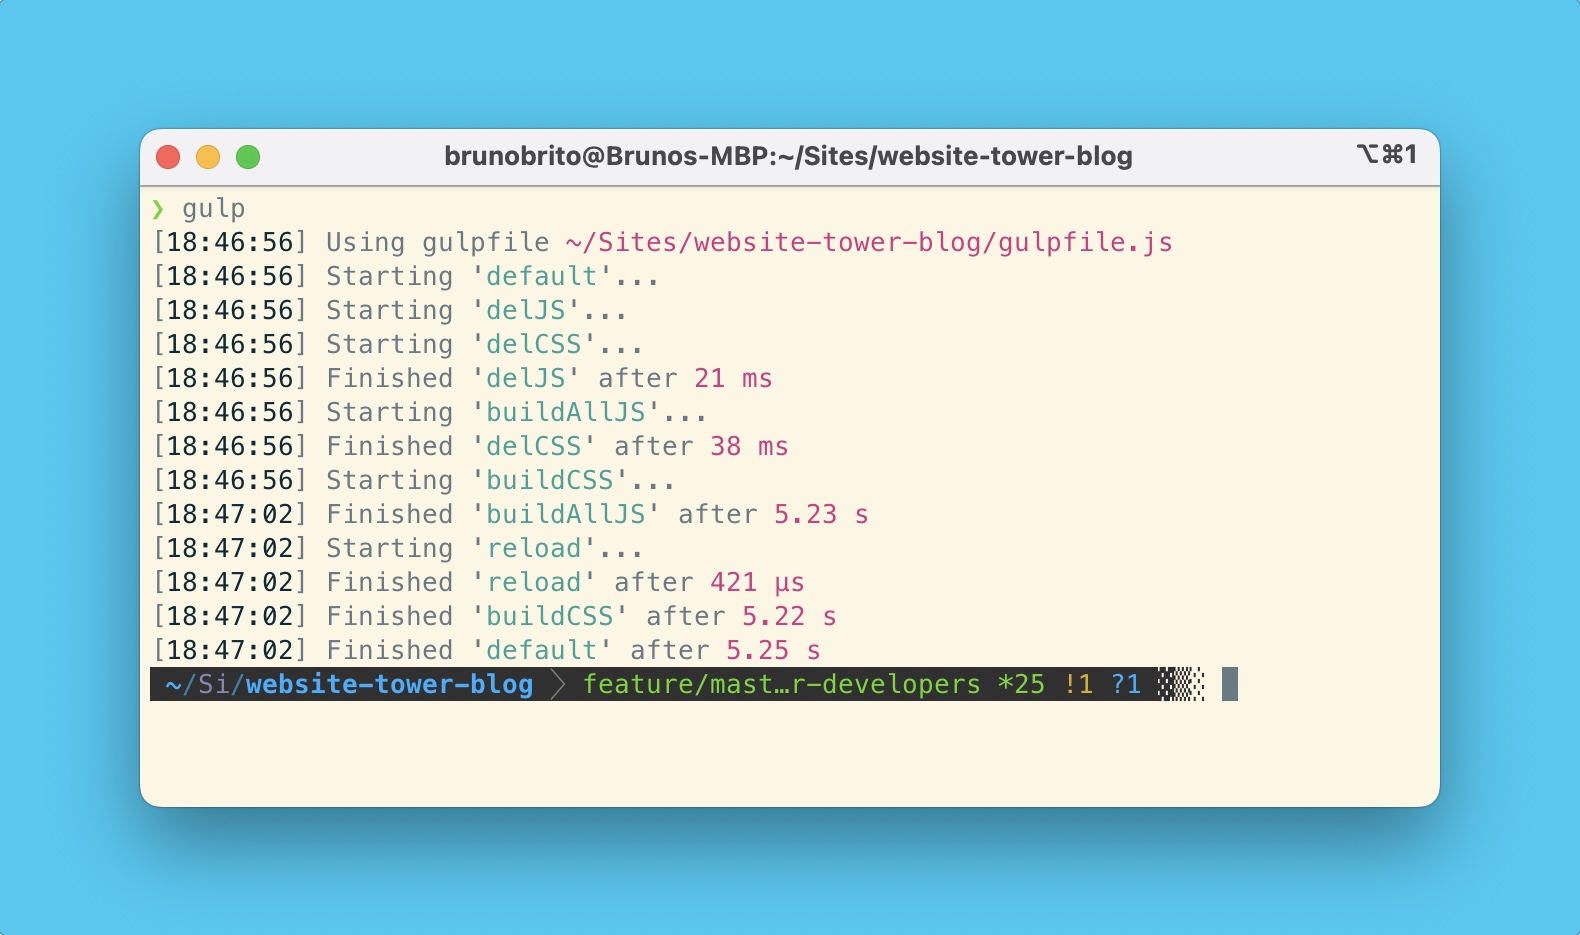
In addition to caching, another essential performance optimization technique is minification, which involves reducing the file size of HTML, CSS, and JavaScript resources. Minification removes unnecessary characters, whitespace, and comments from these files, resulting in faster downloads and improved page rendering speed.
To accomplish this, you can use various tools and build processes, such as Gulp or Webpack, which offer minification capabilities as part of their optimization workflows. These tools can automatically minify your HTML, CSS, and JavaScript code.
7. Core Web Vitals
Web Vitals, introduced by Google, provides valuable insights into key metrics that determine the user experience of a website. These metrics include:
-
Largest Contentful Paint (LCP): Measures loading performance and indicates when the largest content element becomes visible to the user. To provide a good user experience, LCP should occur within 2.5 seconds of when the page starts loading.
-
First Input Delay (FID): Measures interactivity and evaluates the time it takes for a page to respond to user interactions. A good user experience is characterized by an FID of 100 milliseconds or less. It's worth noting that FID is expected to be replaced by Interaction to Next Paint (INP) in 2024.
-
Cumulative Layout Shift (CLS): Measures visual stability and quantifies how much the layout of a page shifts during the loading process. A lower CLS score, ideally 0.1 or less, indicates a more stable and user-friendly experience.
To assess the performance of your pages, you can utilize tools like Google Chrome's DevTools. By navigating to the "Lighthouse" tab and running a report, you can obtain insights into LCP and CLS scores. While Lighthouse doesn't provide a direct score for FID, you can examine the "Total Blocking Time" metric as an alternative measure of interactivity.
One other solution is downloading the Web Vitals Chrome Extension. By installing this extension, you can easily view the scores of various metrics on any page you're currently visiting. Enabling "Console Logging" within the extension will provide additional information in the "Console" tab of the DevTools.
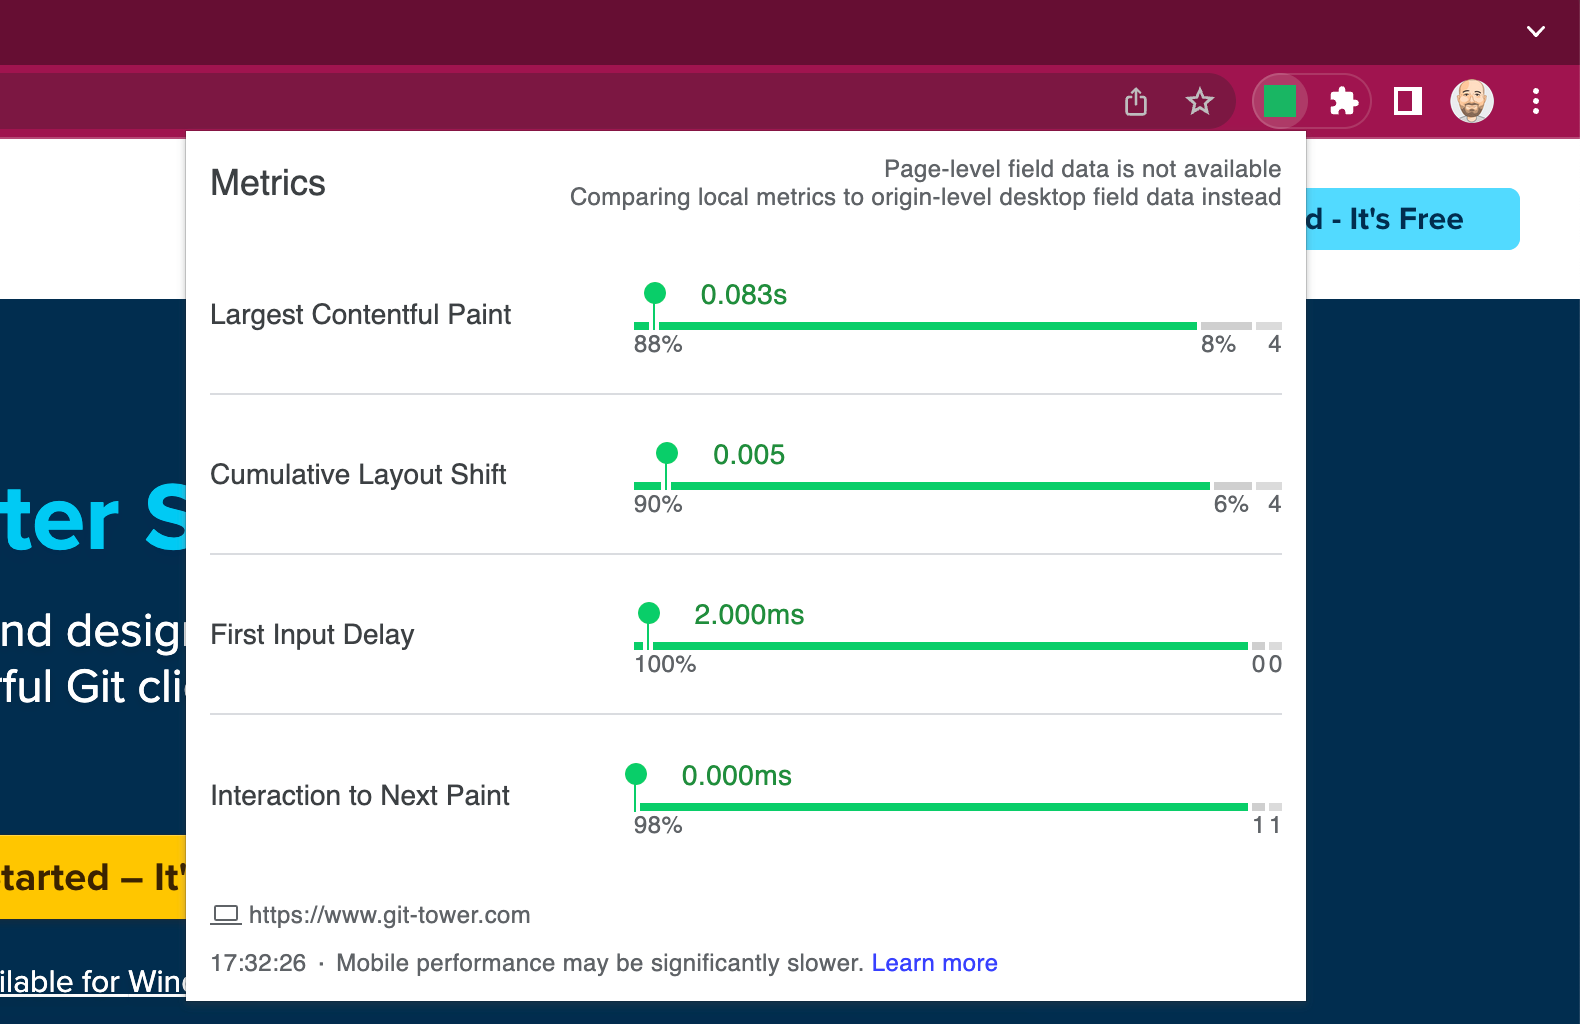
You can also access the Google Search Console, specifically the "Experience > Core Web Vitals" section, for a comprehensive overview of URLs that can be optimized to improve these metrics.
With these tools and resources, you can effectively analyze the Web Vitals metrics and take appropriate actions to improve them based on the recommendations provided by Google.
8. Accessibility
Digital accessibility, often referred to as a11y, aims to ensure that individuals with limitations in their abilities can effectively utilize websites by enabling their access and usability.
This is a broad topic, and ensuring that your website is 100% accessible can require a significant amount of work. The A11Y Project also has a nice checklist for you to follow.
Thankfully, some best practices have already been covered previously in this guide, such as:
- Semantic HTML: Use appropriate HTML elements to structure content and ensure proper screen reader compatibility.
- Proper Headings: Create a logical heading structure to help screen reader users understand the content hierarchy.
- Alt Text for Images: Use descriptive alternative text (alt text) for images so that screen readers can convey their content to visually impaired users.
- Language Declaration: Declare the website's primary language using the HTML
langattribute to aid screen readers in selecting the appropriate voice.
And here are some other important notions that we haven't covered before:
- Color Contrast: Ensure sufficient contrast between text and background colors for improved readability. You can use a Color Contrast Checker to evaluate the contrast ratio.
- Flashing and Animation: Minimize the use of flashing or rapidly moving content to avoid triggering seizures or causing discomfort for users. Consider using the @prefers-reduced-motion CSS media feature to provide alternative styles for users who prefer reduced motion effects.
- Captions and Transcripts: Include captions for videos and provide transcripts for audio content to accommodate users with hearing impairments.
- Focus Indication: Provide clear and visible focus styles for interactive elements to assist keyboard users.
- ARIA Roles and Attributes: Implement ARIA (Accessible Rich Internet Applications) roles and attributes to enhance accessibility for dynamic and interactive elements.
- Keyboard Navigation: Ensure all interactive elements can be accessed and used via keyboard alone, without relying on mouse or touch input.
All modern browsers pack great accessibility tools for developers. I particularly like Firefox Developer Edition for this task — just open the DevTools and look for the Accessibility tab.
To generate a report for a certain URL to fix, you can use Google Lighthouse (via Chrome's DevTools, under the "Lighthouse" panel, or the Node CLI).

Final Words
As I'm sure you have realized by now, SEO has evolved into a set of best practices closely tied to web development. By combining the technical SEO knowledge of developers with high-quality content creation, we can create websites that not only meet user needs but also receive favorable rankings from search engines.
If you follow the techniques outlined in this guide, such as optimizing page titles and meta descriptions, improving website performance, addressing duplicate content, and considering mobile-friendliness, you will definitely increase your chances of achieving a high position in search engine results. So let's embrace SEO as developers and ensure that our websites are optimized to reach their full potential! ✌️
I will be back soon with another episode of "10% More Productive". For more web development tips, don't forget to sign up for our newsletter below and follow Tower on Twitter and LinkedIn!
Join Over 100,000 Developers & Designers
Be the first to know about new content from the Tower blog as well as giveaways and freebies via email.