
Today, we will dive deep into one of the most polarizing tools in the development world: the CLI (Command Line Interface). Many developers dread staring at the black-and-white window, while others embrace it with open arms. Regardless of your stance, one thing is for sure: we all know that we will eventually need to get comfortable with the terminal. This guide will help you with just that!
New Series: "10% More Productive"
This is part 3 of our series titled "10% More Productive". Be sure to check out our tips on:
- Mastering the Keyboard
- Mastering Sublime Text
- Mastering the Terminal ← you are here!
- Mastering Tower for Mac
- Mastering Google (for Developers)
- Mastering macOS
- Mastering SEO for Developers
- Mastering Tower for Windows
Sign up for our newsletter to get notified about the next episode!
You can find a terminal available on pretty much any device; servers, desktop machines, Raspberry Pis, and mobile phones all provide access to this powerful tool. As developers, we are expected to be proficient in the terminal (or, if you prefer, on "the command line"). Many modern web development tools, like Node.js or React, rely on the CLI (Command Line Interface) to get up and running.
But the CLI is not just for Web Development — it's also a reliable solution for task automation, as it enables you to perform complex tasks rapidly. This is partly due to the numerous CLI tools that are at your disposal; some come pre-installed, while others can be found in package registries, which work in a similar way to app stores.
Automating the use of these tools through scripting will guarantee an increase in your productivity. The interface may not be the prettiest to look at, but you can get a lot done by typing the correct set of commands.
After reading this guide, I’m sure the terminal will feel a bit more welcoming. We have a lot of ground to cover, so let's get started!
Not a Tower user yet?
Download our 30-day free trial and experience a better way to work with Git!
1. An Introduction to the Terminal
A terminal is used to execute text-based programs. The terms "terminal" and "command line" are often used interchangeably, but technically, the terminal is the software that starts and connects you to a shell (more on that later), while the command line is the actual line with the blinking cursor where you enter commands.
If you're on macOS or Linux, you can find a Terminal among your other applications.
Windows is a bit trickier, but it's thankfully getting better. For a very long time, launching the command prompt (cmd) was the solution, but since it was based on the old Windows DOS prompt, some Unix commands would not work. For this reason, many Windows users rely on Git Bash, which is part of Git for Windows. Check out our guide to install it.
Since Windows 10 was released (version 2004 and higher), the modern approach is to install Windows Subsystem for Linux (WSL). This will add a compatibility layer to run Linux operating systems without the need of a virtual machine, enabling an authentic terminal experience.
Regardless of your operating system, there are many other alternatives. Many macOS users prefer iTerm2 due to its extra features, or Hyper, a more modern, cross-platform terminal based on Electron. PowerShell, while also cross-platform, is a more popular choice among Windows users.
The following list of essential commands will work on any UNIX-based terminal, so feel free to use whatever you prefer.
2. Essential Terminal Commands
Terminal commands call for some practice (and a bit of patience), so a good way to start is to download and keep a cheat sheet close to you. We have one ready for you with the most essential commands, which you can download here.

Documentation is always useful, and the command line has plenty! You can type man <command> to access the manual to learn more about each specific command. You can press f to move one page forward, b to go back, and q to quit.
You can also check the tldr project for a simpler manual with practical examples. This website should be a good starting point.
When working with a CLI, it's a good idea to become familiar with the list of shortcuts provided by the Readline library. You can have a look at the "Efficient Editing" section in this article to get started.
Working with Files and Directories
Let's start with the basics: navigating through directories and creating (or deleting) directories and files.
You can type pwd (print working directory) to view the full path name of your current working directory. Then, ls (list) will list all the directories and files available in that directory.
Here's an example — the # represents the output after running each command:
pwd
# /Users/bruno/Desktop
ls
# my-folder    index.html
Now would be a good time to introduce you to flags. You can use different flags to get more options, and even combine them. For example, ls -l will provide more information for each file, and ls -a will include entries that begin with a dot (hidden files). You can combine the two by typing ls -la.
To change to a different directory, you can use cd and the name of the folder you're looking for. You can type the full path if needed. You can also navigate up one folder by typing cd .. (the two dots stand for the path to the parent of that directory).
cd my-folder/product
pwd
# /Users/bruno/Desktop/my-folder/product
cd ..
pwd
# /Users/bruno/Desktop/my-folder
You can quickly navigate to your home directory by just typing ~ (tilde). On macOS, "home" is the user's directory under /Users. Let's give it a try, using our last example as the starting point:
pwd
# /Users/bruno/Desktop/my-folder
~
pwd
# /Users/bruno
Time to create some directories and files! Let's start a small website project with the help of mkdir to create a new directory and touch to create some empty files.
mkdir my-website
cd my-website
pwd
# /Users/bruno/my-website
touch index.html style.css script.js
ls
# index.html   script.js    style.css
You can also chain commands with &&. So, this 2-line combination would get you the same result:
mkdir my-website && cd my-website && touch index.html style.css script.js
pwd && ls
# /Users/brunobrito/Downloads/temp/my-website
# index.html script.js  style.css
You can use the open command to open the file. Adding a dot (open .) reveals the entire folder in Finder. While two dots are used to navigate to the path to the parent of that directory, as mentioned previously, a single dot stands for the path to the current working directory.
Let's look into how we can move, copy and delete files or folders next.
Not a Tower user yet?
While the CLI is great, working with Git using a GUI like Tower is way better.
To copy files or directories from one place to another, we can use cp. Here's an example:
cp style.css styles/style.cssIn a similar fashion, we can use mv to move them instead. mv is also the command to rename files. Simply type the current filename, followed by the new name:
mv script.js main.jsFinally, you can delete files with the rm (remove) command. To delete folders, simply add the -r flag.
rm index.html
rm -r my-website
Search Commands
To find specific files, you can trust the find command. This is the command you would run to search for a file named index.html in your current directory (including subfolders):
find . -name index.htmlYou can also use wildcards — in this example, we will look for all JavaScript files:
find /my/folder/ -name '*.js'To find all occurrences of text in a specific file, grep is your friend. Just add your search term as a string, followed by the file you would like to search.
grep "style" index.html
#  <link rel="stylesheet" href="style.css">
You can add the -i flag for case insensitivity or -rl to look for all files inside a directory containing a certain string.
Output Commands
To quickly visualize the contents of a text document in the terminal, you can use cat <file>. If you only need the first 10 lines, head <file> will do the trick.
For longer documents, I would recommend less <file>, since it supports pagination. You can press Q to quit the document.
If you would like to clear your terminal, clear will do just that. On most terminals, ⌘ + k will also do the trick.
To work with the clipboard, pbcopy and pbpaste are two other commands worth memorizing. With the help of the pipe command (|) you can transfer the standard output from one command to the other.
This may sound confusing, so let's have a look at a practical example:
pwd | pbcopyThe pipe command is transferring the output from the command on its left into the command on its right. So, in this case, we're copying the print working directory to the clipboard. You could then paste that path somewhere else, or type pbpaste to paste it on the command line later.
Network Commands
When working with online projects, there are 5 important commands to learn:
-
Ping (
ping <host>) will ping the host and display its status. It checks if the host is available and measures how long it takes for the packet to reach the host and for the response to return to the sender. -
Whois (
whois <domain>) will provide some information regarding a domain, including the creation date, registrar, and name servers. -
Curl (
curl -O <url/to/file>) is used to download a file via HTTP(S) or FTP. -
SSH (
ssh <username>@<host>) allows you to establish an SSH connection to a remote machine. After a successful login, you can manage that machine just as if you were sitting in front of that computer. -
SCP (
scp <file> <user>@<host>:/remote/path) securely copies a file to a remote host. This can also be applied to directories. You can copy files from remote systems to your local system, or even between two remote systems.
Process Management
On remote machines, you will often need to understand which processes are currently running. ps ax will provide you with the full list but, for real-time information, top is a better option.
You will notice that each process has a Process ID (PID). To stop a process, simply type kill <pid>.
3. Shells
The Terminal application comes with a shell, which is the session environment in which we can run commands and scripts. There are many shells available (and you can even install others). Each shell will give you slightly different features.
On macOS, you can run this command to list all the available shells currently available on your computer:
cat /etc/shellsYou will get a list of shells similar to this:
/bin/bash
/bin/csh
/bin/ksh
/bin/sh
/bin/tcsh
/bin/zsh
Starting with macOS Catalina, Macs will use zsh (Z shell) as the default shell. There's also the bash shell (Bourne Again SHell), csh (C shell), ksh (Korn Shell), tcsh (TENEX C Shell), and many others.
This command will tell you which shell you're currently running:
echo $0You can easily change to a different shell by typing chsh -s /bin/bash (if you'd like to switch to the Bash shell).
If you just want to try another shell (without actually changing your default shell), you can usually just run bash, zsh, etc in your current shell, and then type exit when you’re done.
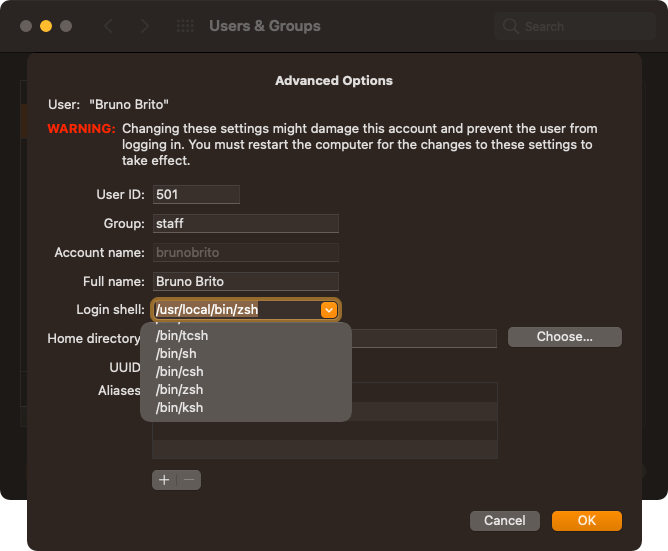
You can also do this in the System Preferences by heading over to the "Users & Groups" section. After unlocking, right-click on your name and click on "Advanced Options". You will see a drop-down with the same set of options.
One shell worth mentioning is the fish shell. While not bundled with macOS, it's pretty popular due to its auto-suggestions, tab completion and syntax highlighting features.
We can achieve something similar with the Z shell. Let's find out how in the next chapter.
4. Shell Settings and Plugins
Shells usually come with a configuration file that sits in your home directory. For the Z shell, that would be ~/.zshrc, while for Bash is ~/.bashrc.
It may be an empty file when you're just getting started, but by editing it you can tweak some settings, change themes, and even install plugins later down the road.
Any text editor can be used to perform this task — I suggest you try nano, a terminal-based text editor.
nano ~/.zshrcAfter making the changes, you can press ctrl + x to exit. You will be prompted to save the changes you made.
Keep in mind that this file is only loaded on shell startup, so your changes will not be reflected immediately. You can open a new terminal instance or type source ~/.zshrc to force an update.
What is "PATH"?
Some commands should be accessible regardless of the directory you're currently in. By adding them to your "PATH" variable, you won't need to specify their full path every time you need to run them, which is great for those frequently-used commands.
You can type echo $PATH to see which folders have been added to your "PATH" variable, but since the output is a colon-delimited list, I prefer to list them on individual lines by typing this instead:
echo $PATH | tr ":" "\n"In the future, if you want to make a program available from anywhere, adding its directory to your "PATH" variable may make sense. For now, all you need to know is what "PATH" is for.
Configuring and Using Aliases
If you find yourself typing the same long commands often, configuring aliases can be helpful. Aliases are a short form of a long command that you can add to your ~/.zshrc file.
Here's how they work:
alias <custom-alias>="<command>"Time for a real-world example: you're working on a website located at Sites/website-currently-working-on. Instead of typing cd Sites/website-currently-working-on, you can simply create a "website" alias.
alias website="cd Sites/website-currently-working-on"Some plugins already come with some aliases configured for you to use. Let's explore the most popular framework for the Z shell: Oh My Zsh.
Oh My Zsh
Oh My Zsh will add plenty of features to the Z shell: with more than 275 plugins available, 150 themes bundled, and plenty of built-in helpful functions, there's a lot to like.
Oh My Zsh adds some much-needed autocompletion. Simply start typing a path and press TAB to get a list of all possible folders to which you can navigate. If you continue pressing that key, you can move through the list until you select a folder by pressing Return. This is one of my favorite features.
In the terminal, if you press ↑, you can cycle through each one of your recent commands. But with Oh My Zsh installed, you can actually enter the beginning of a command and press ↑ to look for recent entries with that same command.
Those are 2 nifty features, but plugins is Oh My Zsh's strongest asset. And they're (usually) pretty simple to install.
For the most part, you'll only need to add the plugin you're looking for to the plugins array of your ~/.zshrc file. Here's an example to add the Sublime Text plugin:
plugins=(... sublime)One plugin that I really like is autosuggestions. This suggests commands as you type based on your previous activity. To install autosuggestions, adding the plugin to the array won't be enough — you will also need to clone the repository first, as mentioned here. It's always a good idea to check the documentation before installing a new plugin.
It's always a good idea to have a Terminal that is nice to look at. Let's have a look at some themes and color schemes next.
5. Themes and Color Schemes
With Oh My Zsh installed, switching to a new theme is fairly straightforward. All you need to do is edit the ZSH_THEME field. Here's an example:
ZSH_THEME="agnoster" "Agnoster" is a fancy theme. Many themes will require the installation of Powerline Fonts to be rendered properly. That repository contains many folders: each one is a "patched font". The community modified the original fonts, adding Powerline-specific icons to it, hence the name.
This is how my setup looks like:
I'm using the powerlevel10k theme with a patched font. The painless interactive setup will take you just a couple of minutes and your terminal will look much nicer when you complete the installation. As for the color scheme, I'm a fan of Solarized Dark on iTerm2.
If you would like to come up with your own theme, have a look at themer. It can help you generate themes for terminals, text editors, and even browsers.
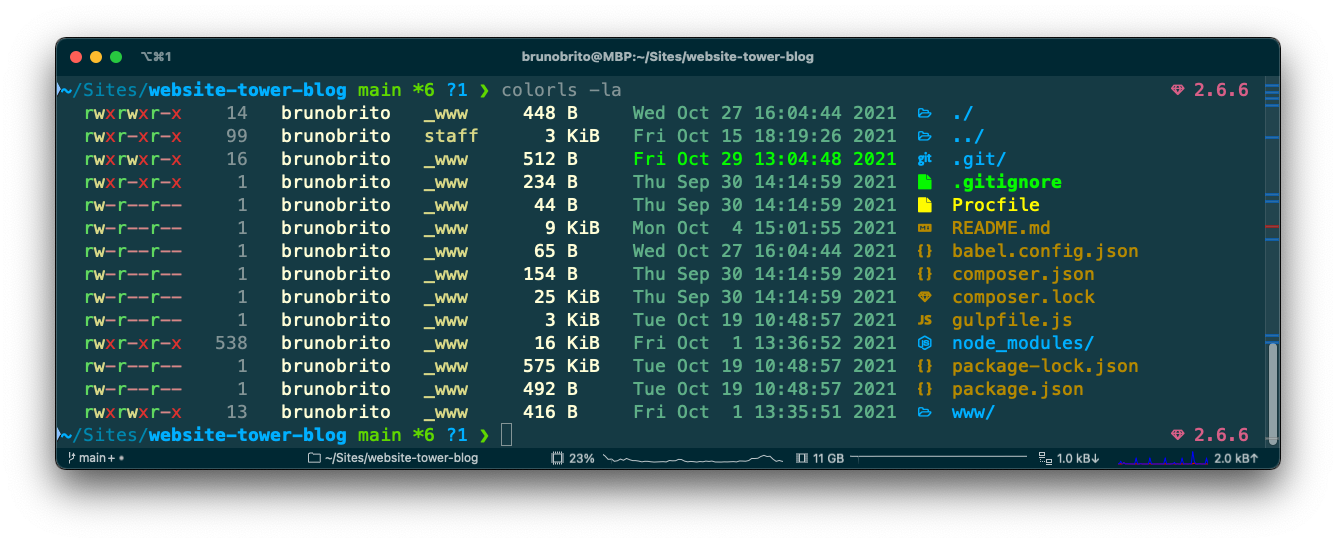
My colorful ls output may have caught your eye. That's colorls, a CLI tool, doing it's magic. Let's have a look at some other noteworthy tools.
6. Command Line Tools Worth a Look
There are hundreds of useful CLI tools out there — I strongly recommend that you take a look at this awesome list for more useful tools, depending on your specific needs.
Here are some of my favorites:
- bat is a cat clone with syntax highlighting and Git integration.
- bottom provides real-time information regarding the system's CPU, Memory, Disk, Network, and more. Similar to htop.
- colorls is a prettier
lsoutput with colors and icons. - fd is a faster alternative to
find, with opinionated defaults. - ffmpeg is an incredible solution for recording, converting, and streaming video and/or audio.
- fzf finds the file you need regardless of the directory you're currently in. With fuzzy matching, it provides a very fast way to reach the file you seek.
- gifgen is a better encoder than ffmpeg when handling GIFs.
- ImageMagick is absolutely essential for converting and manipulating images.
- NCDu is useful when you need to clean up some disk space, sorting folders and files by size.
- nnn is a very fast and full-featured terminal file manager, with many plugins available.
- rclone is similar to rsync, but for cloud storage providers, like Amazon S3, Backblaze B2, Dropbox or Google Drive.
- shallow-backup creates a backup and reinstalls dotfiles, text editor configs, CLI tools, and even fonts.
- tldr is a simpler manual with practical examples.
- trash-cli is a nice alternative to
rm, moving files to the trash instead of deleting them. - youtube-dl allows you to download videos (or just extract the audio) from YouTube and many other video platforms.
- z tracks your most used directories, so that you can just type part of a directory to reach it.
Final Words
If you've followed along, you now know which basic commands you need to learn, and how to get the most out of your shell. These are (arguably) the two most important aspects, but feel free to look for themes and CLI tools to get the most out of the time spent on the command line.
This rabbit hole goes deep — there's lots to explore — but you're already well on your way towards Terminal mastery.
Hope you find this guide useful! I will be back soon with another episode of "10% More Productive"!
Join Over 100,000 Developers & Designers
Be the first to know about new content from the Tower blog as well as giveaways and freebies via email.