Authentication with SSH Public Keys
Often, access to a remote Git repository on a server will be restricted: you probably don't want to allow anybody to read (or at least not write to) your files. In these cases, some kind of authentication is necessary.
One possibility to authenticate uses the "HTTPS" protocol which you probably already know from your browser. Although this is very easy to use, a lot of system administrators use the also very common "SSH" protocol for various reasons. In this scenario, when it comes to authentication, you will most likely meet "SSH Public Keys".
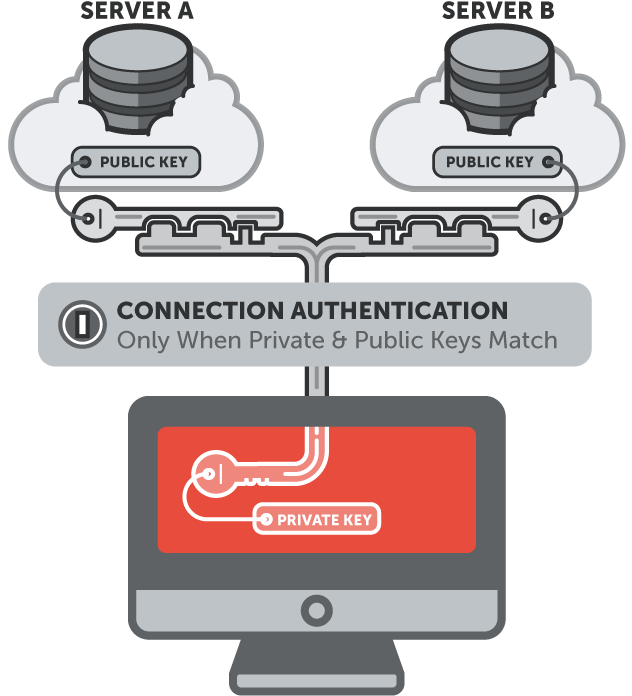
For this type of authentication, a two-part key is used: a public and a private one. The private key (as the name implies) must be kept absolutely private to you under all circumstances. Its public counterpart, in contrast, is supposed to be installed on all servers that you want to get access to.
When a connection via SSH is trying to be established, the server will only grant access if it has a public key installed that matches the private key of the requesting computer.

For the rest of this chapter, we'll work on the command line, in Mac OS' Terminal.app.
Creating a Public Key
Before creating a public key, you should check if you already have one:
$ ls ~/.sshIf a file named "id_rsa.pub" or "id_dsa.pub" is listed, you already have a key. In this case, you can give this file to your server's administrator or (in case you're using a hosting service like GitHub or Beanstalk) upload it to your account.
Otherwise, creating a key is just a matter of executing a single command:
$ ssh-keygen -t rsa -C "john@example.com"With the "-t" flag, we demand an "RSA" type key, which is one of the newest and safest types. With the "-C" flag, we provide a comment which you can think of as a kind of description or label for this key. Using your email address, e.g., lets you identify it more easily later.
After confirming this command, you'll be asked to:
- (1) Enter a name for this new key. Just hit RETURN to accept the default name and location.
- (2) Provide a passphrase. Although SSH public key authentication can be used safely without any password, you should nonetheless enter a strong passphrase to enhance security even further.
$ ssh-keygen -t rsa -C "john@example.com"
Generating public/private rsa key pair.
Enter file in which to save the key (/Users/tobidobi/.ssh/id_rsa):
Enter passphrase (empty for no passphrase):
Enter same passphrase again:
Your identification has been saved in /Users/tobidobi/.ssh/id_rsa.
Your public key has been saved in /Users/tobidobi/.ssh/id_rsa.pub.
The key fingerprint is:
87:23:34:de:35:d0:f2:78:05:a4:78:1b:f1:6a:7e:be john@example.com
The key's randomart image is:
+--[ RSA 2048]----+
|    . = o        |
|   ..o..         |
|  . o S .        |
| . .      . o    |
|  . + + . o      |
|   . S = + o.    |
|    . . + + . o  |
|       o .       |
|              o .|
|              .Eo|
+-----------------+
Now, two files will have been created for you: "id_rsa.pub" (your public key) and "id_rsa" (your private key). You'll find these in the ".ssh" folder inside your home directory (~./ssh/).
If you take a look at the actual contents of your public key file, you'll see something like this:
$ cat ~/.ssh/id_rsa.pub
ssh-rsa AAAB3nZaC1aycAAEU+/ZdulUJoeuchOUU02/j18L7fo+ltQ0f322+Au/9yy9oaABBRCrHN/yo88BC0AB3nZaC1aycAAEU+/ZdulUJoeuchOUU02/j18L7fo+ltQ0f322AB3nZaC1aycAAEU+/ZdulUJoeuchOUU02/j18L7fo+ltQ0f322AB3nZaC1aycAAEU+/ZdulUJoeuchOUU02/j18L7fo+ltQ0f322AB3nZaC1aycAAEU+/ZdulUJoeuchOUU02/j18L7fo+ltQ0f322klCi0/aEBBc02N+JJP john@example.com
It's this output that needs to be installed on the remote server you want to get access to. In case you have an own server for your team, you'll give this to your server's administrator. In case you're using a code hosting service like GitHub or Beanstalk, you'll have to upload this to your account.
You have to copy the content of the public key file exactly as it is - no whitespace or the like is accepted. To make this as safe and easy as possible, you can use the following command to have this copied to your clipboard:
$ pbcopy < ~/.ssh/id_rsa.pub            [on Mac]
$ clip < ~/.ssh/id_rsa.pub [on Windows]Get our popular Git Cheat Sheet for free!
You'll find the most important commands on the front and helpful best practice tips on the back. Over 100,000 developers have downloaded it to make Git a little bit easier.

About Us
As the makers of Tower, the best Git client for Mac and Windows, we help over 100,000 users in companies like Apple, Google, Amazon, Twitter, and Ebay get the most out of Git.
Just like with Tower, our mission with this platform is to help people become better professionals.
That's why we provide our guides, videos, and cheat sheets (about version control with Git and lots of other topics) for free.